English
GREAT BRITAIN • customer service
tel: 0845 300 9799 e-mail: customerservice@clasohlson.co.uk internet: www.clasohlson.com/uk
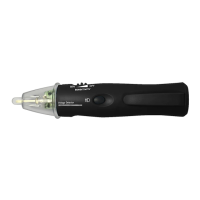
1 2
7
3 4 5
6
Ver. 20141119
Voltage Detector
Art.no 36-5736 Model GK16
Please read theentire instruction manual before using theproduct and
then save it for future reference. We reserve theright for any errors in text
or images and any necessary changes made to technicaldata. If you
have any questions concerning technical problems please contact our
CustomerServices.
Safety
Warning!
• Contact with live conductors can lead to electric shocks with serious
consequences.
• Never use thevoltage detector whilst your hands arewet.
• Never measure voltages over 1000 V AC or under 5 V AC.
Nevermeasure V DC.
• Never use thevoltage detector if any of its parts are missing, if it has any
visible defects or if it is not working properly.
• Do not disassemble thevoltage detector. Itcontains no user-serviceable
or adjustableparts.
• Do not expose thevoltage detector to extreme temperature or humidity.
• To avoid electric shock, NEVER hold thepart of thevoltage detector in
front of thefinger guard when testing voltage.
• Thevoltage detector is not designed for testing shielded cables/
components.
• If thePhase (Live) and Neutral conductors are close to each other,
itmight be impossible to determine which of them iswhich.
• Thesensitivity of voltage detector can be adjusted which can mean that
voltages might not be indicated, depending on thesensitivity setting.
• If there are several cables and 2-phase or 3-phase cables are close to
one another, try to separate them and measure each cable individually.
Explanation of theTEST BEFORE USING warning
on theproduct
Thevoltage detector should always be tested on aconductor which
is known to be live before it is used to test anunknown power source.
NEVERuse thevoltage detector to test for anunknown voltage across
acomponent if thevoltage detector did not indicate thepresence of voltage
on aknown power source.
Care and maintenance
Clean thevoltage detector using asoft, moistcloth.
Only use amild detergent; never use solvents or strong, abrasive cleaning
agents for cleaning as these can damage thevoltage detector.
Disposal
This product should be disposed of in accordance with local regulations.
Ifyou are unsure how to proceed, contact your local council.
Description
• Thevoltage detector is designed to indicate whether or not atest object
is conducting electricity.
• When it detects avoltage, thered LED indicator will flash and thebuilt-in
buzzer willsound.
• This is anon-contact voltage tester for detecting 50/60 Hz AC voltage in
therange: 5–1000 V.
• It is suitable for checking fuses/circuit breakers in consumer units and
electrical sockets, indicating breaks in cables and finding which one of
thebulbs has blown in astring of fairy lights connected in series.
• Built-in LED light with on/off switch.
Operating instructions
Note: Before thevoltage detector is used, it should first be tested on
aconductor which is known to belive.
1. Switch thevoltage detector on using thepower switch/sensitivity dial
– theindicator light will flash twice to show that thevoltage detector is
working. Thereafter theindicator light will flash at afew seconds interval
to show that thevoltage detector is switchedon.
2. Placethetest probe close to theobject to be tested (such as awire or
socket). Moveit along thelength of theobject. Adjust thesensitivity by
rolling thedial to suit thetest object.
3. Whenvoltage is detected, thebuzzer will sound and thered LED
indicator will flash in quick succession.
4. Remember to switch thevoltage detector off after testing to save
thebattery.
Note:
• If testing amulti-core cable – move thetest probe along thecable, don’t
just test one point; thevoltage detector indicates phase and thewires
in thecable might be twisted. Thevoltage detector cannot be used
on shielded cable, cable in trunking or cable behind panels or metallic
surfaces.
• Do not rub theend of thetest probe before use; this can cause
thevoltage detector to indicate static electricity generated by therubbing.
• When testing for breaks in acable – move thetest probe along thecable
for as long as thebuzzer sounds. Theplace where thebuzzer stops is
probably abreak in thecable.
• False indications could occur if thetest probe is held too close to objects
which are statically charged or if theprobe is held close to ferrous
objects close to AClines.
Adjusting thesensitivity setting
1. Turnthevoltage detector on using thepower switch/sensitivitydial.
2. Thesensitivity is adjusted by rolling thesensitivity dial – thehigher
thesensitivity, thegreater thedetection range (distance), but thehigher
thesensitivity, themore susceptible thedetector is to electromagnetic
interference.
3. Itis recommended that you begin on alow sensitivity setting and
gradually increase it to thedesired level according to thetask athand.
Specifications
Safety category CAT IV 1000 V
Voltagerange 5–1000V AC
Frequencyrange 50–400Hz
Operating environment Temperature 0–40 °C
Relative humidity < 85 %, indooruse
Size 154×32×28mm
Weight 50g (including battery)
Batteries 2×AAA/LR03 (sold separately)
1. Test probe
2. LED light
3. Finger guard – to avoid electric shock, never hold onto thepart of
thevoltage detector in front of thefinger guard when testing voltage.
4. Powerswitch/sensitivity dial – roll theknob backwards to switch
thevoltage detector off and forwards to switch thevoltage detectoron.
Thedial also adjusts thesensitivity – decrease thesensitivity by rolling
thedial forwards, increase it by rolling thedial backwards.
5. Pocketclip
6. Switch – Press this button to turn theLED lighton.
7. LED indicator – this red LED will flash at short intervals (and abuzzer
will sound) when AC is detected, theLED will flash at longer intervals to
indicate that thevoltage detector is switchedon.
Changing thebattery
• When thevoltage detector is switched on theLED indicator will flash
twice in quick succession if thebattery is charged. Ifthere is no initial
2-flash indication when thevoltage detector is switched on you should
change thebatteries.
• Always change both batteries at thesametime.
1. Switch thevoltage detector off using thepower switch/sensitivitydial.
2. Carefully push thebattery cover in thedirection of thearrow until it is
released.
3. Remove theold batteries and insert two new (LR03) batteries,
observingthecorrect polarity.
4. Push thebattery cover back on until it locks intoplace.