7
■
English
5. Purging air and checking gas leakage
WARNING
•Donotmixanysubstanceotherthanthespeciedrefrigerant(R410A)intotherefrigerationcycle.
•Whenrefrigerantgasleaksoccur,ventilatetheroomassoonandasmuchaspossible.
•R410A,aswellasotherrefrigerants,shouldalwaysberecoveredandneverbereleaseddirectlyintotheenvironment.
•
UseavacuumpumpforR410Aexclusively.Usingthesamevacuumpumpfordifferentrefrigerantsmaydamagethevacuum
pumportheunit.
•Whenpipingworkiscompleted,itisnecessarytopurgetheairandcheckfor
gasleakage.
•Ifusingadditionalrefrigerant,performairpurgingfromtherefrigerantpipes
andindoorunitusingavacuumpump,thenchargeadditionalrefrigerant.
•Useahexagonalwrench(3/16inch(4mm))tooperatethestopvalverod.
•Allrefrigerantpipejointsshouldbetightenedwithatorquewrenchatthe
speciedtighteningtorque.
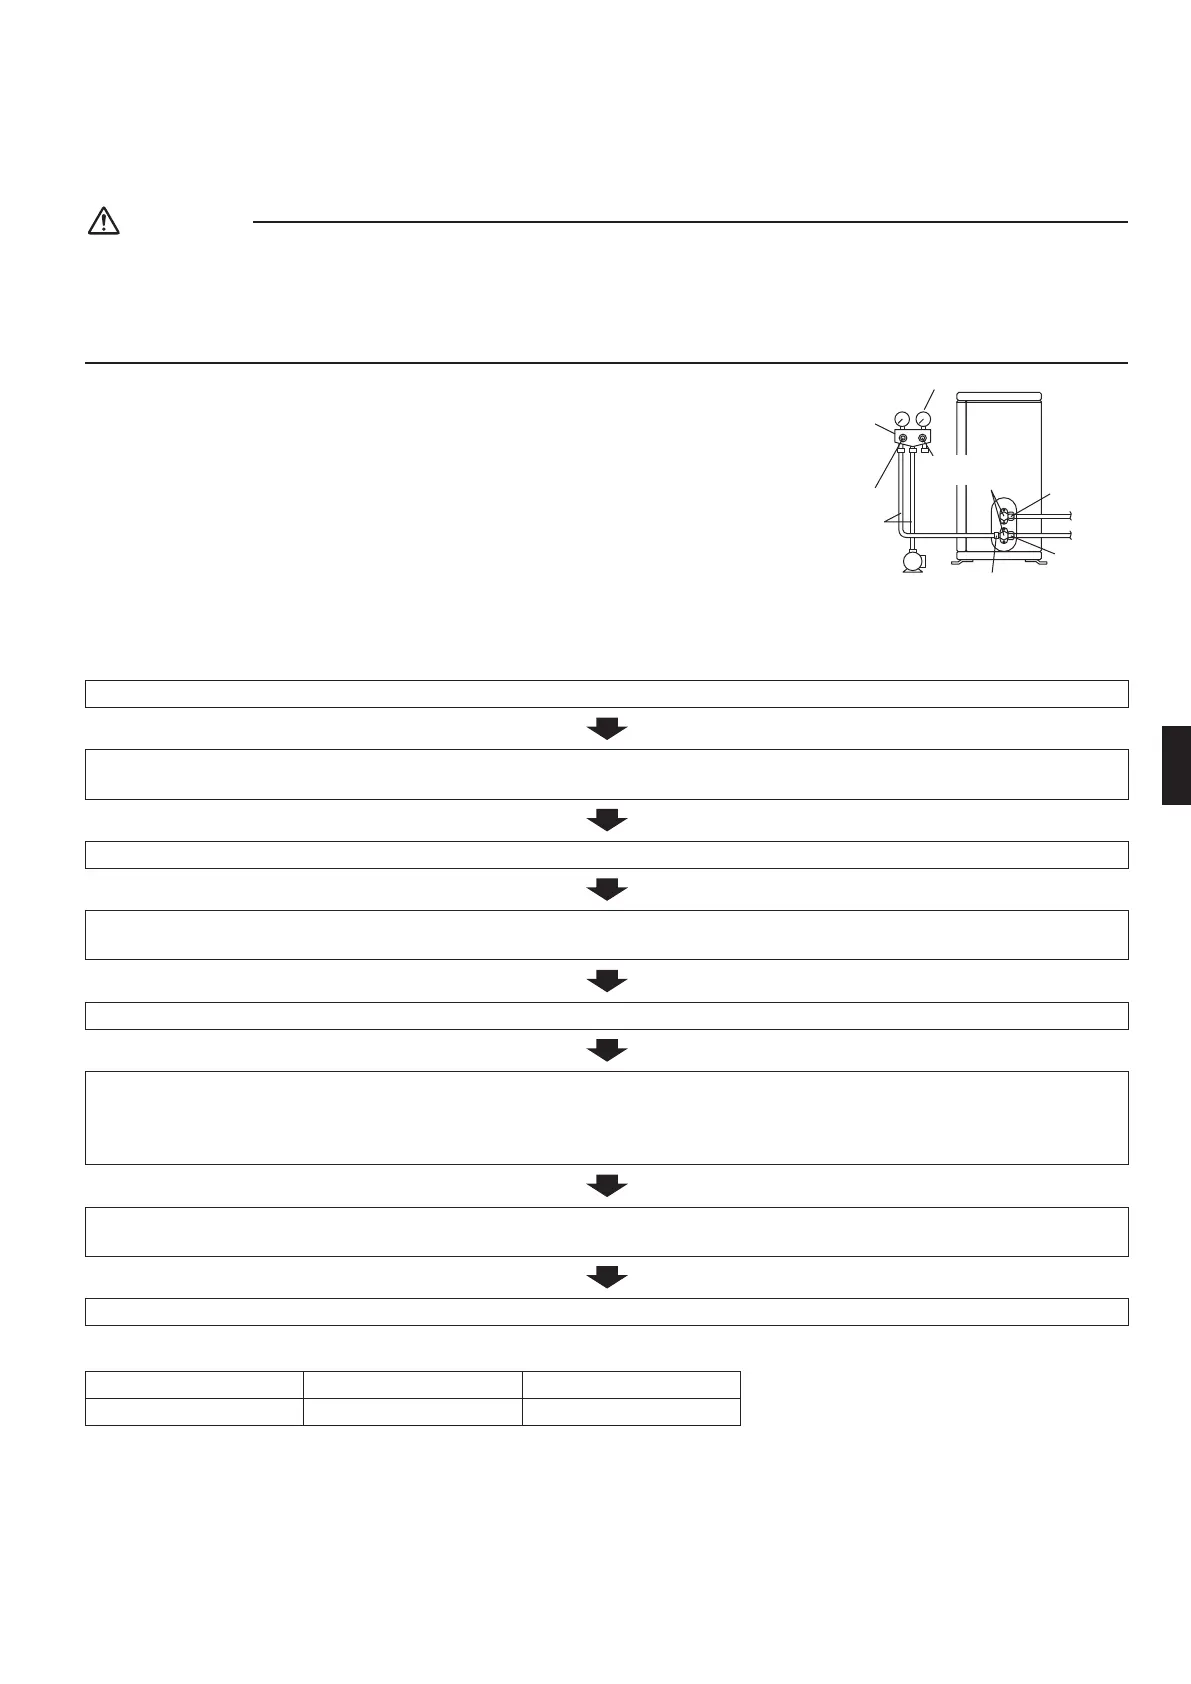
1) Connectprojectionsideofcharginghose(whichcomesfromgaugemanifold)togasstopvalve’sserviceport.
2) Fullyopengaugemanifold’slow-pressurevalve(Lo)andcompletelycloseitshigh-pressurevalve(Hi).
(High-pressurevalvesubsequentlyrequiresnooperation.)
3) Dovacuumpumpingandmakesurethatthecompoundpressuregaugereads–29.9inHg(–0.1MPa).*1
4) Closegaugemanifold’slow-pressurevalve(Lo)andstopvacuumpump.
(Keepthisstateforafewminutestomakesurethatthecompoundpressuregaugepointerdoesnotswingback.)*2
5) Removecapsfromliquidstopvalveandgasstopvalve.
6) Turntheliquidstopvalve’srod90degreescounterclockwisewithahexagonalwrenchtoopenvalve.
Closeitafter5seconds,andcheckforgasleakage.
Usingsoapywater,checkforgasleakagefromindoorunit’sareandoutdoorunit’sareandvalverods.
Afterthecheckiscomplete,wipeallsoapywateroff.
7) Disconnectcharginghosefromgasstopvalve’sserviceport,thenfullyopenliquidandgasstopvalves.
(Donotattempttoturnvalverodbeyonditsstop.)
8) Tightenvalvecapsandserviceportcapsfortheliquidandgasstopvalveswithatorquewrenchatthespeciedtorques.
*1.Pipelengthvs.vacuumpumpruntime
Pipelength Upto49.2ft(15m) Morethan49.2ft(15m)
Runtime Notlessthan10min. Notlessthan15min
*2.Ifthecompoundpressuregaugepointerswingsback,refrigerantmayhavewatercontentoraloosepipejointmayexists.Check
allpipejointsandretightennutsasneeded,thenrepeatsteps2)through4).
Gauge
manifold
Compound
pressure gauge
Pressure meter
Low-pressure
valve
High-pressure
valve
Charging
hoses
Vacuum pump
Valve caps
Service port
Liquid
stop
valve
Gas
stop
valve
01_EN_3P300674-1.indd 7 10/6/2011 1:37:42 PM
 Loading...