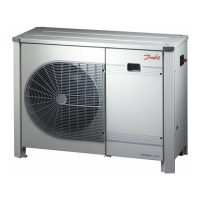
9BC08728642552802-001001
Manual
Controller Installation
Electrical installations
Commissioning
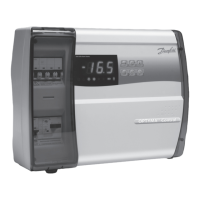
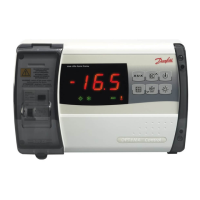
Main display (after controller
start-up)
Parameter Menu
Quick start of the unit /
Refrigerant change
• Arrange electrical connections as mentioned in the table below
• Remove temporarily bridge DI1 (terminals 24 - 25 of the controller) to get access to parameters and
values of the controller without starting the condensing unit
• The controller’s screen displays the Evaporation Temperature in °C
• Press short the lower button of the controller to show the Condensing Temperature in °C
• After a few seconds the display returns to the Evaporation Temperature in °C
• To get access to parameter menu press 5 seconds the upper button of the controller
• The first Parameter “r05” of the Parameter menu will be shown on the display
• Press short the upper (or lower) button to go to the next Parameter of the Parameter menu. Scroll
fast through the Parameters with a long press on these buttons
• Press short the middle button to show the value of the selected Parameter
• Press afterwards the upper (or lower) button to change the value of the selected parameter. A long
press on these buttons will change the value fast
• The value will be stored after 20 seconds without any action or with a short press on the middle
button
• After 20 seconds without pressing any button, the display returns to the main screen, the
evaporation temperature in °C. The parameter menu is closed now, to go back to the parameter
menu press again upper button 5 seconds …
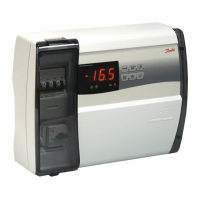
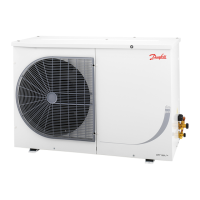
• Optyma
™
Plus new generation is preset, depending on the compressor model and refrigerant type.
In the case of a “multi-refrigerant” compressor, the controller of the condensing unit is Factory
Preset as per above table (see table on page3). If this factory setting fits for the requirement of your
application, no controller parameter must be changed.
• For a refrigerant change go into the parameter menu (press upper button 5 seconds)
• Select parameter “r12” (software main switch) with a short press on lower button
• Activate parameter “r12” with middle button and change the value to 0 (zero)
• Confirm the value with a short press on the middle button (the 3 LED’s start flashing)
• Go to the parameter “o30” (Refrigerant)
• Change the value to 3 (R134a), 17 (R507), 20 (R407C), 19 (R404A), 21 (R407A), 37 (R407F), 40 (R448A),
41 (R449A), 42 (R452A), 13 (R513A)
• Confirm the value with a short press on the middle button
• Select parameter “r12” again
• Change the value to 1 (one)
• Confirm the value with a short press on the middle button (the 3 LED-signs stop flashing and the
condensing unit will start if required)
• After 20 seconds the display returns to the evaporation temperature in °C, the new refrigerant and all
relevant parameters are changed
Room Thermostat control
without Pump Down function
Pump Down control
with factory delivered low pressure transmitter
- Connect Room Thermostat to these terminals
- Connect power supply to main switch acc. wiring
diagram, located in front door inner side
- Connect power supply to main switch acc. wiring
diagram, located in front door inner side
- Increase the Setting of controller Par. c33 (Pump Down
CUT-OUT value):
e.g. Piston : 0,7bar
e.g. Scroll : 1,7bar
Note: To avoid low pressure alarm, the Setting of c33 and
r23 (for INVERTER units) should be higher than c75
 Loading...