10
ENGLISH
NOTE: The light will not time out until the entire unit timesout.
OPERATION
Instructions for Use
WARNING: Always observe the safety instructions and
applicableregulations.
WARNING: To reduce the risk of serious personal
injury, turn tool off and disconnect battery pack
or external power supply before making any
adjustments or removing/installing attachments or
accessories. An accidental start-up can causeinjury.
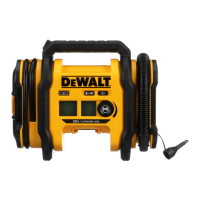
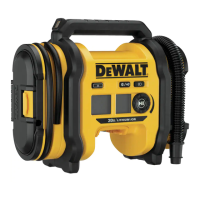
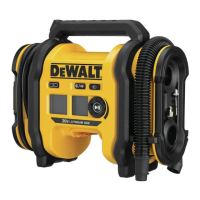
Switching On (Fig. A)
WARNING: Risk of Bursting. Do not leave unit running
unattended. Over inflation of tyres and other items could
result in serious injury and propertydamage.
NOTE: When power is supplied to the inflator by 12V vehicle
connector, 18V battery or an external power supply (optional
accessory), the LCD display will remain on for approximately
2minutes before the display shuts off/goes into sleep mode.
This occurs when the unit is not operating. To wake up the
system, press the power switch
2
. At this time the LCD will turn
on and the inflator is ready foruse.
Before switching your inflator on, decide which power source
you will be using; a 18V battery pack
12
, the12V DC vehicle
connector
19
, or an external power supply (optional accessory),
and connect them using the following instructions. You can
then press the AC/DC power switch
2
located on the front of
theunit.
Powering with an 18V Battery Pack
To use the 18V battery pack, refer to Inserting and Removing
the BatteryPack.
Powering with the 12V DC Vehicle Connector
To use the 12V DC vehicle connector
19
, connect it to your
vehicle's 12V DC accessorysocket. Always fully extend the
12VDC cord before eachuse. Your vehicle's accessory socket
must be rated for at least12A.
Powering with an External Power Supply (Fig. C)
WARNING: Use only the external power supply
recommended for this product. Use of any other
external power supply could damage the inflator or
powersupply.
To use an external power supply, attach the DC output cord
from the external power supply to the external power supply
connector
20
on the side of the unit, then plug the 220V–240V
AC cord end into the wall outlet or an appropriate-sized
extension cord that is plugged into a wall outlet. Always fully
extend the cord before eachuse.
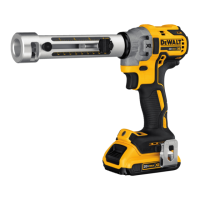
To Inflate/Deflate Using High-Volume
(Fig. A, B)
The high-volume hose is meant to be used for objects that hold
large amounts of air, such as air mattresses, rafts, and swimming
poolfloats.
NOTE: The high-volume mode DOES NOT have an auto shut-
offfeature.
To Inflate
1. Remove the high-volume hose
5
from it's storage channel.
Attach the high-volume hose to the high-volume outlet/
inflation port
18
as described in the Fitting the High-
Volume Hosesection.
2. Insert the high-volume hose
5
, or its tapered nozzle
13
into the object beinginflated.
3. Press the power switch
2
.
4. Then press the pressure mode switch. You will see the
inflator/deflator symbol in the pressure setting/mode
display
8
.
5. Then press the inflation start/pause button
7
to turn the
pumpon.
6. To turn off, press the inflation start/pause button
7
.
To Deflate
Follow steps 1 through 6 in section To Inflate above, but attach
the high-volume hose to the inlet/deflation port
14
, Fig.A.
To Inflate Using High-Pressure (Fig. A, B)
WARNING: Risk of Bursting. Excessive air pressure may
cause a hazardous risk of bursting or personal injury.
Check the manufacturer's maximum pressure rating for
items beinginflated.
WARNING: Replacing the high-pressure hose must be
done by a DeWALT serviceorganisation.
The high-pressure hose
10
is meant to be used for objects that
need more air pressure, such as tyres andbasketballs.
1. Remove the high-pressure hose
10
from its
storagechannel.
2. Attach a nozzle as described in the Fitting the Accessories
section. Attach the chuck to the tyre stem to inflate a tyre, or
attach an accessory to inflate a ball or otherinflatable.
3. Attach or insert the nozzle into the object beinginflated.
4. Press the power switch
2
. The inflator will default to High-
Pressure inflation mode.
NOTE: The pressure gauge display
9
will only show inflation
pressures when the inflator is in high-pressuremode.
NOTE: To switch between units, press and hold the inflation
mode switch
3
and the LED light switch
4
while rotating
the pressure adjustment knob
6
.
5. Rotate the pressure adjustment knob
6
to set the
desiredpressure.
6. Press the inflation start/pause button
7
to begininflation.
7. To stop the inflator at any time, press the inflation start/pause
button
7
.
8. When the item to be inflated has reached the preset value,
the unit will automatically turnoff.
NOTE: You may notice the actual pressure reading may
drop after a couple of seconds. This isnormal.
NOTE: If the power switch
2
is turned off, all settings will be
lost and will need to be reentered. This is a safety feature to
prevent the risk of items OVERINFLATING.
 Loading...