ENGLISH
13
TO INSTALL THE BATTERY PACK INTO THE TOOL HANDLE
1. Align the battery pack (b) with the rails inside the
tool’s handle (fig. 4).
2. Slide it into the handle until the battery pack is
firmly seated in the tool and ensure that it does
not disengage.
TO REMOVE THE BATTERY PACK FROM THE TOOL
1. Press the battery release button (a) and firmly
pull the battery pack out of the tool handle.
2. Insert battery pack into the charger as
described in the charger section of this manual.
FUEL GAUGE BATTERY PACKS (FIG. 4)
Some DeWALT battery packs include a fuel gauge
which consists of three green LED lights that
indicate the level of charge remaining in the battery
pack.
To actuate the fuel gauge, press and hold the fuel
gauge button (r). A combination of the three green
LED lights will illuminate designating the level of
charge left. When the level of charge in the battery
is below the usable limit, the fuel gauge will not
illuminate and the battery will need to be recharged.
NOTE: The fuel gauge is only an indication of the
charge left on the battery pack. It does not indicate
tool functionality and is subject to variation based
on product components, temperature and end-user
application.
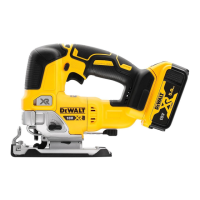
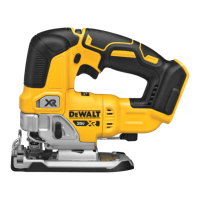
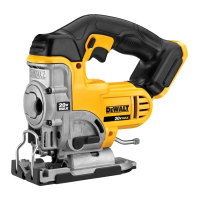
Blade Installation and Removal
(fig. 6)
TO INSTALL A BLADE
NOTE: This jig saw uses only T-shank jig saw
blades.
NOTE: The DT2074 flush cutting blade is for use
with DeWALT DCS331, DCS332, DW331 and
DC330 jig saws only.
NOTE: When installing flush cutting blades
(DT2074), the anti-splinter insert must be removed
and the shoe must to be in the 0° positive stop
position.
1. Lift the keyless blade release lever (e) as shown
in figure 6.
2. Insert the T-shank blade into the clamp
mechanism (k) while guiding the back of the
blade into the groove of the guide rollers (l).
3. The T-shank should be completely inside the
clamp mechanism as shown in Figure 6.
4. Release the keyless blade release lever.
TO REMOVE A BLADE
CAUTION: Do not touch used blades,
they may be hot. Personal injury may
result.
1. Lift the keyless blade release lever (e).
2. With a slight shake the blade will drop out.
Beveling the Shoe (fig. 7)
To unlock the shoe, pull the keyless bevel lever (f)
to the side.
To lock the shoe, push the keyless bevel lever
back under the body of the jigsaw.
TO BEVEL THE SHOE
1. Unlock the shoe.
2. Slide the shoe (g) forward to release it from the
0° positive stop position.
3. The shoe can be beveled to the left or to the
right and has detents at 15°, 30° and 45°. The
shoe can be manually stopped at any degree
between 0° and 45°.
4. Once the desired bevel angle is achieved, lock
the shoe into place.
TO SET SHOE BACK TO 0°
1. Unlock the shoe.
2. Rotate the shoe back to 0°.
3. Slide the shoe back into the 0° positive stop
position.
4. Lock the shoe.
Cutting Action – Orbital or Straight
(fig. 8)
This jig saw is equipped with four cutting actions,
three orbital and one straight. Orbital action has a
more aggressive blade motion and is designed for
cutting in soft materials like wood or plastic. Orbital
action provides a faster cut, but with a less smooth
cut across the material. In orbital action, the blade
moves forward during the cutting stroke in addition
to the up and down motion.
NOTE: Metal or hardwoods should never be cut in
orbital action.
To adjust the cutting action, move the orbital
action lever (h) between the four cutting positions: 0,
1, 2, and 3. Position 0 is straight cutting. Positions
1, 2, and 3 are orbital cutting. The aggressiveness of
the cut increase as the lever is adjusted from one to
three, with three being the most aggressive cut.
 Loading...