15
ENGLISH
Inserting and Removing the Battery Pack from the
Tool (Fig. B)
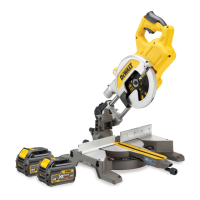
NOTE: Make sure your battery pack
4
is fullycharged.
To Install the Battery Pack into the Tool Handle
1. Align the battery pack
4
with the rails inside the tool’s handle (Fig. B).
ASSEMBLY AND ADJUSTMENTS
WARNING: To reduce the risk of serious personal injury, turn
tool off and disconnect battery pack before making any
adjustments or removing/installing attachments or accessories.
An accidental start-up can causeinjury.
WARNING: Use only
battery packs andchargers.
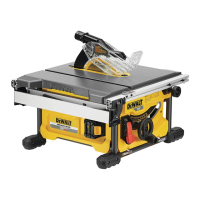
Unpacking (Fig. A1,G)
1. Open the box and lift the saw out by the con venient carrying handle
3
,
as shown in FigureG.
2. Place the saw on a smooth, flatsurface.
3. Release the rail lock knob
6
, and push the saw head back to lock it in
the rearposition.
4. Press down lightly on the operating handle
2
and pull out the lock
down pin
11
.
5. Gently release the downward pressure and hold the operating handle,
allowing it to rise to its fullheight.
Bench Mounting (Fig. A1)
Holes
18
are provided in all four feet to facilitate bench mounting. Two
different-sized holes are provided to accommodate different sizes of screws.
Use either hole; it is not necessary to useboth.
Always mount your saw firmly to a stable surface to prevent movement.
To enhance the tool’s portability, it can be mounted to a piece of 12.7 mm
or thicker plywood which can then be clamped to your work support or
moved to other job sites andreclamped.
NOTE: If you elect to mount your saw to a piece of plywood, make sure that
the mounting screws don’t protrude from the bottom of the wood. The
plywood must sit flush on the work support. When clamping the saw to
any work surface, clamp only on the clamping bosses where the mounting
screw holes are located. Clamping at any other point will interfere with the
proper operation of thesaw.
CAUTION: To prevent binding and inaccuracy, be sure the mounting
surface is not warped or otherwise uneven. If the saw rocks on the
surface, place a thin piece of material under one saw foot until the saw
sits firmly on the mountingsurface.
Assembling the Base Extensions (Fig. Z)
WARNING: Base extensions must be assembled to both sides of
the saw's base before using thesaw.
WARNING: Be sure to adjust the base extensions using the
mounting holes so they are level with the saw'sbase.
1. Locate the holes above the hand indentations
16
on the side of
thebase.
2. Using the supplied wrench or a T30 wrench, attach the screw
63
through the washer
64
, through the base extension
15
, and into the
holes on thebase.
3. Ensure the extension is secure by pulling on the extension to verify
nomovement.
4. Repeat steps 1 through 3 on the otherside.
2. Slide it into the handle until the battery pack is firmly seated in the tool
and ensure that you hear the lock snap intoplace.
To Remove the Battery Pack from the Tool
1. Press the release button
5
and firmly pull the battery pack out of the
toolhandle.
2. Insert battery pack into the charger as described in the charger section
of thismanual.
Fuel Gauge Battery Packs (Fig. B)
Some
battery packs include a fuel gauge which consists of
three green LED lights that indicate the level of charge remaining in the
batterypack.
To actuate the fuel gauge, press and hold the fuel gauge button
61
. A
combination of the three green LED lights will illuminate designating the
level of charge left. When the level of charge in the battery is below the
usable limit, the fuel gauge will not illuminate and the battery will need to
berecharged.
NOTE: The fuel gauge is only an indication of the charge left on the battery
pack. It does not indicate tool functionality and is subject to variation based
on product components, temperature and end-userapplication.
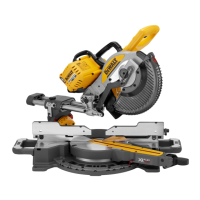
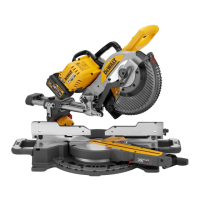
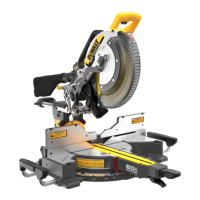
Description (Fig. A1, A2, C–F)
WARNING: Never modify the power tool or any part of it. Damage or
personal injury couldresult.
Fig. A1
1
Lower guard
2
Operating handle
3
Carrying handle
4
Battery
5
Battery release button
6
Rail lock knob
7
Rail set screw adjustment
8
Date code
9
Rails
10
Bevel scale
11
Lock down pin
12
Fence adjustment knob
13
Sliding fence
14
Base fence
15
Base extension/carry handle
16
Hand indentation
17
Table
18
Bench mounting holes
19
Mitre scale
20
Dust duct inlet
21
Mitre lock handle
22
Mitre latch button
23
Kerf plate
Fig. A2
24
Trigger switch
25
Lock-off lever
26
Padlock hole
27
XPS™ temporary on switch
28
Wing nut
29
Depth adjustment screw
30
Grooving stop
31
Blade wrench
32
Base
33
Bevel lock knob
34
0° bevel stop
35
Right-hand flip down stop
36
Dust port
37
Belt cover
38
Mitre detent override
Optional accessories
Fig. C
39
DWS5026-XJ Workpiece clamp
Fig. D
40
DW7053-QZ Dustbag
Fig. E
41
DE7023-XJ / DE7033-XJ Leg
stand
Fig. F
42
DE7025-XJ Clamp brackets
Intended Use
Your
DCS727 mitre saw has been designed for professional
cutting of wood, wood products and plastics. When using the appropriate
saw blades, sawing aluminium is also possible. It performs the sawing
operations of cross-cutting, bevelling and mitring easily, accurately
andsafely.
DO NOT use under wet conditions or in the presence of flammable liquids
orgases.
This mitre saw is a professional powertool.
DO NOT let children come into contact with the tool. Supervision is
required when inexperienced operators use thistool.
• Young children and the infirm. This appliance is not intended for use
by young children or infirm persons withoutsupervision.
• This product is not intended for use by persons (including children)
suffering from diminished physical, sensory or mental abilities; lack of
experience, knowledge or skills unless they are supervised by a person
responsible for their safety. Children should never be left alone with
thisproduct.
 Loading...