ENGLISH
9
Clean the shields as soon as you start to see
buildup on the outside. To clean the wool ingestion
shields:
1. Remove the mounting screw (l).
2. Slide the shield back toward the trigger end of
the tool and lift it off.
3. Clean with soap and water and a soft bristle
brush.
4. Replace the shield on the tool and tighten the
mounting screw.
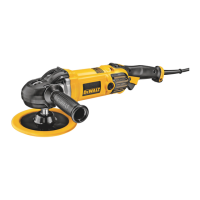
Spindle Lock Button (fi g. 1)
NOTICE: To reduce the risk of damage
to the tool, do not engage the spindle
lock while the tool is operating. Damage
to the tool will result and attached
accessory may spin off possibly
resulting in injury.
In order to prevent the spindle of the tool from
rotating while installing or removing accessories, a
spindle lock button (d) has been provided in the gear
head of the machine.
To lock the spindle, depress and hold the lock
button. NEVER DEPRESS THE SPINDLE LOCK
BUTTON WITH THE TOOL RUNNING OR
COASTING.
Attaching and Removing Polishing
Pads (fi g. 3)
WARNING: To reduce the risk of
serious personal injury, do not allow any
loose portion of the polishing bonnet
or its attachment strings to spin freely.
Tuck away or trim any loose attachment
strings. Loose and spinning attachment
strings can entangle your fingers or
snag on the workpiece.
Polishing pads with a diameter of 150, 180 or
230mm (6", 7" or 9") may be used with the
DWP849X.
NOTE: The DWP849X may use either type of
polishing pad assembly described below.
TO ATTACH POLISHING PAD WITH RUBBER BACKING PAD
(FIG. 3A)
1. Engage the hexagonal hole in the backing pad
(o). Holding the clamp washer (n) and backing
pad firmly together, place the assembly on the
tool spindle (h).
2. Hold the spindle lock button (d) while turning the
backing pad and clamp washer clockwise to
thread them completely on the spindle. Tighten
firmly by hand.
3. Fix the polishing pad (m) onto the backing pad.
TO ATTACH POLISHING PAD WITH HOOK AND LOOP BACK-
ING PAD (FIG. 3B)
1. Attach hook and loop foam or wool pad (p) to
hook and loop backing pad (q), being careful to
center the backing pad with the foam or wool
pad.
2. Screw backing pad (q) onto spindle (h), while
depressing spindle lock button (d).
TO REMOVE PADS
Turn the pads by hand in the opposite direction
from normal rotation to allow lock button to engage
spindle, then unscrew pads in normal direction for
right-hand thread.
Prior to Operation
1. Be sure the polishing pad is mounted correctly.
2. Make sure the pad rotates in the direction of the
arrows on the accessory and the tool.
3. Make sure any dirt is washed off the workpiece
surface.
OPERATION
Instructions for Use
WARNING: Always observe the safety
instructions and applicable regulations.
WARNING: To reduce the risk
of serious personal injury, turn
tool off and disconnect tool from
power source before making any
adjustments or removing/installing
attachments or accessories. Before
reconnecting the tool, depress and
release the trigger switch to ensure
that the tool is off.
WARNING:
• Apply only a gentle pressure to the
tool. Do not exert side pressure on the
backing pad.
• Avoid overloading. Should the tool
become hot, let it run a few minutes
under no load condition.
Proper Hand Position (fi g. 4)
WARNING: To reduce the risk of
serious personal injury, ALWAYS use
proper hand position as shown.
WARNING: To reduce the risk of
serious personal injury, ALWAYS hold
securely in anticipation of a sudden
reaction.
 Loading...