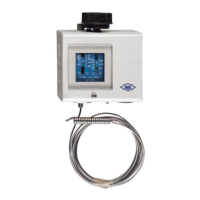
For application in refrigeration systems and heat
pumps.
Technical data:
• Protection class: IP44 (IEC 529/EN 60529)
IP30 with Off-Switch
• Ambient temperature (housing): -50 .. +70°C
• Storage / transportation temperature: -50 .. +70°C
• Temperature sensing range: -55 .. +180°C
• Max. bulb temperature: see product label
• Vibration resistance: 4g (10...1000 Hz)
• Electrical rating
Heating load (AC1): 24A / 230V AC
Inductive load (AC15): 10A / 230V AC
Inductive load (DC13): 0.1A / 230V DC
3A / 24V DC
Start-up (AC3): 144A / 230V AC
Motor rating (FLA): 24A / 120/240V AC
Locked rotor (LRA): 144A / 120/240V AC
• Dimensions width x height x depth (mm)
TS1-A/B/C/D/E/F/R 86 x 75 x 44
TS1-G/H (flush mounting) see fig. 2b:
cut-out: 85 x 39 x 73
front cover (mm): 106 x 44
all dimensions without reset button, adjustment
spindles, off-switch and temperature sensors
Type code:
TS1 -
e.g. TS1-A 4 F
Function
A = Wall mounting, top adjustment
B = as A plus off-switch
C = Frost monitor, auto reset
D = Frost monitor, manual reset
E = Wall mounting, front adjustment
F = as E plus off-switch
G = flush mounting
H = as H plus off-switch
R = Wall mounting, top adjustmnet, manual reset
NOTE: Function types D, R with Temperature
Ranges 0…4 have a manual reset for falling
temperature, with Ranges 5 – 9 for rising temp.
Temperature range
ranges 0 … 9
refer to product label or catalogue data
Temperature sensor type
A = Vapour charge, 2 m, capillary
E = Vapour charge, 0 m, coil
F = Adsorption charge, 2 m, bulb
P = Vapour charge, 2 m capillary
(frost monitors Function C/D: 6 m)
Safety instructions:
• Read installation instructions thoroughly.
Failure to comply can result in device failure,
system damage or personal injury.
• It is intended for use by persons having the
appropriate knowledge and skill.
• Ensure supply voltage and current of electric
device match rating on TS1 name plate.
Disconnect supply voltage from system and TS1
before installation or service.
• Do not exceed max. bulb temperature.
• Keep temperatures within nominal limits.
Function/Type of switch (Fig. 1):
Mounting (Fig. 2a; all model
Mounting (Fig. 2b models TS1
Temperature sensors (Fig. 3):
Emerson Climate Technologies
GmbH
Holzhauser Str. 180 - D
Function/Type of switch (Fig. 1):
Fig. 1a: Automatic reset function
Fig. 1b: Manual reset function for low temp. reset
Fig. 1c: Manual reset function for high temp. reset
Fig. 1d: Bellows heater 82 kΩ, 230V AC/DC
on devices with temperature sensor type A, E
Fig. 1e: Off-switch, function types B, F, H
TS1 temperature switches are equipped with a
SPDT snap action contact switching from 1-2 to 1-
4 on rising and from 1-4 to 1-2 on falling
temperature. Reaching the preset switch point on
rising temperature, contact 1-2 breaks while
contact 1-4 makes and vice versa on falling
temperature.
TS1 with manual reset:
Reaching the preset switching point contact 1-4
breaks (low temp. switch) or contact 1-2 makes
(high temp. switch) and locks in this position.
After the temperature has risen or dropped by a
fixed differential, the switch can be reset by
pushing the reset button.
TS1 with manual reset are “trip-free”.
Mounting (Fig. 2a; all model
TS1 controls may be installed by using a mounting
plate or as a wall-mounted device against a flat
surface.
For wall-mounted devices, the insulating
console supplied with controls with sensor type
“E” must be installed between wall and control
to ensure proper operation.
For devices with vapour charges “A” and “P”
an insulating console or other insulating
material must be used if the wall temperature is
close to the application temperature to be
sensed.
Use universal thread M4 or UNC8-32 mounting
holes for installation via mounting plate.
Use the standard mounting holes at the backside
for wall mounting.
Use mounting screws supplied with control.
Mounting screws must not penetrate control
backside by more than 8 mm to ensure proper
operation.
In order to achieve protection class IP44, the
following instructions must be observed:
Cover must be closed and cover screw
fastened.
Control must be mounted against a flat surface
so that all openings on the housing backside
are fully covered.
Any direction except upside
Mounting (Fig. 2b models TS1
Prepare cut out section for 85 x 39 mm
Prepare holes for M4 screws
Insert control into slot and tighten screws
Temperature sensors (Fig. 3):
Avoid sharp bends or kinks in capillaries.
Do not allow capillary to rub and abrade against
any moving surface. Avoid work hardening
effects.
A capillary loop of ca. 8 cm diameter should be
provided in capillary type sensors (A, C, P) below
the control.
These sensing elements always sense from the
coldest point on the capillary, coil, bulb or power
element head.
Ensure that the control body and the portion of the
capillary which is not at the sensing location is
warmer than the sensing location by at least 2 K.
Surfaces mounted controls should use an
insulating console in order to ensure that control is
not affected by the temperature of the mounting
At least 30 cm of sensor type “P” should be
located at the sensing point for pr
Adsorption charge (Sensor type “F”)
This sensing element always responds to the bulb
The entire bulb must be in contact with the sensed
This charge is slower in response than a vapour
Electrical connection (Fig. 4):
: Comply with local electrical regulations
when conducting electrical wiring. Wire size
must match the electrical load connected to the
Feed cables through rubber grommet at switch
Optionally, replace rubber grommet by a standard
Connect wires to terminals 1, 2 and 4 by taking
into account switch functions as shown in Fig. 1a
Fasten terminal screws with torque 1.2 Nm.
For electronic applications with low electrical
plated contacts are recommended.
Setpoint adjustment (Fig. 4, Fig. 5):
TS1 pressure switches come with individually
adjustable range and differential depending on the
Manual reset switches always have a fixed
adjustment knob, a flat screw driver or a
¼” refrigeration (square) wrench to adjust
setpoints as described below.
Adjust upper setpoint using the range spindle.
Adjust lower setpoint by turning the differential
A separate thermometer must be used for exact
adjustment of the setpoints. The integrated display
scale can only be used for obtaining approximate
Refer to the ALCO catalogue for standard factory
Minimum differential setting
do differ slightly from the nominal differentials.
Manual reset: press the reset button.
Note that the reset is ‘trip
possible if the temperature has reached its reset
line to terminal 1 when in Position “STOP”.
electrical contact position for testing out the
UL/CSA: all models except front operated
Emerson Climate Technologies
not affected by the temperature of the mounting
At least 30 cm of sensor type “P” should be
located at the sensing point for pr
Adsorption charge (Sensor type “F”)
This sensing element always responds to the bulb
The entire bulb must be in contact with the sensed
This charge is slower in response than a vapour
Electrical connection (Fig. 4):
: Comply with local electrical regulations
when conducting electrical wiring. Wire size
must match the electrical load connected to the
Feed cables through rubber grommet at switch
Optionally, replace rubber grommet by a standard
Connect wires to terminals 1, 2 and 4 by taking
into account switch functions as shown in Fig. 1a
Fasten terminal screws with torque 1.2 Nm.
For electronic applications with low electrical
<24 V and current <50 mA) gold
plated contacts are recommended.
Setpoint adjustment (Fig. 4, Fig. 5):
TS1 pressure switches come with individually
adjustable range and differential depending on the
Manual reset switches always have a fixed
adjustment knob, a flat screw driver or a
¼” refrigeration (square) wrench to adjust
setpoints as described below.
Adjust upper setpoint using the range spindle.
Adjust lower setpoint by turning the differential
– Differential = Lower setpoint
A separate thermometer must be used for exact
adjustment of the setpoints. The integrated display
scale can only be used for obtaining approximate
Refer to the ALCO catalogue for standard factory
Minimum differential setting
do differ slightly from the nominal differentials.
Manual reset: press the reset button.
Note that the reset is ‘trip
-free’, i.e. reset is only
possible if the temperature has reached its reset
-switch which cuts off the
line to terminal 1 when in Position “STOP”.
-out lever to manually override the
electrical contact position for testing out the
Directive 73/23/EWG; 93/68/EWG;
-1; EN 60947-5-1; EN 60730-2-9
UL/CSA: all models except front operated