En-13
9.2. Function settings
• Various functions can be set. Follow the setting method described in 9.2.1. to set as per the requirement.
Perform these settings after the indoor unit stops.
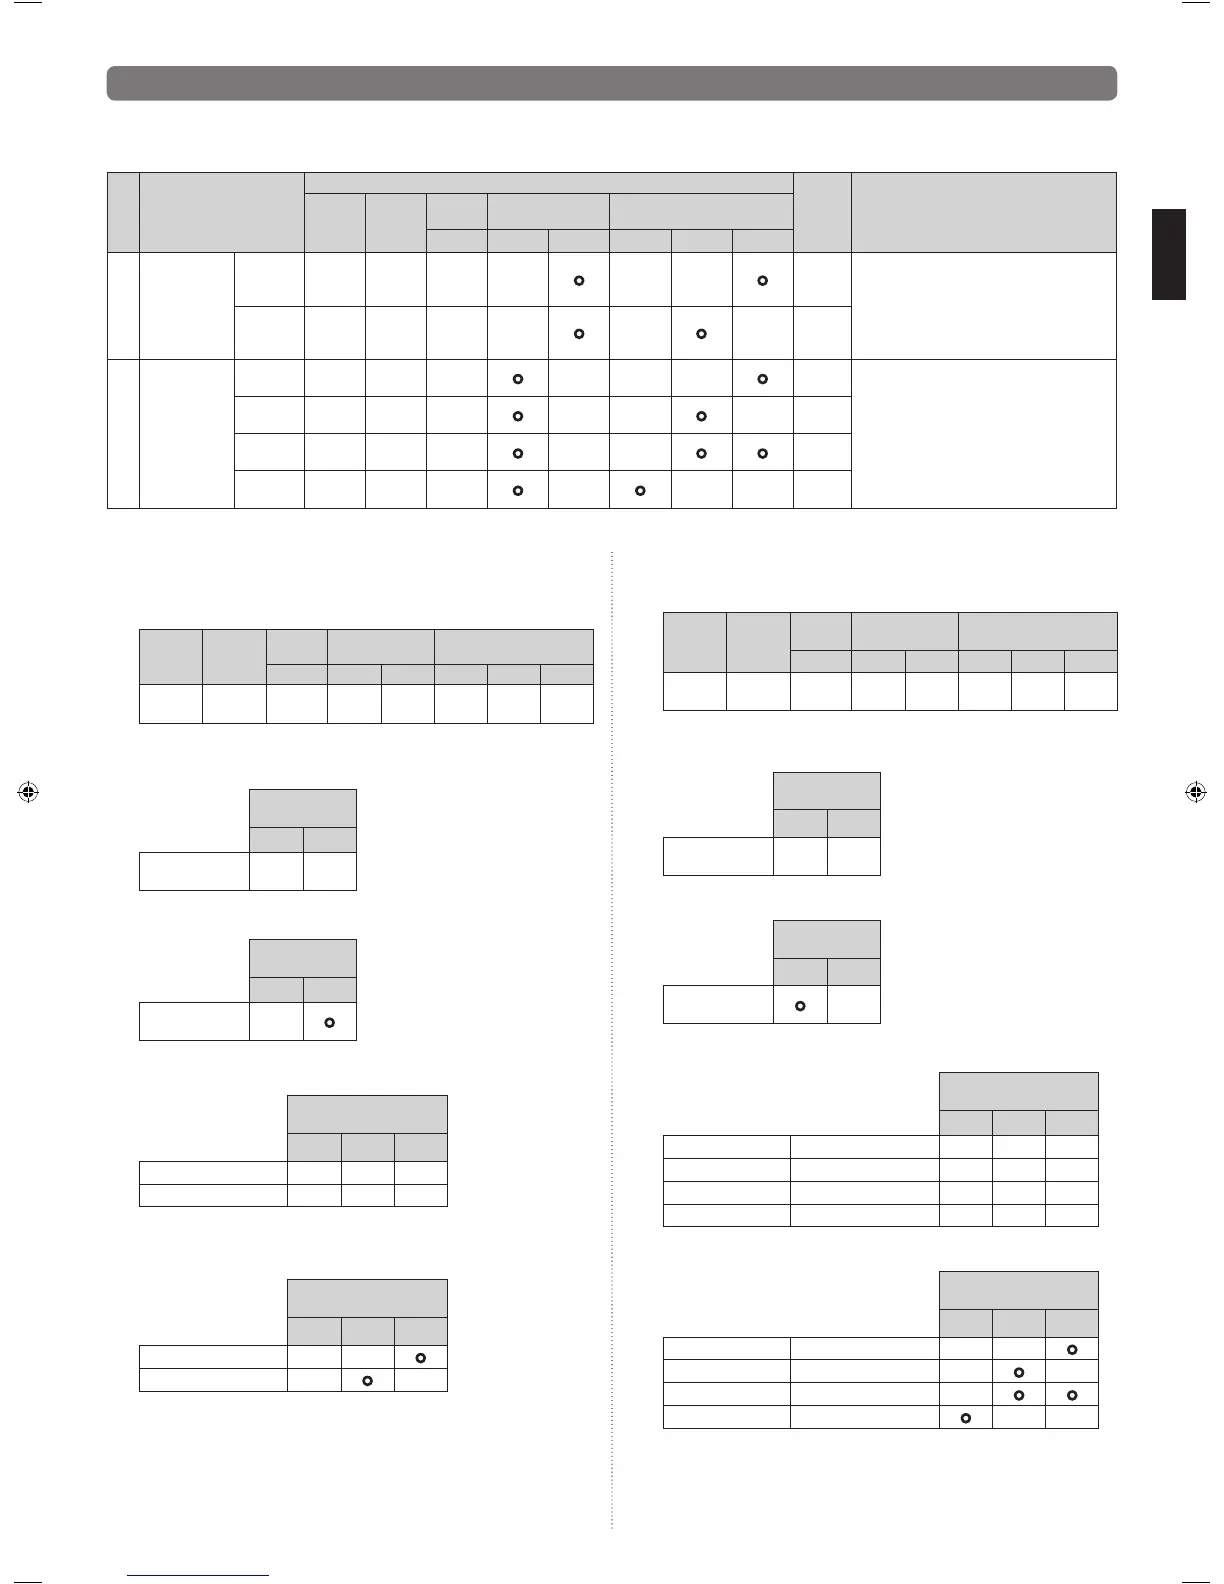
Table. Settings List
No Setting Item
LED display
Factory
setting
Content
POWER/
MODE
ERROR
PUMP
DOWN
LOW NOISE PEAK CUT
(L1) (L2) (L3) (L4) (L5) (L6)
1
Low noise
mode setting
Level 1
Blink
(9 times)
○ ○ ○
●
○ ○
●
○
The noise level when operating in the low noise
mode can be set. The operation selection can
be done by external input terminal (CN10).
Cooling/heating performance decreases by
lowering operation noise level.
Level 2
Blink
(9 times)
○ ○ ○
●
○
●
○
2
Peak cut
mode setting
Level 1
Blink
(9 times)
○ ○
●
○ ○ ○
●
The capacity limit can be selected when
operating with the “Peak Cut mode”.
The operation selection can be done by
external input terminal (CN11).
The lower the level, the more the effect
of energy saving, but the cooling/heating
performance decreases.
Level 2
Blink
(9 times)
○ ○
●
○ ○
●
○
Level 3
Blink
(9 times)
○ ○
●
○ ○
● ●
Level 4
Blink
(9 times)
○ ○
●
○
●
○ ○ ○
Sign “
○
”: Lights off, “
●
”: Lights on
9.2.1. Setting for low noise mode
(1) Switch to “Field setting mode” by pressing “MODE” button (SW1) for 3 seconds or
more.
(2) Conrm (POWER / MODE) blinks 9 times, and press “ENTER” button (SW3).
POWER/
MODE
ERROR
PUMP
DOWN
LOW
NOISE
PEAK
CUT
(L1) (L2) (L3) (L4) (L5) (L6)
Blink
(9 times)
○ ○ ○ ○ ○ ○ ○
Sign “
○
”: Lights off, “
●
”: Lights on, () : Number of blinking
(3) Press “SELECT” button (SW2), and adjust LED display as shown below. (Current
setting is displayed)
LOW
NOISE
(L2) (L3)
LOW NOISE
MODE
○
Blink
Sign “
○
”: Lights off
(4) Press “ENTER” button (SW3).
LOW
NOISE
(L2) (L3)
LOW NOISE
MODE
○
●
Sign “
○
”: Lights off, “
●
”: Lights on
(5) Press “SELECT” button (SW2), and adjust LED lamp as shown in below gure.
PEAK
CUT
(L4) (L5) (L6)
Level 1
○ ○
Blink
Level 2
○
Blink
○
Sign “
○
”: Lights off
The noise of Level 2 is lower than the one of Level 1.
(6) Press “ENTER” button (SW3) and x it.
PEAK
CUT
(L4) (L5) (L6)
Level 1
○ ○
●
Level 2
○
●
○
Sign “
○
”: Lights off, “
●
”: Lights on
(7) Return to “Operating status display (Normal operation)” by pressing “EXIT” button
(SW4).
• In case of missing how many times “SELECT” and “ENTER” button are pressed,
restart from the beginning of operation procedure after returning to “Operation status
display (normal operation)” by pressing the “EXIT” button once.
9.2.2. Setting for peak cut mode
(1)
Switch to “
Field
setting mode” by pressing
“
MODE” button (SW1) for 3 seconds or more.
(2) Conrm (POWER / MODE) blinks 9 times, and press
“
ENTER
”
button (SW3).
POWER/
MODE
ERROR
PUMP
DOWN
LOW
NOISE
PEAK
CUT
(L1) (L2) (L3) (L4) (L5) (L6)
Blink
(9 times)
○ ○ ○ ○ ○ ○ ○
Sign “
○
”: Lights off, “
●
”: Lights on, () : Number of blinking
(3) Press “SELECT
”
button (SW2), and adjust LED lamp as shown below. (Current
setting is displayed)
LOW
NOISE
(L2) (L3)
PEAK CUT
MODE
Blink
○
Sign “
○
”: Lights off
(4) Press “ENTER
”
button (SW3).
LOW
NOISE
(L2) (L3)
PEAK CUT
MODE
●
○
Sign “
○
”: Lights off, “
●
”: Lights on
(5) Press “SELECT
”
button (SW2), and adjust LED lamp as shown in below gure.
PEAK
CUT
(L4) (L5) (L6)
Level 1 0% of rated input ratio
○ ○
Blink
Level 2 50% of rated input ratio
○
Blink
○
Level 3 75% of rated input ratio
○
Blink Blink
Level 4 100% of rated input ratio Blink
○ ○
Sign “
○
”: Lights off
(6) Press “ENTER
”
button (SW3) and x it.
PEAK
CUT
(L4) (L5) (L6)
Level 1 0% of rated input ratio
○ ○
●
Level 2 50% of rated input ratio
○
●
○
Level 3 75% of rated input ratio
○
● ●
Level 4 100% of rated input ratio
●
○ ○
Sign “
○
”: Lights off, “
●
”: Lights on
(7) Return to “Operating status display (Normal operation)” by pressing “EXIT
”
button
(SW4).
• When pressed number is lost during operation, restart from the beginning of operation
procedure after returning to “Operation status display (normal operation)” by pressing
the “EXIT
”
button once.
9379069762_IM.indb 13 3/4/2016 09:03:50