49-80722 Rev. 2 13
CARE AND CLEANING: 2YHQ /LJKW 2YHQ 'RRU
WARNING
SHOCK OR BURN HAZARD:%HIRUHUHSODFLQJRYHQOLJKWEXOEGLVFRQQHFWWKHHOHFWULFDOSRZHUWRWKH
oven at the main fuse or circuit breaker panel. Failure to do so may result in electric shock or burn.
CAUTION
BURN HAZARD: The glass cover and bulb should be removed when cool. Touching hot glass with
bare hands or a damp cloth can cause burns.
'LVFRQQHFWSRZHUDWWKHPDLQIXVHRUFLUFXLWEUHDNHU
panel.
2. Remove oven racks.
3. Slide a flat blade screwdriver between the housing
and the glass light cover.
4. Support the glass light cover with two fingers to
prevent the cover from falling to the bottom of the
oven.
5. Gently twist the screwdriver blade to loosen the glass
OLJKWFRYHU%HFDUHIXOQRWWRFKLSWKHRYHQFRDWLQJ
6. Remove the glass light cover.
7. Remove the bulb by firmly grasping and sliding the
bulb straight out until the two prongs have cleared
the ceramic holder.
'RQRWWRXFKWKHJODVVRIWKHQHZUHSODFHPHQWEXOE
ZLWK\RXUILQJHUV,WZLOOFDXVHWKHEXOEWRIDLOZKHQLW
lights. Grasp the replacement bulb with a clean towel
or facial tissue with the prongs facing down. Align
the two prongs in the ceramic holder, pressing gently
until the bulb is securely in the ceramic socket.
9. Slide the protective lens into the holder and push
until the clips snap into the housing.
10. Reconnect power.
Oven Light Replacement
Oven Light
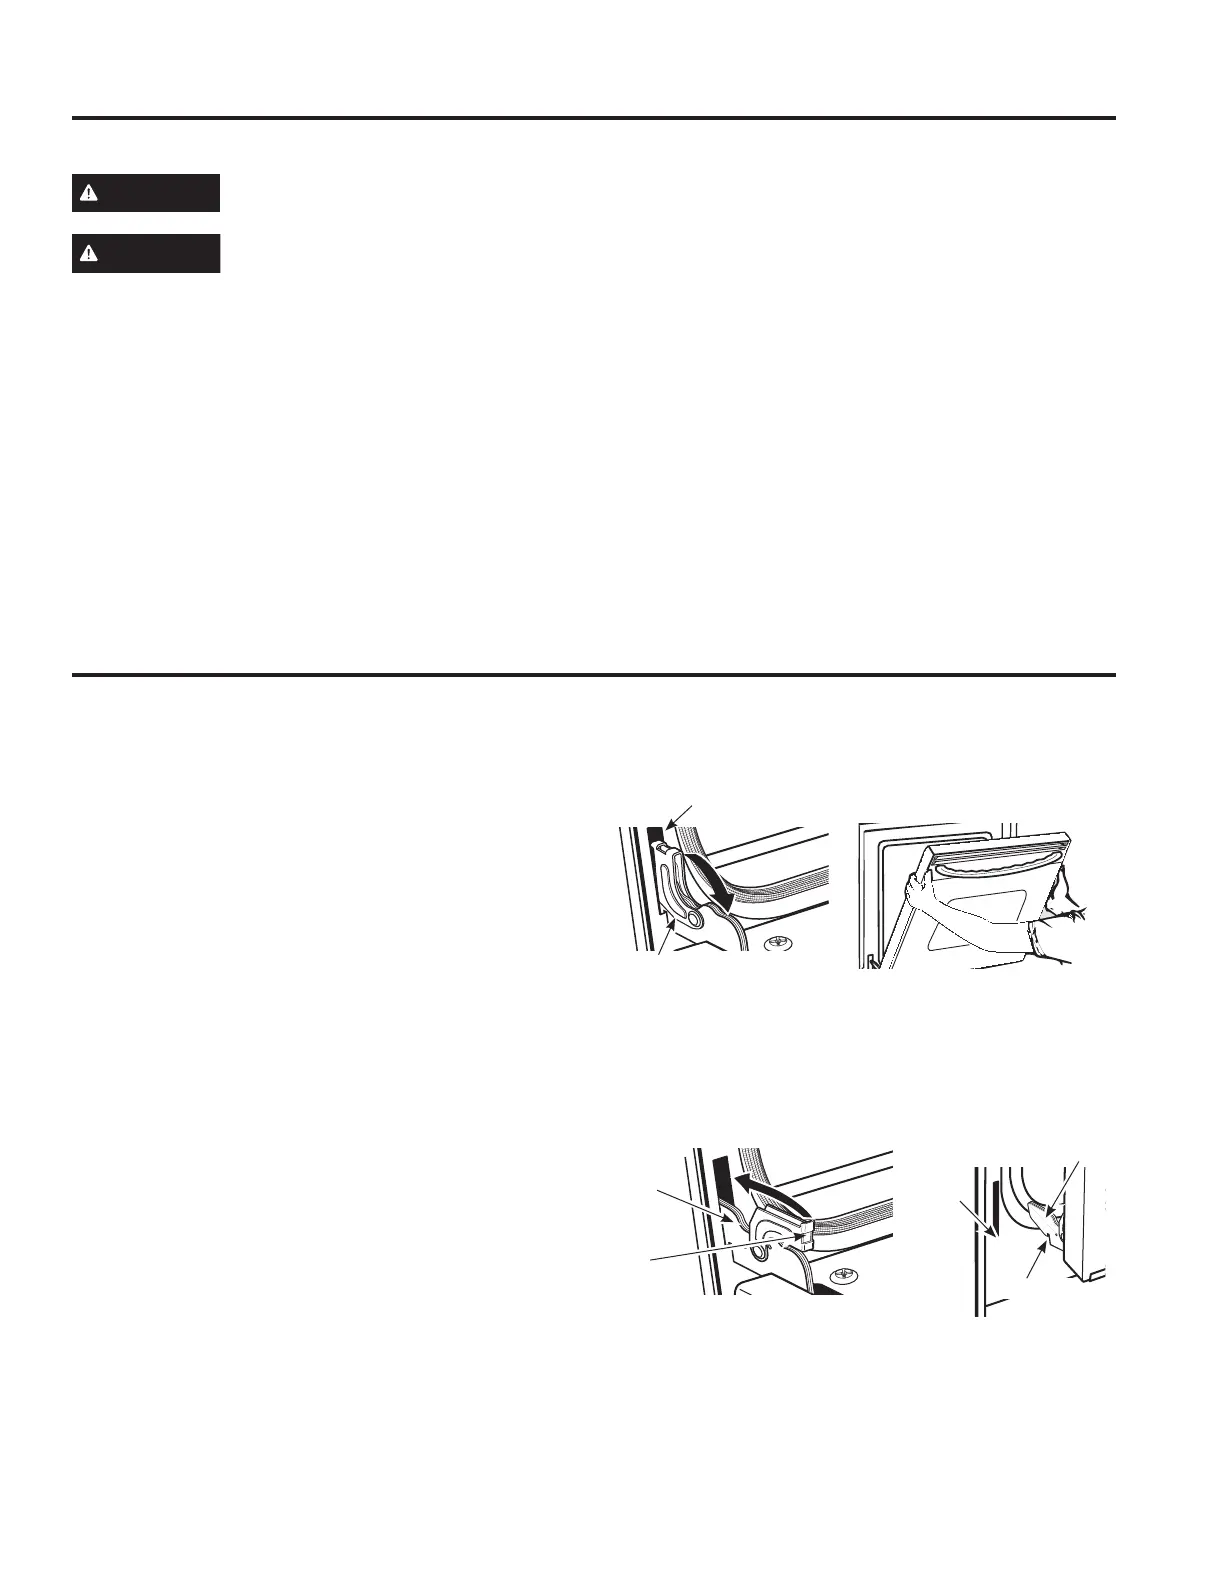
7KHORZHUGRRULVYHU\KHDY\%HFDUHIXOZKHQUHPRYLQJDQGOLIWLQJWKHGRRU
'RQRWOLIWWKHGRRUE\WKHKDQGOH
To remove the door:
1. Fully open the door.
2. Pull the hinge locks down toward the door frame,
to the unlocked position. A tool, such as a small
flat-blade screwdriver, may be required.
3. Firmly grasp both sides of the door at the top.
4. Close door to the door removal position. The door
should be open approximately 3" with no obstruction
above the door.
/LIWGRRUXSDQGRXWXQWLOERWKKLQJHDUPVDUHFOHDURI
the slots.
To replace the door:
1. Firmly grasp both sides of the door at the top.
2. Starting on the left side, with the door at the same
angle as the removal position, seat the indentation of
the hinge arm into the bottom edge of the hinge slot.
The notch in the hinge arm must be fully seated into
the bottom of the slot. Repeat for right side.
)XOO\RSHQWKHGRRU,IWKHGRRUZLOOQRWIXOO\ RSHQWKH
indentation is not seated correctly in the bottom edge
of the slot.
4. Push the hinge locks up against the front frame of the
oven cavity, to the locked position.
5. Close the oven door.
Removal position
Hinge lock
Slot
Pull hinge locks down to unlock
Push hinge locks up to lock
Hinge
lock
Hinge
arm
,QGHQWDWLRQ
%RWWRP
edge of
slot
Hinge arm
Oven Door
 Loading...