Handling instructions
for GISMA connectors
HI – 2007 - 001
Document: replaces
MV 2000-020,
MV 2000-030 and
MV 2005 - 011
First issue: 15.07.2008
Rev.-Index: -Z-
From: 29.07.2020
Page 41 of 44
7.8.7. ROV Connectors
Alignment
These connectors have been designed to self align during mating. The connectors must be
roughly aligned using the alignment keyway on the plug’s locking device and receptacle’s
main keyway slot. The mounting of the GISMA ROV handle has sufficient compliance to
accommodate fine adjustments during the final approach prior to connector engagement.
Pre Mating Checks
Before mating the receptacle connector should be checked for debris. The connectors have
been designed to accommodate sand and silt contamination however large pieces of debris
should be removed using a water jet. Prior to mating a visual inspection has to be done. Pin
contacts have to be straight and without any damages.
Mating
The ROV mateable plug is assembled with GISMA locking system including 3 clamps and
an over-all spring and a GISMA ROV handle (e.g. T-bar, fishtail). For mating just push the
plug into the receptacle.
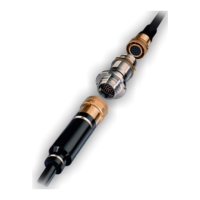
Post Mating Checks
Full engagement will be achieved, if the
over-all spring lies back close to the outer
keyway locator.
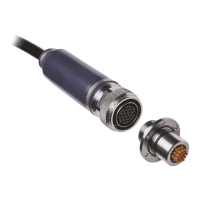
Plug during mating process or not fully
mated. Over-all spring is away from the
outer keyway locator.
 Loading...