16
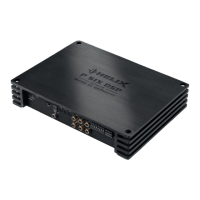
1
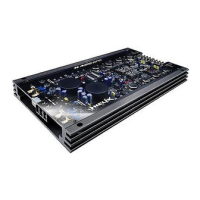
Subwoofer Output
This output provides for the connection of a passive
plug & play subwoofer (e.g. PP 7E). When using
a subwoofer, we recommend to connect the PP50
DSP directly to a 12 Volt source. Refer to connec-
tion instructions in section 4b, page 18.
2
AUX Input
The intelligent AUX input of the PP50 DSP auto-
matically detects input signals of external devices.
After connection of an external device to the PP50
DSP, its signal is detected and the radio signal will
be muted. If there is no signal for more than 3 se-
FRQGV IURP WKH$8; LQSXW WKH DPSOL¿HU DXWRPDWL-
cally switches back to the radio signal.
Please note: The PP50 DSP will not detect the si-
gnal if the volume of the external device is too low.
The input sensitivity of the AUX input can be adju-
sted using the level control „AUX Gain“.
Please note: :KHQ XVLQJ FDUVSHFL¿F VHWXS¿OHV
the AUX operation mode can be switched between
MP3 and navigation mode via MODE/DIP-Switch
no. 6 (AUX mode).
3
AUX Gain
This control is used to adjust the input sensitivity of
the AUX input.
Attention: Care should be taken when setting
the sensitivity. An improperly set input gain can
result in direct damage to the loudspeakers.
4
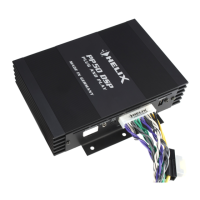
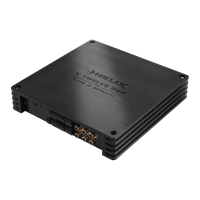
HELIX Plug & Play Connector
This connector is used to connect the provided
PP50 DSP wiring harness to the vehicle.
Attention: The use of any other cables
FDQ UHVXOW LQ GDPDJH RI WKH DPSOL¿HU WKH
head unit/car radio and/or the connected
loudspeakers!
5
Remote
The remote connector can be used as either an in-
put or an output.
If the PP50 DSP cannot be switched on via the car
radio harness, you can use the remote terminal as
an input by connecting it to a switched 12+ source.
When using it as an output, it can control other ex-
WHUQDO GHYLFHV VXFK DV DQ DPSOL¿HG VXEZRRIHU E\
providing a turn-on signal.
6
Subwoofer Volume
This control is used to adjust the output volume of
the connected subwoofer.
Please note: If the volume of the subwoofer is too
high, it can be decreased with this knob.
7
MODE/DIP Switch
9LD WKHVH VZLWFKHV WKH '63 FRQ¿JXUDWLRQ FDQ EH
PRGL¿HGPDQXDOO\$IWHU ORDGLQJD FDUVSHFL¿F VH-
WXS¿OHWKHVH VZLWFKHVZLOOKDYH OLPLWHGIXQFWLRQV
Refer to pages 22 / 23 for more information.
Please note: If using aftermarket loudspeakers
ensure that MODE/DIP-Switch no. 1 is set to the
correct speaker impedance.
8
Control Input
This multifunctional input is used to connect the
„HELIX Optical & USB Interface“ as well as the „HE-
LIX Optical & Bluetooth Interface“.
9
Status-LED
The Status-LED indicates the current active DSP-
setup. Green means that setup 1 (af1) is loaded,
RUDQJHPHDQVWKDWVHWXSDILVORDGHG$ÀDVKLQJ
red light indicates that no setup is loaded.
10
Control Pushbutton
The control pushbutton allows the user to switch
EHWZHHQWZRORDGHGVHWXSSUR¿OHVÄDI³DQGÄDI³
To switch between the setups, the button must be
pressed and held for 1 second. Switching is indi-
FDWHGE\DVLQJXODUUHGÀDVKRIWKH6WDWXV/('
Pressing the button for 5 seconds completely era-
ses the internal memory. This is indicated by a con-
VWDQWÀDVKLQJRIWKH6WDWXV/('
Attention: After erasing the setups from memo-
ry the PP50 DSP will not reproduce any audio
output.
Please note: The PP50 DSP is delievered in facto-
U\PRGHZLWK7:2GLIIHUHQWVHWXS¿OHV7KH¿UVWPH-
mory area (af1) is loaded with the „PC-Tool-Setup“,
which is needed for the communication between the
Initial start-up and functions
 Loading...