6
English
INSPECTION AND MAINTENANCE
CAUTION:
Be sure to disconnect the hose during cleaning jams,
inspection, maintenance and cleaning.
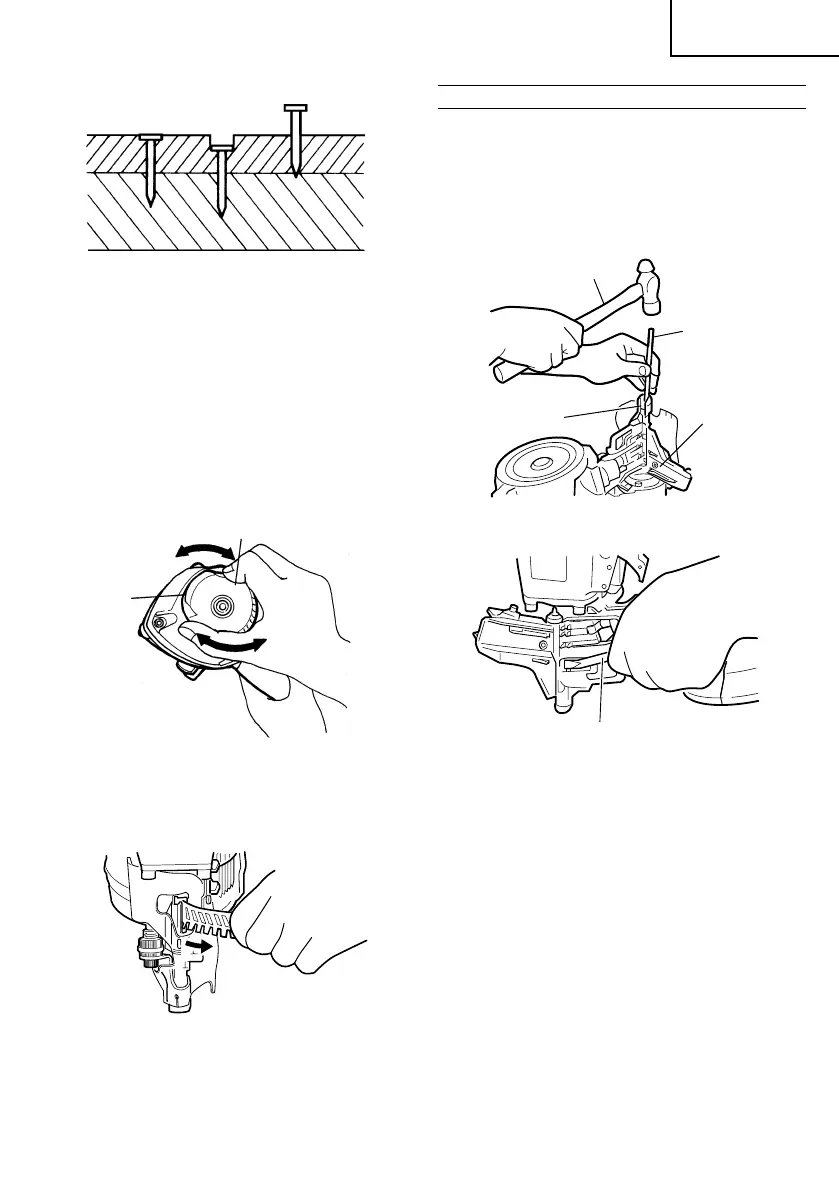
1. Countermeasure for nail jamming
(1) Remove the nail roll from the magazine, open the
nail guide, insert a rod into the outlet and tap the rod
with a hammer. (Fig. 13)
(2) Remove the jammed nail with slotted screwdriver.
(Fig. 14)
Fig. 13
Fig. 14
(3) Cut off the defective part of the steel wire which links
the nails with cutting nippers, correct the deformation,
then load the nail roll in the magazine.
(4) In case of frequent jams, consult the Authorized
Service Center from which you bought this machine.
2. Check on mounting screws for each part
At regular intervals check every part for loose
mounting screws and whether or not there are any
air leaks. Retighten any loose screws. Operating the
equipment with loose screws untightened will incur
a hazard.
3. Inspecting the push lever
Check if the push lever can slide smoothly. (Fig. 15)
Clean up the sliding area of the push lever and use
the provided oil for lubrication from time to time.
Lubrication enables smooth sliding and
simultaneously serves to prevent the formation of
rust.
Too shallow
Too deepFlush
Top Cover
Exhaust
Vent
Fig. 10
NOTES:
䡬 When adjusting the adjuster, it does not rotate more
than 3 mm from the deepest point where a nail goes
down. Do not rotate the adjuster by force beyond
that point.
䡬 The nail-driving depth can also be adjusted by
changing the air pressure used. Carry this out together
with movement of the adjuster. Using a high air
pressure that does not match the nail-driving
resistance will shorten the life of this nailer.
3. Changing the exhaust direction
The direction of the exhaust vent can be changed by
turning the top cover. (Fig. 11)
Fig. 11
4. Cutting off the sheet
Tear off the output sheet in the direction of the arrow
when using the sheet collated nails. (Fig. 12)
Fig. 12
Hammer
Rod
Outlet
Nail Guide
Slotted Screwdriver
01Eng_NV65AH_WE 08/3/20, 11:456
 Loading...