 Loading...
Do you have a question about the Honda Minimoto Maxii and is the answer not in the manual?
| Fuel System | Carburetor |
|---|---|
| Front Suspension | Telescopic Fork |
| Rear Brake | Drum |
| Transmission | Automatic |
| Rear Suspension | Single shock |
Key warnings and recommendations for safe operation and rider selection.
Specifies outdoor, private property use, avoiding traffic, water, and hazardous areas.
Mandates footwear, helmet, pads, and prohibits headphones/phones.
Covers single rider, weight limits, avoiding water, and motor heat.
Adult-only tire inflation, avoiding gas stations, max pressure limits.
Information on how to contact the Minimoto Service Center for support.
Notes insurance may not cover accidents; advises contacting insurer.
Emphasizes caution with the electric product and keeping it away from children.
Details on avoiding modifications, damaged chargers, high temperatures, water, and improper parts.
Specifies adult-only battery handling, charging, and connector checks.
Reminds users to remove the key when not in use to prevent unauthorized operation.
Instructions for removing the bike from packaging and positioning it upright.
Locating and identifying the included assembly tools.
Guidance on positioning, tightening, and adjusting handlebars for safe riding.
Steps to adjust the throttle grip for a comfortable and secure position.
Using the adjustment knob near the hand brake for fine-tuning brake feel.
Using a wrench to adjust the rear wheel brake cable for more significant changes.
Mandatory 12-hour initial charge for the new battery before first use.
Rules for charging in dry areas, adult supervision, battery orientation, and charger safety.
Information on normal charging times (8-20 hours) and factors affecting it.
Advice against using surge protectors for the battery charger.
Identifying the charger port on the upper body, resembling a 'FUEL CAP'.
Steps for inserting the charger plug into the port, noting the 'groove' for orientation.
Explaining the green light indicator and confirming outlet switches are ON.
Guidance on 12-hour initial charge, max 30 hours, and recommended 8-hour recharge.
Table detailing charger specifications for different world-wide standards.
Instructions for handling battery acid, including safety warnings and first aid.
Advice on using specified batteries, avoiding overcharging, and proper storage.
Guidance on disconnecting battery for long storage and ensuring it's secured.
Emphasizes that direct adult supervision is mandatory when the bike is being ridden.
Listing prohibited areas like traffic, streets, steep inclines, water, and hazardous locations.
Warnings against riding at night, with multiple riders, or for stunts/tricks.
Rules on keeping clear of moving parts, level ground, and avoiding flammable materials.
Ensuring no visible problems, tight handlebars, and secure battery retainer.
Checking tires for damage or deflation and ensuring axle nuts are tight.
Verifying brake lever tightness, automatic release, and secure throttle grip.
Confirming that all cables and wires are not frayed, cut, or broken.
Moving foot pegs down and kickstand up before mounting the bike.
Sitting on seat, feet supporting bike, then lifting feet as speed increases.
Inserting key to ON, rotating throttle to move forward.
Using throttle for speed control and brake lever for stopping.
Information on achieving up to 18 MPH on level surfaces.
Advice on starting slowly and practicing smooth braking for control.
Prohibits throttle operation when wheels are off ground or bike is upside down.
Tire inflation must be done by adults only; never exceed 35 PSI.
Specifies recommended pressure of 30 PSI and using a bicycle pump.
Explains consequences of incorrect inflation on handling, wear, and safety.
Instructions to remove key, unscrew cap, and attach pump.
Suggests local bicycle repair shops for inner tube repairs.
Recommends replacing tires when tread is worn or shows uneven wear.
Advises replacement of bent or cracked wheel rims.
Explains breaker's role in protecting electrical components and its location.
Details when breaker trips and how to reset it after cooling down.
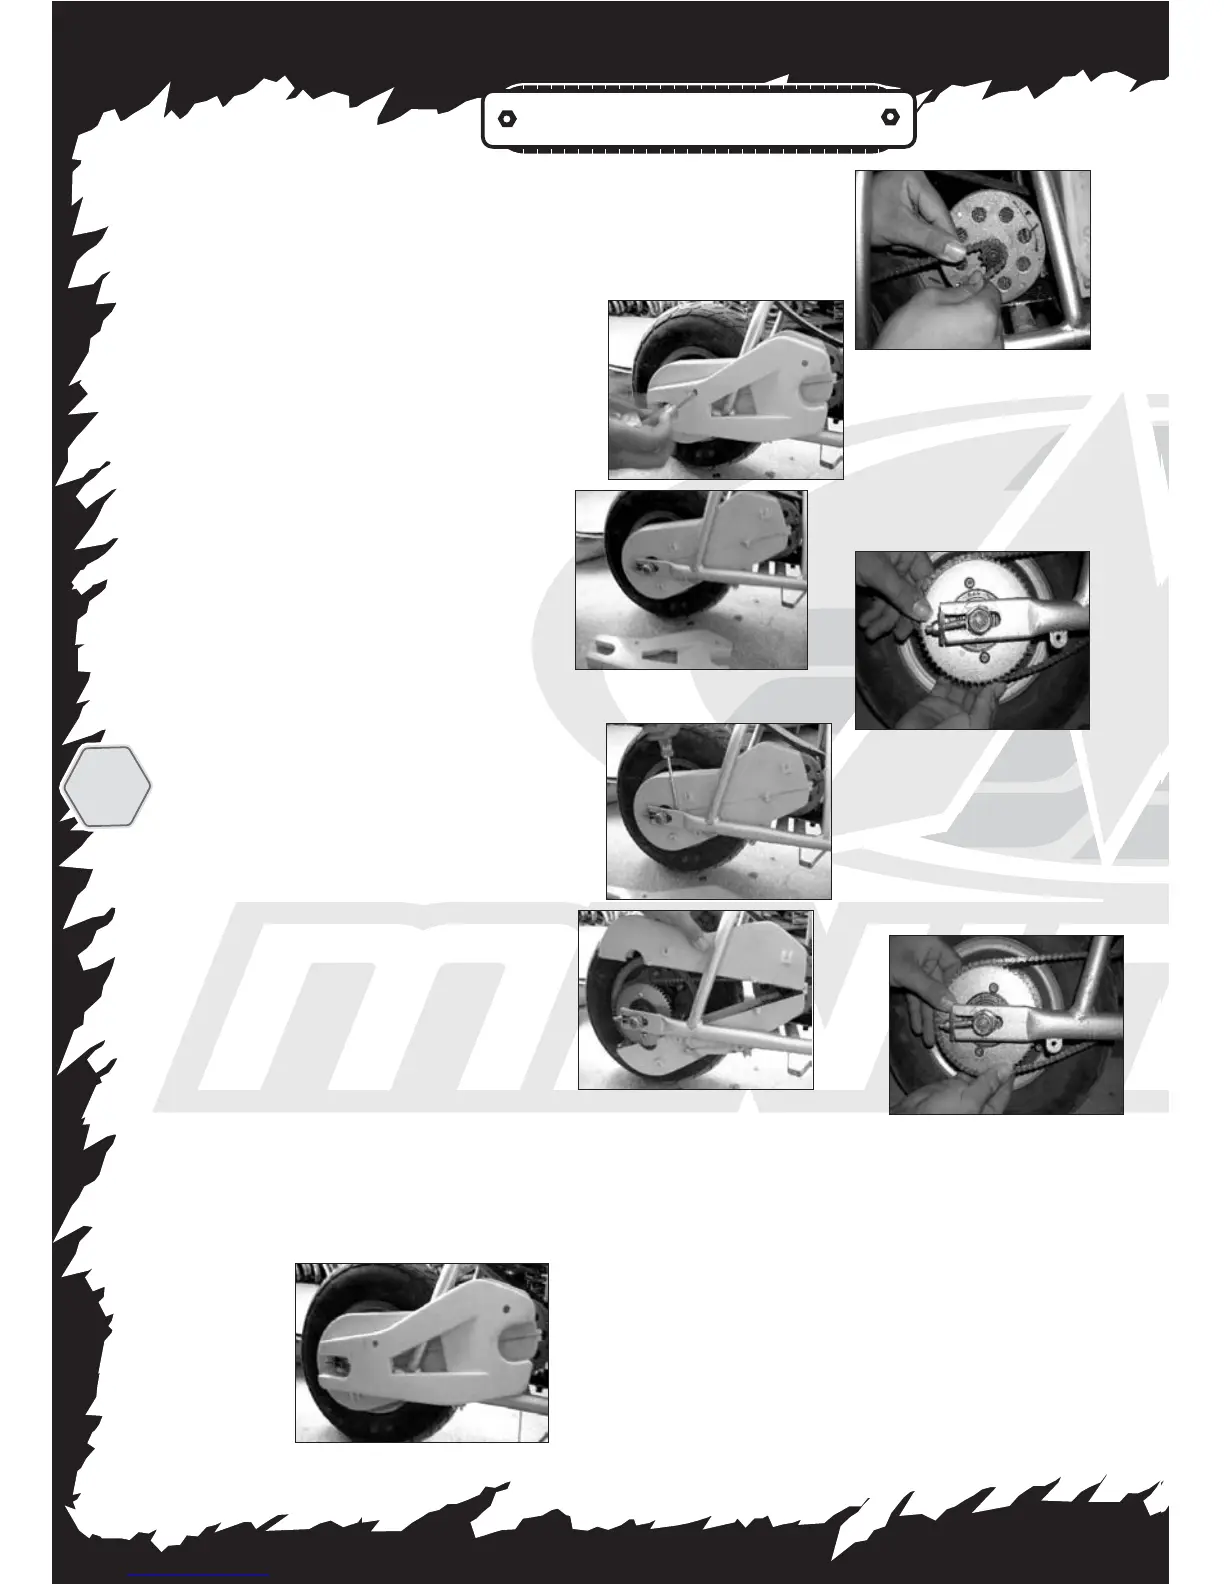
Crucial safety warning to disconnect battery before working on the chain.
Ensuring bike is stable and in a safe workspace before starting chain replacement.
Detailed instructions for removing covers, placing chain, and reassembling.
Explains need for periodic adjustment and consequence of loose chain.
Steps for disconnecting battery, removing cover, loosening nuts, adjusting axle.
Detailed steps involving removing bolts, body parts, seat, and battery box.
Instructions for loosening retainer, disconnecting plug, and removing battery.
Steps for reconnecting plugs, securing battery, and reassembling parts.
Instructions to charge the new battery before riding again.
Notes on non-rechargeable batteries, adult charging, equivalent types, and polarity.
Advice on safe and legal disposal, avoiding trash and fire.
Recommends returning batteries to recycling centers or authorized sellers.
Addresses common causes like key, battery charge, circuit breaker, and loose wires.
Troubleshooting low battery voltage, tripped circuit breaker, or loose connectors.
Solutions for charger connected, tight brake, or chain coming off.
Diagnosing and fixing issues related to brake cable or loose drive chain.
Clarifies that a warm charger is normal during recharging.
Addresses undercharging, battery age, extreme conditions, and overloading.
Troubleshooting charging issues related to connectors or battery age.
Solutions for undercharging, old battery, extreme conditions, or overloading.
Details product warranty, exclusions like wear and tear, and user-caused damage.
Specifies actions that will void the warranty, such as misuse or unauthorized repairs.
Manufacturer's liability limits, excluding consequential damages.
Advises checking local laws regarding where the bike can be legally ridden.
How to contact the Minimoto Repair Center for warranty claims.
Providing email and mailing addresses for service and registration.
Lists spare parts with part numbers and names for body, windshield, battery, and charger.
Lists spare parts including circuit breaker, tires, chain, motor, and controls.
Emphasizes minimum 12-hour charge before use and recharging each time.
Recommends recharging at least once a month to protect battery life.
Instructs users not to return to store and provides toll-free number and email.