PREPARINg yOUR ClEANER
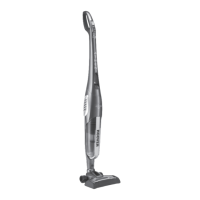
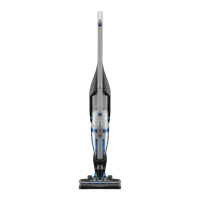
PRODUCT COMPONENTS
A. Ergonomic Handle
B. On/O Switch
B1. OFF Position
B2. FLOOR Position
B3. CARPET Position
C. Turbo Button
D. Carry Handle
E. LED Display*
E1. LED Charging Indicator*
F. Dust Container
F1. Pre motor lter
F2. Shroud
F3 Dust Bin
F4 Dust Container Release Button
G. Exhaust Grill
H. Main Body
I. Nozzle Release Button
J. Rear Wheels
K. Nozzle
K1. Removable Agitator Cover
K2. Front Wheels
K3. Agitator
K4. Flexible Hose
L. Locking Screw
M. Charger
2
* Certain Models Only
GB
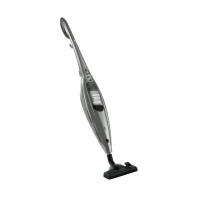
1. Line up the ergonomic handle to the main body of the cleaner and x in position with the supplied
locking screw. [2]
2. Line up the nozzle with the main body and rmly push into the neck until it locks into place. [3]
3. Plug charger into the DC socket. [4]
4. The charge indicator will ash when charging.
NOTE: To remove the nozzle press the nozzle release button and pull away from the main body.
NOTE: Use only the charger supplied with your cleaner to recharge.
IMPORTANT: When charging the cleaner the On/O switch must be in the OFF position.
It is normal for the charger to become warm to the touch when charging.
If the operating times reduces after repeated use let the cleaner run until it stops then recharge for 24
hours, repeat this monthly for best results.
Unplug the charger in the event of prolonged absence. Recharge product again before use as batteries
may self discharge over increased periods of storage.
Hoover service: To ensure the continued safe and ecient operation of this
appliance we recommend that any servicing or repairs are only carried out by
an authorised Hoover service engineer.
Do not use the appliance to clean animals or people.
Do not replace the batteries with non-rechargeable batteries.
Do frequently clean the dust container and lter assembly as per the
instruction.
Do plug in the charger after use to recharge the batteries. Occasionally fully
discharged the batteries to obtain the maximum battery life.
Do not use any other charger with the cleaner.