2
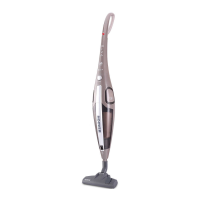
GETTING TO KNOW YOUR CLEANER
A. Main Handle
B. Permanent Exhaust Filter
C. Floor type selector*
D. Carpet and Floor nozzle (GP)**
D1. Carpet Nozzle (CA)**
D2. Hard Floor Nozzle (HF)**
D3. Hard Floor Nozzle (HF)**
E. Bag Door Release Button
F. Bag Door
G. Power Control Knob*
H. Cord Grip
I. Carry Handle
J. Rotating Upper Cord Hook
K. Lower Cord Hook
L. Pre-Motor Filter
M. Dust Bag
N. Parquet Nozzle*
PREPARING YOUR CLEANER
1. Remove the accessories from the main packaging. You will nd the following:
• Cleaner body
• Cleaner handle
• Parquet nozzle*
• Carpet and Floor nozzle (GP)**
• Hard Floor Nozzle (HF)**
• Carpet Nozzle (CA)**
2. Assemble the cleaner handle and x in position with the supplied screw. [1a,1b]
3. Secure the nozzle to the product [1c].
For models equipped with Carpet & Floor nozzle*:
Secure the nozzle to the product. Press the oor type selector pedal on the nozzle [1d] to
select the ideal cleaning mode for the oor type.
Hard Floor – Brushes are lowered to protect the oor.
Carpet – Brushes are raised for the deepest clean.
For models equipped with Parquet nozzle*:
Secure the nozzle to the product in the same way as the main nozzle. For parquet oors
and other delicate oors.
*Certain Models Only ** Certain models only, nozzles may vary according to model
For models equipped with Carpet Nozzle*:
Secure the nozzle to the product in the same way as the main nozzle. Use the Carpet
nozzle for deep cleaning on carpets.
Cord storage:
To store the cord after cleaning wrap the cord around the two cord hooks. [2]
NOTE: During cleaning, the cord can be clipped in the cord grip on the rear of the handle
to avoid any interference while cleaning.
USING YOUR CLEANER
Power switch:
1. To switch the cleaner on, rotate the power control knob. [3]
2. Rotate the knob to the correct power level.*
3. To switch off the product, rotate the same knob.
CLEANER MAINTENANCE
Replacing the disposable bag
1. Lay the cleaner on a at surface, pull back the door release button and remove the
bag door. [4]
2. Remove the disposable bag, close the ap to lock the contents and dispose. [5]
3. Take a new bag and t the collar with the location in the main body and rotate until
xed. [6]
4. Locate tabs on door as shown and close door.
Attention: This product is tted with a mechanism that prevents the door closing when
there is no bag tted.
NOTE: The bag may need changed frequently when picking up material such as powder
or ne dust or when cleaning new carpets.
1. Lay the cleaner on a at surface, pull back the door release button and remove the
bag door. [4]
2. Remove the old pre motor lter by pressing the nger tab to release. [7]
3. Gently tap the lter against the side of a bin to release excess dust. [8a]
4. If deeper cleaning is required: Wash the lter thoroughly under hand warm water until
the water runs clean. [8b]
5. Remove excess water by shaking and leave to dry for 24 hours. DO NOT USE HOT
WATER OR DETERGENTS. [8c]
6. Ret bag door as above.
IMPORTANT - For optimum performance, shake off excess dust from the lters regularly.
We recommend that the lter is washed every 3 months.
NOTE: Do not use the cleaner without lters assembled.
GB
 Loading...