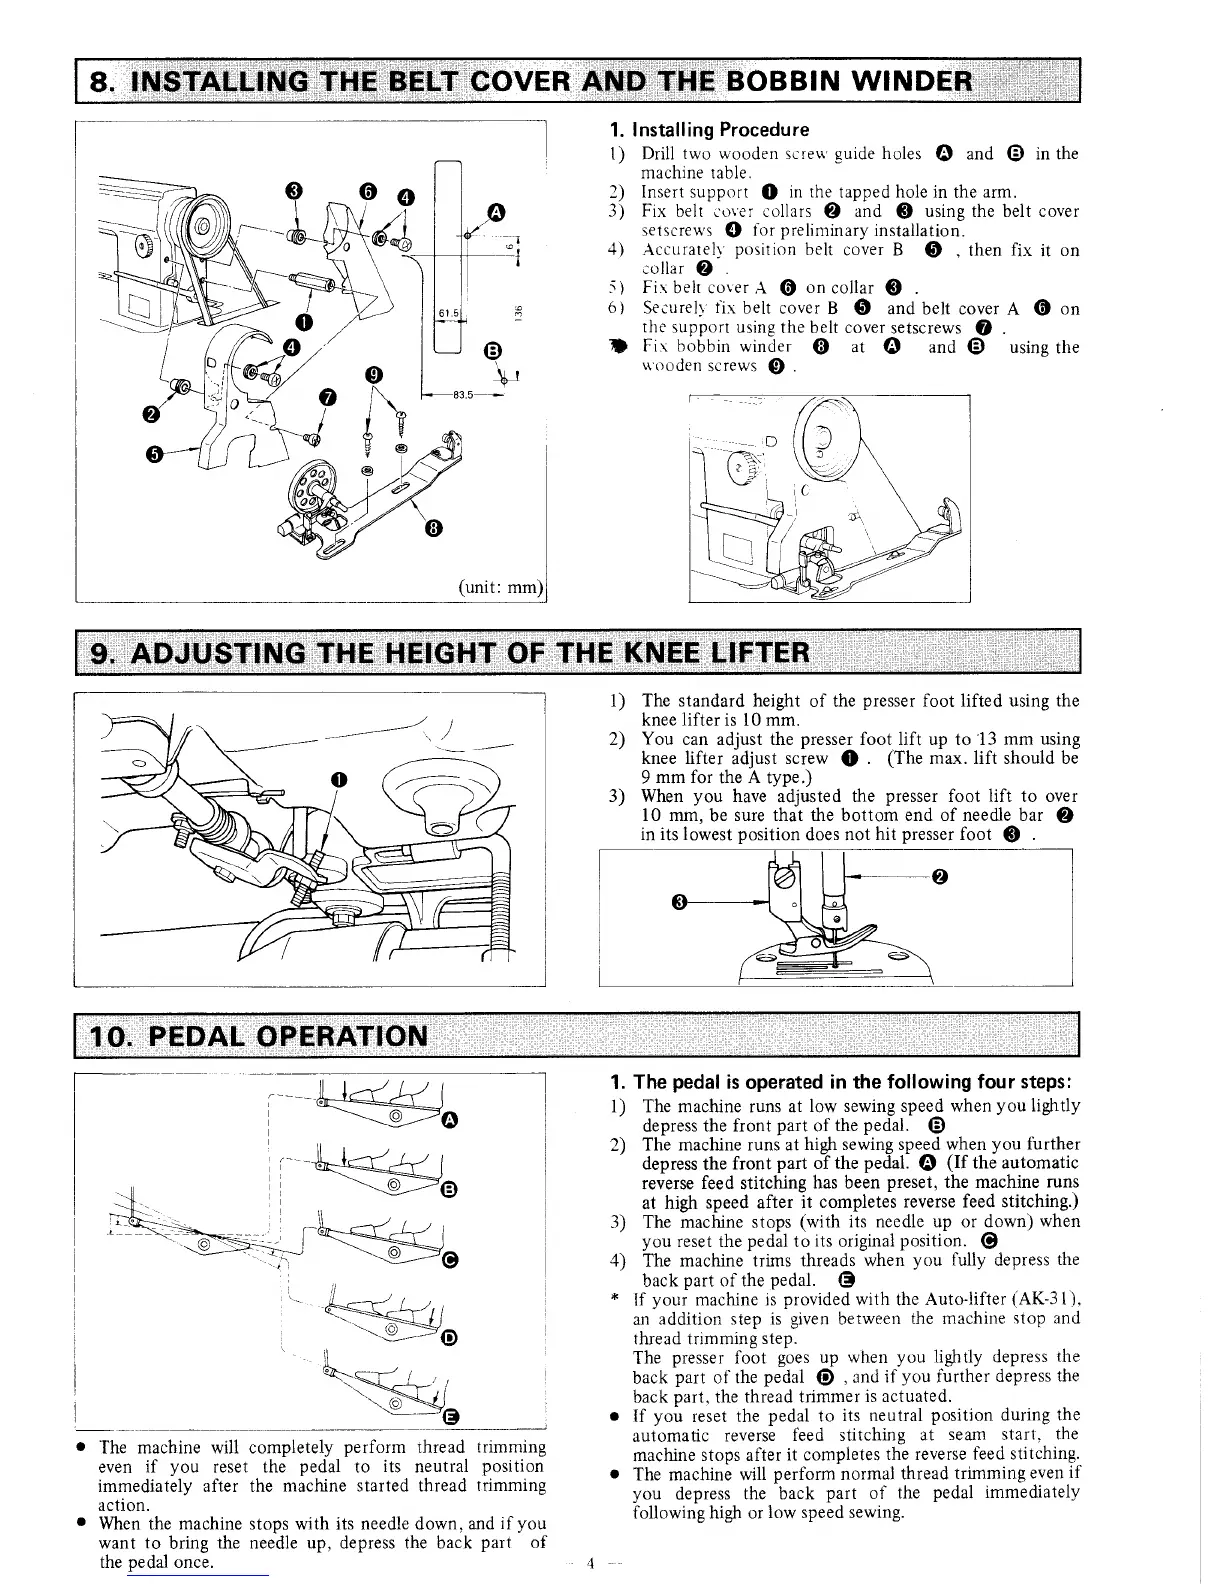
8.
INSTALLING
THE BELT COVER
AND THE BOBBIN
1. Installing
Procedure
1) Drill
two wooden scre',r'suide holes
6
and
@
in the
machine table.
2)
Insert supporr
O
in the
tapped
hole in
the
arm.
3)
Fix
belt cover collars
O
and
@
using the belt cover
setscre$,s
@
for
preliminary
installation.
4) Accuratell
position
belt
cover B
O
,
then
fix
it
on
collar
@
5) Fir
belt cover A
@
on
collar
@
6)
Securelr.
tlx
belt
cover
B
O
and
belt cover A
@
on
thc-
support using
the belt cover
setscrews
@
D
Fir bobbin
winder
O
at
6
and
@
usins
the
rrooden
screws
@
9.
ADJUSTING
THE HEIGHT
OF
THEKNEELIFTER
1)
2)
The standard height
of the
presser
foot lifted using the
knee lifter is 10 mm.
You
can adjust the
presser
foot lift up to.13 mm
using
knee lifter
adjust
screw
Q
.
(The
max. lift should be
9
mm for
the
A
type.)
When
you
have
adjusted
the
presser
foot
lift
to over
l0 mm,
be
sure that the bottom end of needle bar
O
in its lowest
position
does not
hit
presser
foot
@
3)
I
I
1O.
PEDAL
OPERATION
1.
The
pedal
is
operated
in the
following four steps:
1) The machine runs at
low sewing speed when
you
lightly
depress
the front
part
of
the
pedal.
@
2) The
machine runs at
high sewing speed
when
you
further
'
depress
the
front
part
oT
the ped'al.
O
(If
the automatic
reverse
feed
stitching
has been
preset,
the machine
runs
at
high
speed after it
completes
reverse feed stitching.)
3) The machine
stops
(with
its needie up or down)
when
you
reset the
pedai
to
its
original
position.
@
1)
The
machine trims threads when
you
fully
depress
the
back
part
of the
pedal.
e
*
If
your
machine
is
provided
with the
Auto-lifter
iAK-3
1),
an
addition
step
is
given
between
the machine
stop an,J
thread trimmins
step.
The
presser
foot
gbes
up
when
you
lightly depress
the
back
part
of the
pedai
0
,
and
if
you
iurther
depress
the
back
part,
the thread
trimmer
is actuated.
r
If
you
reset the
pedal
to
its neutral
position
during
the
automatic
reverse
feed stitching
at
seam start.
the
machine
stops after
it completes
the reverse
t'eed stitching.
e
The machine will
perform
normal
thread
tnmming
even
if
you
depress
the back
part
of
the
pedal
immediately
following high or
1ow speed sewing.
,t
r
The machine will completely
perform
thread
trimming
even
if
you
reset
the
pedal
to
its
neutral
position
immediately after the
machine started thread
trimming
action.
.
When
the machine stops with its needle down.
and
if
you
want
to
bring
the needle up. depress the back
part
of
the
pedal
once.
 Loading...