– 8 –
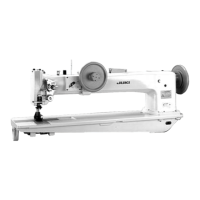
Rotate the handwheel toward the normal direction (with the bobbin case open-
er in rotated condition toward the arrow direction) and as shown in the fi gure,
when the bobbin case opening lever has retreated to the rearest position, loos-
en the clamp screw
❶
of the bobbin case opening lever and adjust so that the
clearance between the bobbin case opener and the bobbin case opening lever
comes to 0.3 - 0.4 mm (3/256 - 1/64”).
12. INSTALLING AND DISMANTLING THE SEWING HOOK
WARNING :
To protect against possible personal injury due to abrupt start of the machine, be sure to start the following
work after turning the power off and ascertaining that the motor is at rest.
13. ADJUSTING THE BOBBIN CASE OPENING LEVER
WARNING :
To protect against possible personal injury due to abrupt start of the machine, be sure to start the following
work after turning the power off and ascertaining that the motor is at rest.
1. Dismantling the sewing hook
1) Remove the presser foot, walking foot, throat plate, feed dog and bobbin case
opening lever.
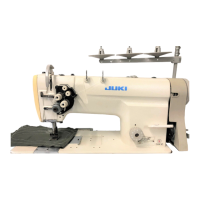
2) Tilt the machine and loosen the set screw
❶
of the small gear.
3) Rotate the handwheel to bring the needle bar to its highest position and re-
move the sewing hook by pulling it upwards.
(Note) At this point, be sure to see that the interlocking of the large gear
and the small gear is not slipping. (If the gears are marked, it will
help)
2. How to install the sewing hook
1) To install the sewing hook, reverse the dismantling procedure. In so doing,
watch the following:
* That the bobbin case opening lever link is inserted into the link pin.
* Make the No.1 set screw of the small gear (the fi rst screw seen when it is ro-
tated in normal direction) enter the V-groove of the sewing hook driving shaft.
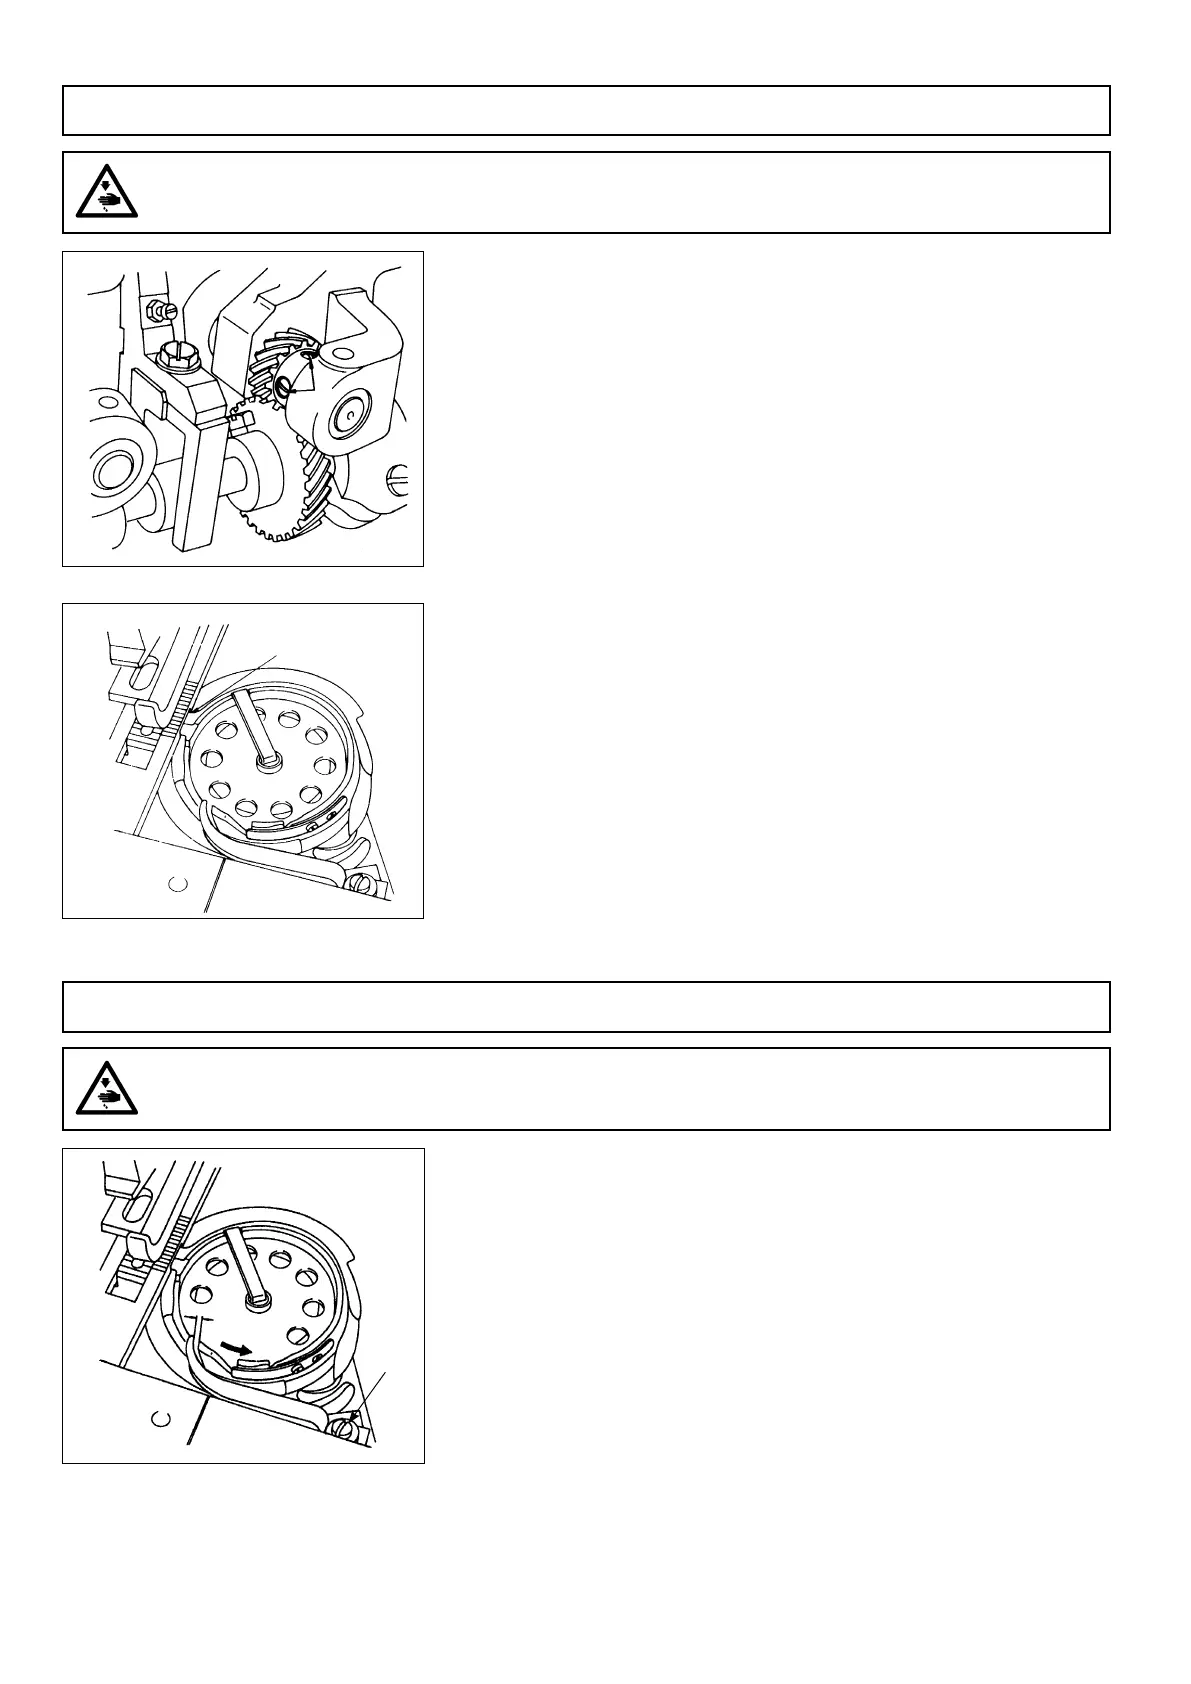
2) In order that the protruding part of the bobbin case holder enters the groove
of the throat plate, rotate the bobbin case holder by the hand and after that,
set the throat plate.
0.3-0.4mm
❶
Protruding part
❶
– 1 –
SPECIFICATIONS
Model LG-158 LG-158-1
Type of sewing
machine head
2-needle, unison-feed lockstitch machine
(with a reverse-feed stitching function)
1-needle, unison-feed, lockstitch machine
(with a reverse-feed stitching function)
Usage For sewing extremely heavy weight & heavy weight materials
Sewing speed Max. 1,500 sti/min
Lift of presser foot Max. 16 mm
Stitch length 0
〜
10 mm
Needle DD x 1 #25 2 ea. DD x 1 #25 1 ea.
Reverse sewing By treading pedal
Needle gauge
3/4" (Standard), 1/4", 5/16", 3/8", 1/2", 5/8", 7/8",
1", 1-1/4", 1-1/2", 2", 2-1/4", 2-1/2"
-
Lubricating oil JUKI New Defrix Oil No. 1
Noise
- Equivalent continuous emission sound pressure
level (L
pA
) at the workstation:
A-weighted value of 87.5 dB; (Includes K
pA
= 2.5
dB); according to ISO 10821- C.6.2 - ISO 11204
GR2 at 1,500 sti/min.
- Sound power level (L
WA
);
A-weighted value of 97.5 dB; (Includes K
WA
= 2.5
dB); according to ISO 10821- C.6.2 - ISO 3744
GR2 at 1,500 sti/min.
- Equivalent continuous emission sound pressure
level (L
pA
) at the workstation:
A-weighted value of 87.5 dB; (Includes K
pA
= 2.5
dB); according to ISO 10821- C.6.2 - ISO 11204
GR2 at 1,500 sti/min.
- Sound power level (L
WA
);
A-weighted value of 96.5 dB; (Includes K
WA
= 2.5
dB); according to ISO 10821- C.6.2 - ISO 3744
GR2 at 1,500 sti/min.
1. INSTALLING THE MACHINE
1) When carrying the sewing machine, be sure to carry by two
people.
(Caution) Do not hold the pulley.
2) Do not place a protruding object, such as a screw driver, at
a place where the sewing machine is to be installed.
3) Fix the oil pan supplied with the machine on the table in 10
placed with nails.
Set the oil pan so that its U-shaped notch is brought to the
opposite side of the operator.
4) Attaching the hinge arm
Install hinge arms
❶
to the front and rear (at one location
each) of the sewing machine head with screws
❷
. Hook
hinge seats
❸
on hinge arms
❶
.
(When hooking hinge seats
❸
on the hinge arms
❶
, face
the counter sunk plane of the hinge seats
❸
upward.)
❸
❷
❶
2mm 2mm
30mm
 Loading...