–
41
–
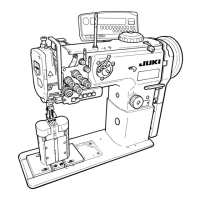
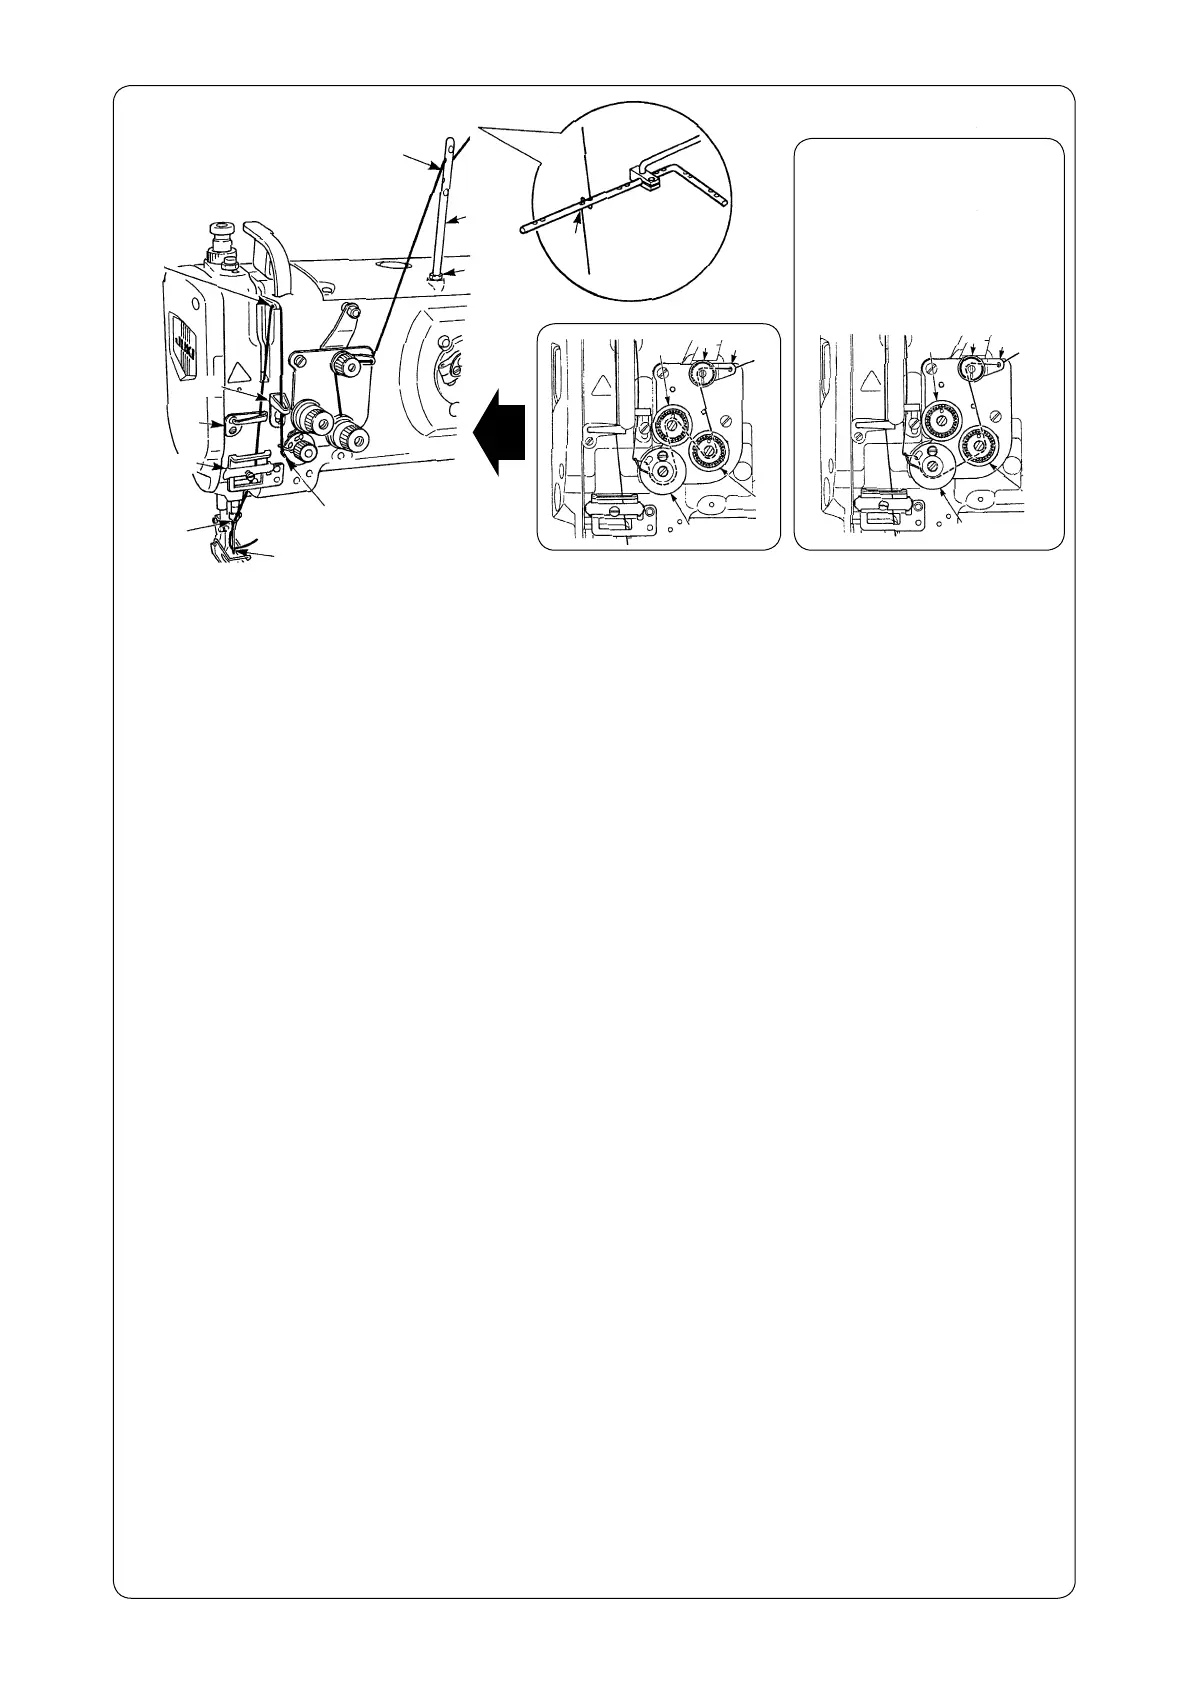
1. Die Fadenführungsstange
a
mit der Mutter
b
an der oberen Abdeckung befestigen.
2. Den Maschinenkopf in der Reihenfolge von
1
bis
!3
gemäß der obigen Abbildung einfädeln.
*
Den Faden durch die rechte Seite der Fadenführung
!1
ziehen.
(Vorsicht) Wenn Sie einen dünnen Nadelfaden verwenden (wenn der Nadelfaden durch beide Fadenspannungsscheiben
Nr. 2 gezogen wird, kann nicht die notwendige Spannung ausgeübt werden, und die Scheiben haben Spiel),
führen Sie den Faden nicht durch
6
, und fädeln Sie ihn in der Reihenfolge
5
bis
7
ein.
1. 用螺母
b
把线导向杆
a
固定到顶盖。
2. 如图所示按
1
~
!3
的顺序穿上线。
*
导线器
!1
从右侧穿过。
( 注意 ) 使用细上线 ( 线穿过第二线张力盘的两侧后 , 达不到需要的张力 , 张力盘松弛)时,请不穿过
6
,按照
5
~
7
的顺序穿线。
1. 糸案内棒
a
をナット
b
でトップカバーに固定します。
2. 上糸は図のように
1
〜 !3 の順に通します。
* 糸案内 !1 は、右側を通します。
(注意) 細糸番手の上糸を使用(第二糸調子皿の両方へ糸を通した時、必要な張力がかけられない、皿が遊ぶ)の場合は、
6
を
通さず
5
-
7
の順に通してください。
1. Fix thread guide bar
a
to the top cover with nut
b
.
2. Thread the machine head following the order of
1
through
!3
as shown in the illustration given above.
*
Pass thread through the right side of thread guide
!1
.
(Caution) When using thin needle thread (when needle thread is passed through both of the thread tension disk No. 2,
necessary tension cannot be applied and the disks play), do not pass the thread through
6
and pass it in the
order of
5
to
7
.
1. Fixer la tige de guide-fi l
a
sur le couvercle supérieur avec l'écrou
b
.
2. Enfi ler la tête de la machine dans l’ordre
1
à
!3
indiqué sur l’illustration ci-dessus.
*
Faire passer le fi l par le côté droit du guide-fi l
!1
.
(Attention) Lorsque le fi l d’aiguille est fi n (si l’on fait passer le fi l d’aiguille par les deux disques de tension de fi l n° 2, on
ne peut obtenir la tension nécessaire et les disques présentent un jeu), le faire passer directement de
5
à
7
sans le faire passer par
6
.
1. Sujete la barra
a
de la guía de hilo a la cubierta superior con la tuerca
b
.
2. Enhebre el cabezal de la máquina siguiendo el orden de
1
a
!3
como se ilustra en la fi gura anterior.
*
Enhebre el hilo por el lado derecho de la guía del hilo
!1
.
(Precaución) Cuando use hilo delgado de aguja (cuando el hilo de aguja pasa por los dos discos tensores de hilo No. 2, la
tensión necesaria no se puede aplicar y los discos huelgan); no pase el hilo por
6
y páselo por el orden de
5
a
7
.
1. Fissare la barra guidafi lo
a
al coperchio superiore con il dado
b
.
2. Infi lare il fi lo nella testa della macchina seguendo l’ordine da
1
a
!3
come mostrato nella fi gura qui sopra.
*
Fare passare il fi lo attraverso il lato destro del guidafi lo
!1
.
(Attenzione) Quando si usa fi lo dell’ago sottile (quando il fi lo dell’ago è fatto passare attraverso tutti e due i dischi del
disco di tensione No. 2, la tensione necessaria non può essere applicata ed i dischi giocano), non fare passare
il fi lo attraverso
6
e farlo passare nell’ordine da
5
a
7
.
• PLC-1710, PLC-1710-7
2
8
!0
!2
3
5
6
4
7
細糸番手使用の場合
When using thin thread
Bei Verwendung eines dünnen Fadens
Lors de l’utilisation de fi l fi n
Cuando use hilo delgado
Quand o si usa fi lo sottile
使用
细线时
* !1
1
!3
7
a
b
3
5
6
4
7
9
 Loading...