3
ENGLISH
B
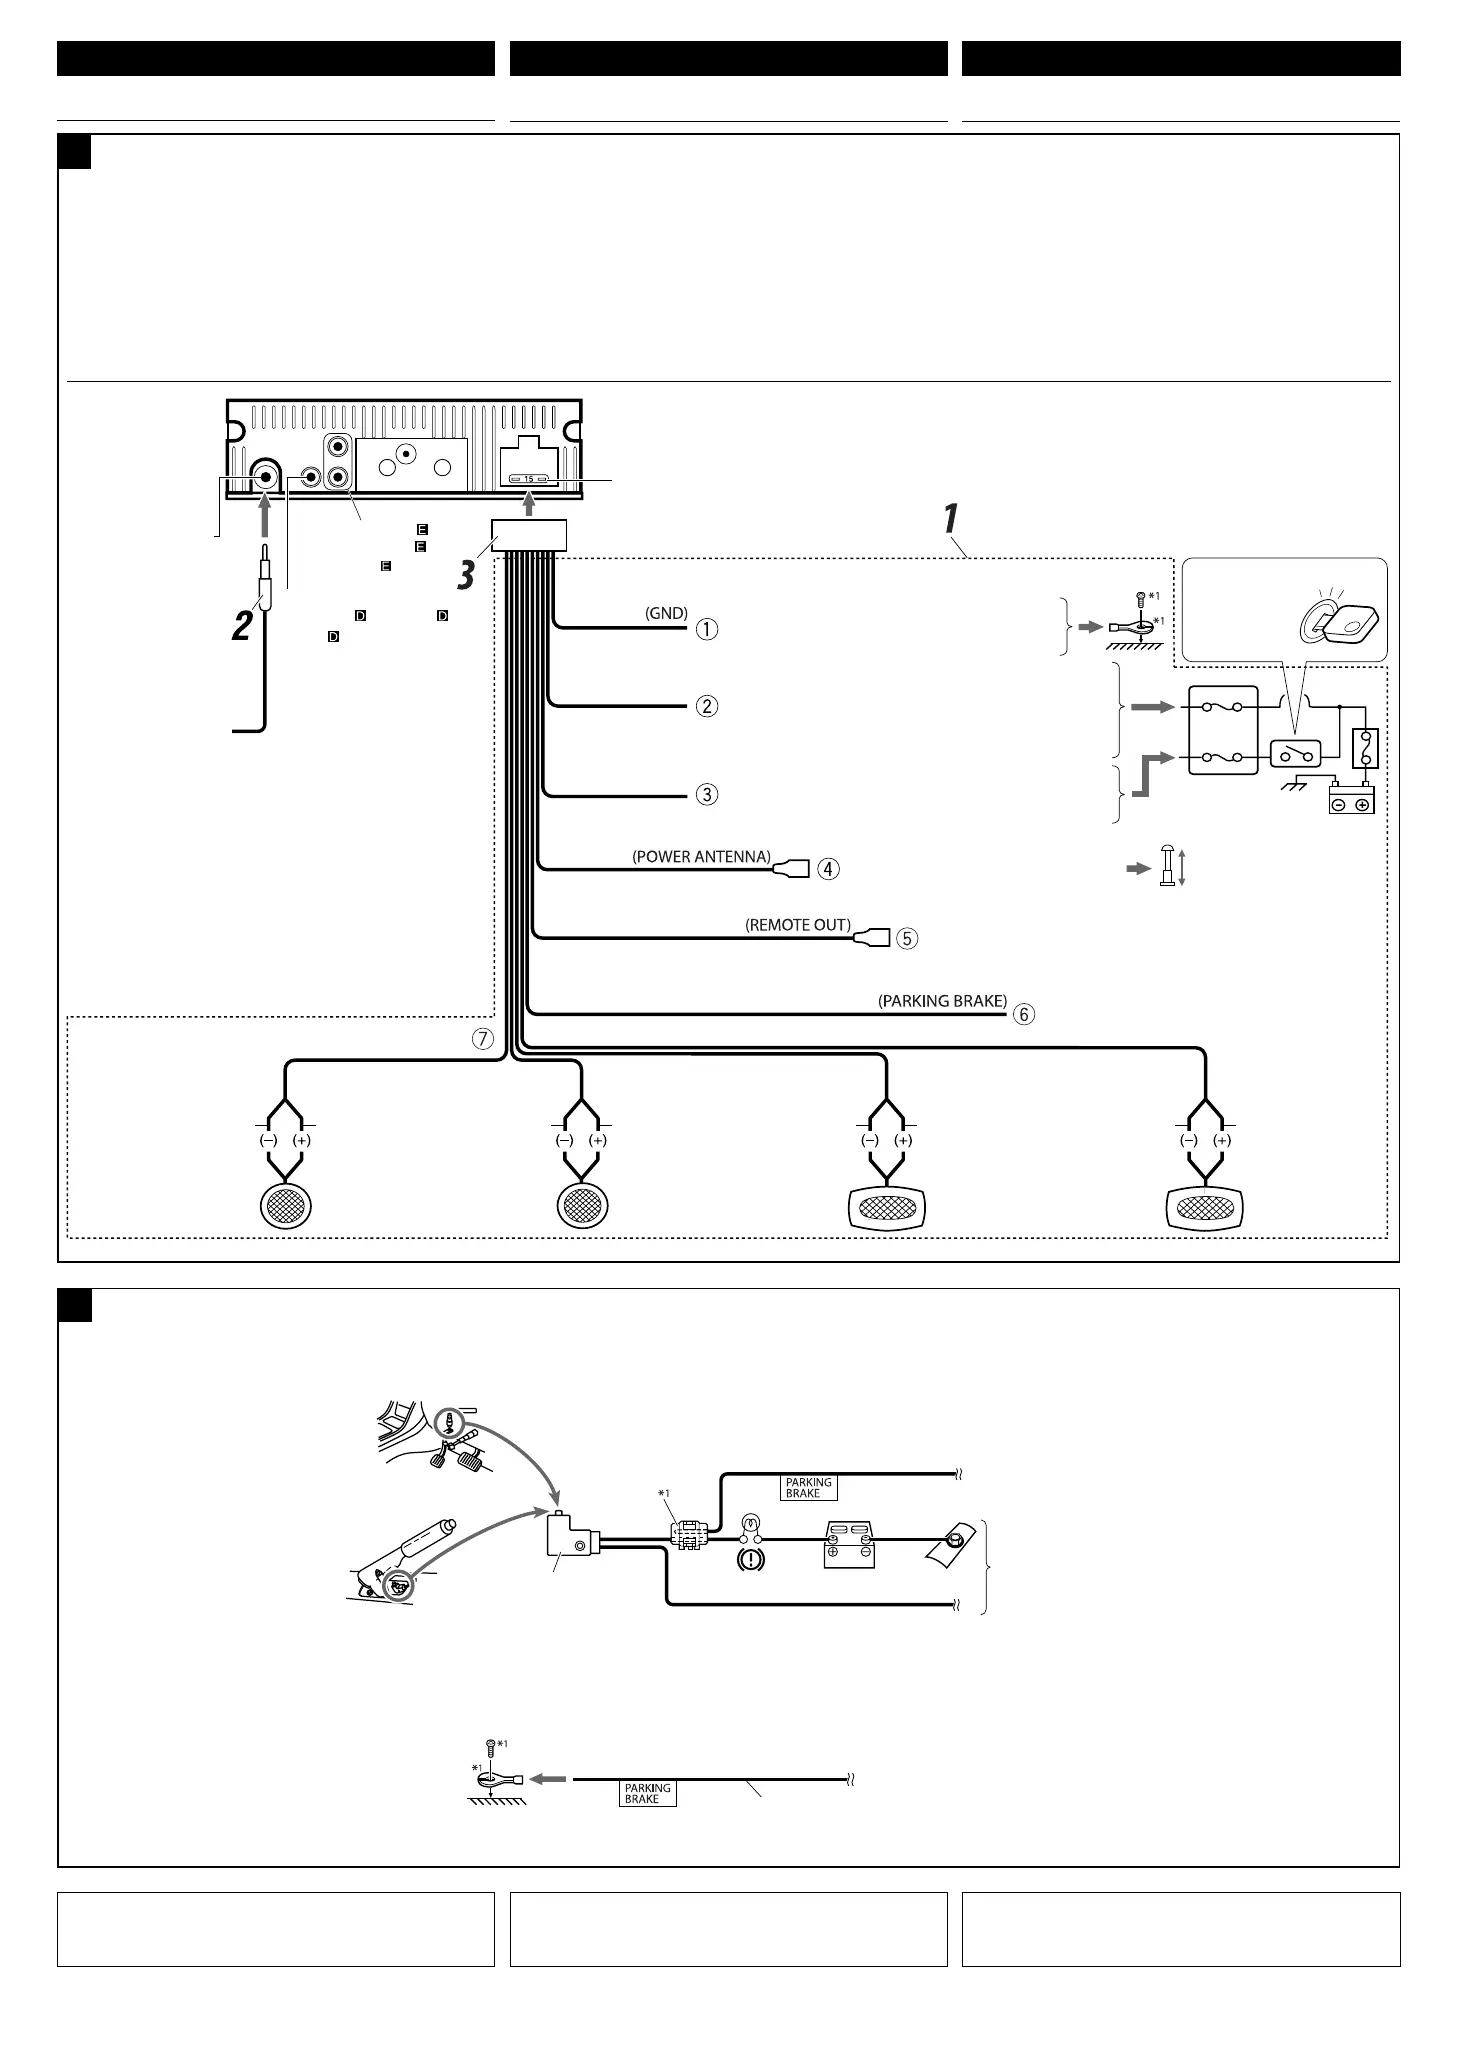
Connecting the parking brake wire /
連接至手剎車導線
/ µËÕ“¬‡∫√°¡◊Õ
When installing the monitor in a location where it can be
seen by the driver
Connect the parking brake wire to the parking brake system built in
the car.
When installing the monitor in a location where it cannot be
seen by the driver
Connect the parking brake wire to metallic body or chassis of the
car.
Parking brake wire (light green)
手剎車導線(淺綠色)
“¬‡∫√°¡◊Õ (’‡¢’¬«ÕàÕπ)
To metallic body or chassis of the car
接至金屬體或汽車底盤
µËÕ°—∫‚§√ß‚≈À–À√◊Õ‡™´‘¢Õß√∂¬πµú
Parking brake switch (inside the car)
手剎車開關(位于車內)
«‘µ™Ï‡∫√°¡◊Õ (¿“¬„π√∂)
Parking brake
手剎車
‡∫√°¡◊Õ
Parking brake wire (light green)
手剎車導線(淺綠色)
“¬‡∫√°¡◊Õ (’‡¢’¬«ÕàÕπ)
Light green
淺綠色
’‡¢’¬«ÕËÕπ
VIDEO OUT
(see diagram / 參閱圖表 /
¥Ÿ·ºπ¿Ÿ¡ )
A
To parking brake, metallic body or chassis of the car
接至手剎車導線、金屬體或汽車底盤
µËÕ°—∫‡∫√°¡◊Õ µ—«∂—ß∑’ˇªìπ‚≈À– À√◊Õ‚§√ß√∂¬πµÏ
Before connecting: Check the wiring in the vehicle carefully.
Incorrect connection may cause serious damage to this unit.
The leads of the power cord and those of the connector from the car
body may be different in color.
1 Connect the colored leads of the power cord in the order
specified in the illustration below.
2 Connect the antenna cord.
3 Finally connect the wiring harness to the unit.
15 A fuse
15 A 保險絲
øî«Ï¢π“¥ 15 A
Black
黑色
’¥”
Blue with white stripe
藍色帶有白色條紋
πÈ”‡ß‘π≈“¬¢“«
Red
紅色
’·¥ß
Yellow *
2
黃色 *
2
’‡À≈◊Õß *
2
To metallic body or chassis of the car
接至金屬體或汽車底盤
µËÕ°—∫‚§√ß‚≈À–À√◊Õ‡™´‘¢Õß√∂¬πµú
Ignition switch
點火開關
«‘∑™Ï®ÿ¥√–‡∫‘¥
Fuse block
保險絲單元
·ºßøî«
To an accessory terminal in the fuse block
接至保險絲單元內的附屬端子
µËÕ°—∫¢—È«Ë«πª√–°Õ∫„π·ºßøî«
To the remote lead of other equipment (200 mA max.)
連接至其他裝置上的遙控導線(最大 200 mA)
µËÕ‡¢È“°—∫Õª°√≥ÏÕË◊π (¢π“¥Ÿßÿ¥ 200 mA)
To a live terminal in the fuse block connecting to the car battery
(bypassing the ignition switch) (constant 12 V)
接至保險絲單元內的附屬端子,保險絲單元於車裝電池相連接
(用於旁路點火開關) (恆定 12 V)
µµËÕ°—∫¢—È«∑’Ë¡’°√–·‰øøÈ“„π·ºßøî«Ï ´÷ËßµËÕ°—∫·∫µ‡µÕ√’Ë√∂¬πµ
(‚¥¬‰¡ËµÈÕß„™È«‘∑™Ï®ÿ¥√–‡∫‘¥) (12 ‚«≈∑ϧß∑’Ë)
*
1
Not supplied for this unit.
*
2
Before checking the operation of this unit prior to installation, this
lead must be connected, otherwise power cannot be turned on.
Line out (see diagram )
線性輸出 (參閱圖表
)
“¬ÕÕ° (¥Ÿ·ºπ¿Ÿ¡ )
Left speaker (front)
左揚聲器 (前置)
≈”‚æß´È“¬ (ÀπÈ“)
Right speaker (front)
右揚聲器 (前置)
≈”‚æߢ«“ (ÀπÈ“)
Left speaker (rear)
左揚聲器 (後置)
≈”‚æß´È“¬ (À≈—ß)
Right speaker (rear)
右揚聲器 (後置)
≈”‚æߢ«“ (À≈—ß)
Purple
紫色
’¡Ë«ß
Purple with black stripe
紫色帶有黑色條紋
’¡Ë«ß·∂∫¥”
Green
綠色
’‡¢’¬«
Green with black stripe
綠色帶有黑色條紋
’‡¢’¬«·∂∫¥”
Gray
灰色
’‡∑“
Gray with black stripe
灰色帶有黑色條紋
’‡∑“·∂∫¥”
White
白色
’¢“«
White with black stripe
白色帶有黑色條紋
’¢“«·∂∫¥”
Typical connections / 典型的接線方法 / °“√‡™◊ËÕ¡µËÕ·∫∫ª°µ
ELECTRICAL CONNECTIONS
Antenna terminal
天線端子
¢—È«µËÕ“¬Õ“°“»
To the automatic antenna if any (250 mA max.)
接至自動天線(若有裝設)(最大 250 mA)
‡“Õ“°“»‰øøÈ“Õ—µ‚π¡—µ‘ À“°¡’ (¢π“¥Ÿßÿ¥ 250 mA)
Blue
藍色
»’øÈ“
將顯示器安裝在司機可以看到的位置時
將手剎車導線連接至車內的手剎車系統。
¡◊ËÕ®–µ‘¥µ—È߮աÕ𑇵Õ√Ï„πµ”·ÀπËß∑’˺ŸÈ¢—∫“¡“√∂¡Õ߇ÀÁπ‰¥È
µËÕ“¬‡∫√°¡◊Õ°—∫√–∫∫‡∫√°¡◊Õ¢Õß√∂¬πµ
*
1
不隨本機提供。
*
2
本機未安裝時,進行工作狀況檢查之前,必須把這導線接上,否
則不能開啟電源。
*
1
‰¡Ë‰¥È„ÀÈ¡“°—∫™ÿ¥ª√–°Õ∫π’È
*
2
°ËÕπ°“√µ√«®Õ∫°“√∑”ß“π¢Õß™ÿ¥ª√–°Õ∫π’È°ËÕπ∑’Ë®–µ‘¥µ—Èß µÈÕßµËÕ“¬µ–°—Ë«π’È°ËÕπ
¡‘©–π—Èπ®–‰¡Ë“¡“√∂‡ª‘¥‡§√◊ËÕ߉¥È
將顯示器安裝在司機看不到的位置時
將手剎車導線連接至金屬體或汽車底盤。
‡¡◊ËÕ®–µ‘¥µ—È߮աÕ𑇵Õ√Ï„πµ”·ÀπËß∑’˺ŸÈ¢—∫‰¡Ë“¡“√∂¡Õ߇ÀÁπ‰¥È
µËÕ“¬‡∫√°¡◊Õ°—∫µ—«∂—ß∑’ˇªìπ‚≈À–À√◊Õ‚§√ß√∂¬πµ
接線前: 仔細檢查汽車內的線路。不正確的接線會導致本機嚴
重損壞。
電源線的引線和車身的連接器引線在顏色上可能有所不同。
1 依照下圖所示之次序連接電源線的顏色導線。
2 將天線的電線連接起來。
3 最後,把配線束的插頭插在本機上。
°àÕπ°“√‡™◊ËÕ¡µàÕ: µ√«®¥Ÿ°“√‡¥‘𓬉ø„π√∂¬πµå„Àâ≈–‡Õ’¬¥∂’Ë∂â«π
‡æ√“–°“√‡™◊ËÕ¡µàÕ∑’˺‘¥æ≈“¥Õ“®∑Ì“„À⇰‘¥§«“¡‡’¬À“¬√⓬·√ßµàÕ™ÿ¥ª√–°Õ∫™ÿ¥π’ȉ¥â
“¬µ–°—Ë«¢Õß“¬‰ø·≈–¢ÕßÕÿª°√≥åµàÕ‡™◊ËÕ¡®“°µ—«∂—ß√∂¬πµåÕ“®¡’’∑’ˉ¡à‡À¡◊Õπ°—π
1 µËÕ“¬‰ø’µ“¡≈”¥—∫∑’Ë√–∫ÿ„π√Ÿª¥È“π≈Ë“ß
2 ‡™◊ËÕ¡µËÕ°—∫“¬Õ“°“»
3 ÿ¥∑È“¬ µËÕË«π§«∫§ÿ¡°“√‡¥‘𓬉ø‡¢È“°—∫™ÿ¥ª√–°Õ∫™ÿ¥π’È
電路連接
°“√‡™◊ËÕ¡‚¥¬„™È‰øøÈ“
中文 ‰∑¬
CTTH_install_KD-SV3706[US].indb 3CTTH_install_KD-SV3706[US].indb 3 11/20/08 4:23:52 PM11/20/08 4:23:52 PM
 Loading...