– 2
Do not operate this attachment if there
are leaks.
Stop operating the attachment immedi-
ately whenever there are functional dis-
ruptions.
Never block the depressed triggering
lever of the gun or prevent its closure in
some other way.
Vehicle tyres or tyre valves are suscep-
tible to damage from the high pressure
jet and may burst. The first indication of
this is a discolouration of the tyre. Dam-
aged vehicle tyres/tyre valves are high-
ly dangerous. Ensure that a distance of
at least 30 cm is observed when clean-
ing with the jet!
NOTICE
The operator must use the accessory
properly. When working with the appli-
ance, he must consider the local condi-
tions and pay due care and attention to
other persons, in particular children,
who are nearby.
The appliance must not be operated by
children or persons who have not been
instructed accordingly.
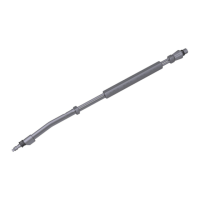
Illustrations on Page 2
1 Special lance
2 Handle for setting the angle
3 Part to be screwed
4 Adapter 5
5 Adapter 7
In order to ensure that the max. torque of
20 Nm is not exceeded, determine the per-
missible nozzle size.
NOTICE
To determine the nozzle size, use the dia-
grams on the last page of these operating
instructions.
Diagram 1:
Select the diagram for the respective
spray lance length.
Draw a horizontal line with max.
throughflow volume (A) of the high-
pressure cleaner and select interface
with torque curve (B).
Draw a vertical line through the inter-
face and note max. permissible pres-
sure (C).
Diagram 2:
Select the column with the determined
pressure and browse downwards, until
the value corresponds to the through-
flow value of your high-pressure clean-
er. Follow the line to the left and find
nozzle size (D).
Unscrew the part that can be screwed.
Screw on the provided adapter 7 item 5.
Insert nozzle.
Screw on the part that can be screwed.
To adjust the angle on the special lance,
slide the handle of the special lance
Check the pressure and temperature
ranges set at the high-pressure cleaner;
adjust according to the values approved
for accessory.
Press safety catch on the trigger gun to
release it and pull lever.
Release the lever on the trigger gun.
Commissioning and opera-
tion
Description of the Appliance
Preparing the Appliance
Selecting the high pressure nozzles
Installing the nozzles
Adjust the angle
Operation
Interrupting operation
7EN
 Loading...