DPC-885 (En)
_
+
DC-IN
INPUT
INPUT
CD
R
L
OPT.OUT
PORTABLE MD RECORDING DMC -G7R
REMOTE
OPT.
OUT
LINE OUT
REMOTE
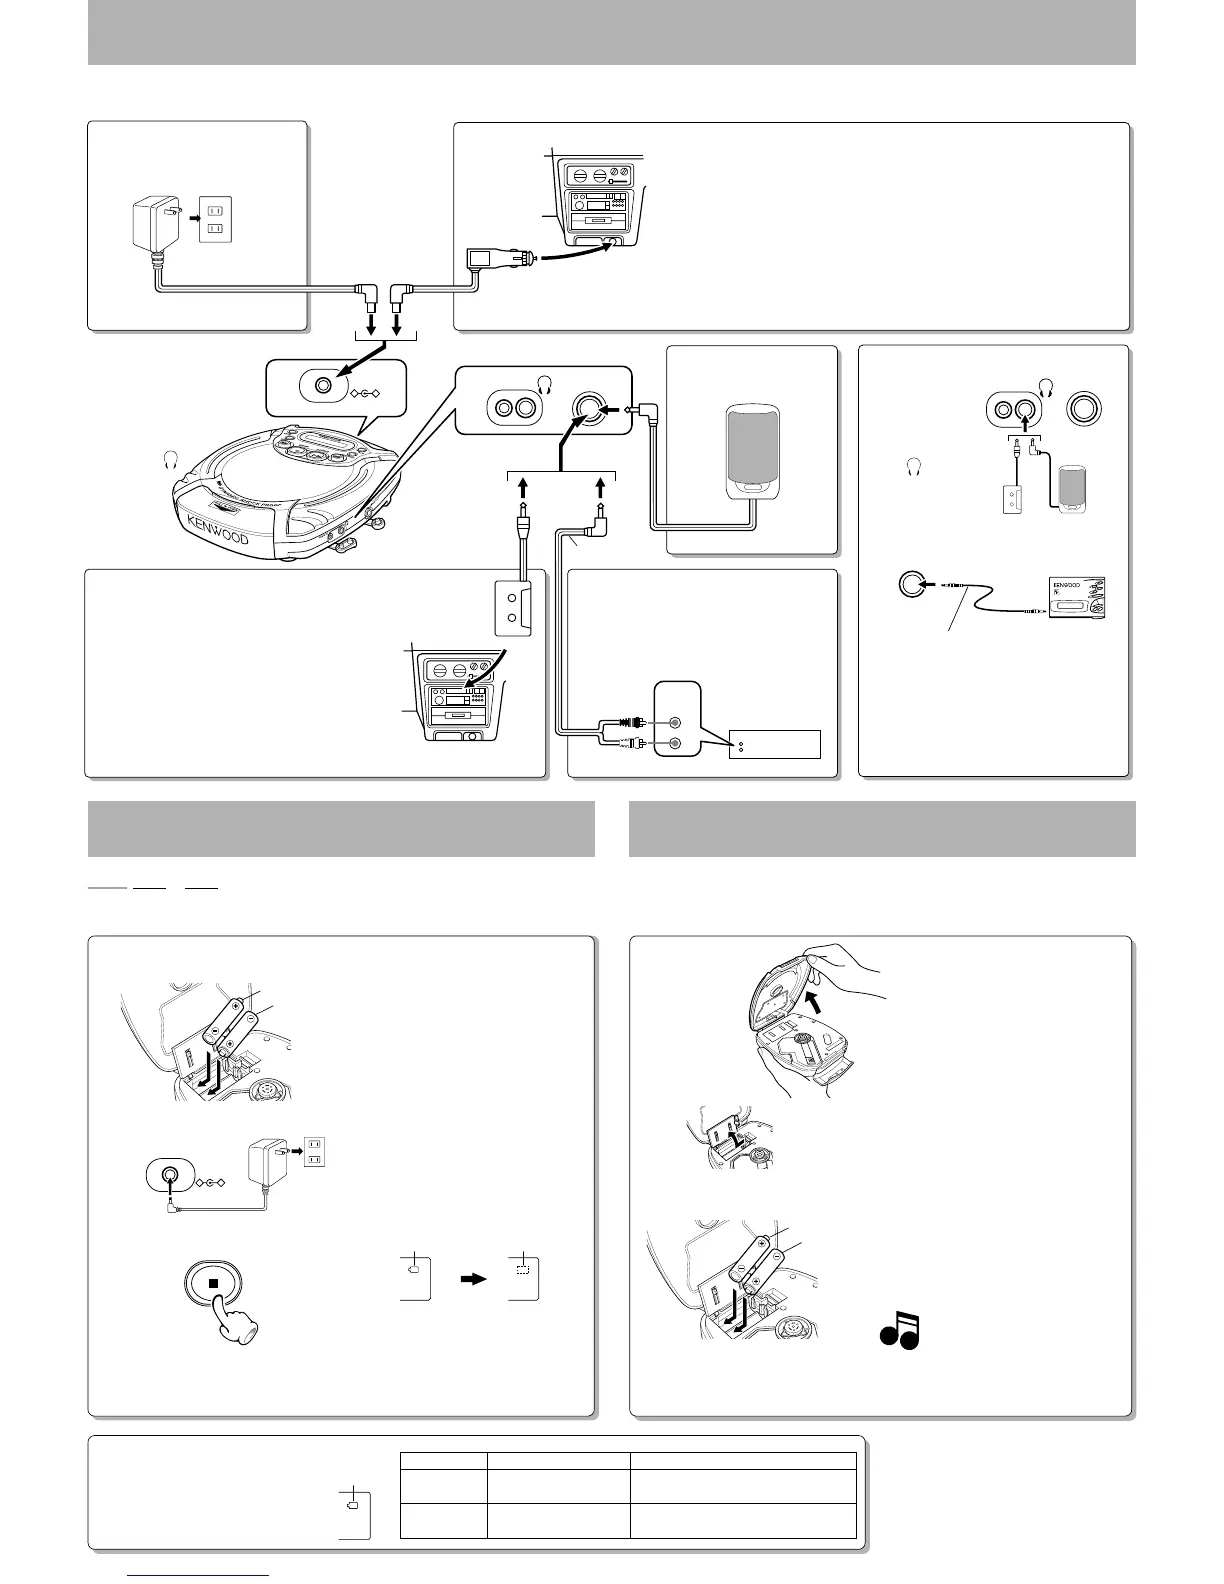
Connections
Listening through car audio
• If sound is not produced, change the tape playing
direction of the car stereo.
(Sound is not produced if the car stereo is set to play
tape side B.)
• Audio reproduction may be impossible with the follow-
ing types of car stereo:
Models which function by detecting the tape tension.
(With these car stereo models, the CAC-2 is ejected
automatically when it is inserted.)
Insert into
cassette deck
slot.
Car cassette adaptor
CAC-2 (optional)
Car stereo
Listening through speakers
Speakers
with built-in
amplifier
Notes:
*1.The REMOTE terminal can be used
only when the unit has headphones
with remote controller.
Do not use this terminal for other
purpose than the above.
*2.With connection to the
LINE OUT terminal,
no sound will be put
out from the
ter-
minal.
Mains power operation
AC adaptor
Car battery powered operation
• When the unit is not used, unplug the car battery adaptor. (Otherwise,
the car battery may run out, with some car models.)
• The plug may not match the cigar lighter socket of some car models.
• If the unit cannot be operated with the car battery adaptor connected,
suspect the possibility of a blown fuse. The fuse can be replaced by
turning the electrode on the tip of the adaptor plug. When replacing the
fuse, be sure to use a fuse with a rating of 1 A.
Car stereo
Connect to cigar
lighter socket.
Car battery adaptor
DC-C3A (optional)
(Cars with DC 12V battery only)
Recharging the batteries
Battery duration indicator
The duration at which the battery indicator
starts to blink is variable depending on the
type of battery used.
Refer to the table on the right.
1 Open the top cover.
4 Close the cover.
Rechargeable
batteries
Alkaline batter-
ies
Treatment
When the batteries are
nearly exhausted
When the batteries are half
exhausted
In a while, the power will be turned off auto-
matically. Then recharge the batteries.
Playback is possible while the indicator is
blinking.
Blinking TimingBattery Type
3 Plug in the AC adaptor.
4 Wait for 5 seconds, then press
the 7 key twice quickly.
Connect to DC IN jack.
Battery duration
indicator
3 Insert rechargeable batteries or
two LR6 alkaline batteries fol-
lowing the polarity indications.
C
_
+
DC-IN
This unit can be powered with three kinds of supplies including the batteries, household power
line and car battery.
The batteries may either be rechargeable batteries manufactured specially by KENWOOD or
alkaline batteries. Be sure to remove the batteries from the unit when it is not to be used for
a long period (of more than a week).
• Rechargeable batteries can be recharged for
about 500 times. When the playable time per
recharge reduces, please newly purchase the
optional NB-130, NB-77 or NB-88 rechargeable
batteries.
• When loading the rechargeable batteries or SUM-
3/R6/“AA”-size alkaline batteries, insert from
the nearer battery,i.e. in order of 1 then 2, and
be sure to observe the polarity marking in the
battery compartment. When unloading the bat-
teries, first remove the farther battery, i.e. in
order of 2 then 1.
• We recommend the use of alkaline batteries
(LR6) because the playable time may some-
times extremely short when manganese batter-
ies are used.
• Always replace both batteries at a time.
5 After recharging, unplug the AC
adaptor from this unit.
• When using a rechargeable batteries which are
new or which have not been used for more than
2 months, the operating period may be shorter
than normal. This is due to the properties of the
battery and not a malfunction. After recharging,
use the batteries on the unit until there are
exhausted.
The original performance of the battery perfor-
mance can be recovered by repeating this cycle
a few times.
• When loading the rechargeable batteries, insert
from the nearer battery,i.e. in order of 1 then 2,
and be sure to observe the polarity marking in
the battery compartment. When unloading the
batteries, first remove the farther battery, i.e. in
order of 2 then 1.
• Be sure to close the top cover of the unit before
proceeding to recharging.
• Recharging is not possible during playback. Be
sure to set the power OFF before starting re-
charging.
• Recharging completes in about 4.0 hours with
the NB-130 or about 3.0 hours with the NB-77 or
NB-88. Do not recharge batteries for longer
period than above.
After recharging
Extinguishes.
During recharging
Battery indicator lights.
C
The unit returns to the power OFF status.
STOP/OFF
D
AC power outlet
The rechargeable batteries should be the batteries provided as standard accessories or optional
NB-130, NB-77 or NB-88. Never use other batteries than the rechargeable batteries manufac-
tured for exclusive use with KENWOOD products.
For CHINA and Duty Free Shop in JAPAN
Connect the speaker or
car cassette adaptor to
the
jack.
Recording onto a digital component
Portable MD recorder
etc.
To optical input
Optical cord (optional)
Consult your dealer before purchasing this option.
• For the recording procedure refer to the description
in the Notes of “Playback from the first track”.
Note :
Digital recording is not possible with playback using
batteries or when the D.A.S.C. function is ON.
When using the OPT.OUT jack, cancel the D.A.S.C.
function and power the unit from the household AC
power supply (using the AC adaptor).
Listening through an amplifier with
CD input jacks
• Connect the cable to the amplifier's CD input jacks.
• For detailed playback procedures, please read the
instruction manual of your amplifier.
• This connection may be impossible with some am-
plifiers
Amplifier
CD input terminal connection
Battery powered operation
2 Open the cover.
5 Close the top cover.
2 Set the power OFF.
After loading or unloading the batteries, be
sure to close the battery cover securely
until it clicks. (The disc may be damaged if
the battery cover is not closed tightly.)
Remove the rubber cap from the connection terminal.
Ensure that the power of the all of the components is off before connecting the cords.
*1 *2
Audio cord
(Commercially available)
1 Insert rechargeable batteries fol-
lowing the polarity indications.
1
2
Note
Note
1
2