Page 21
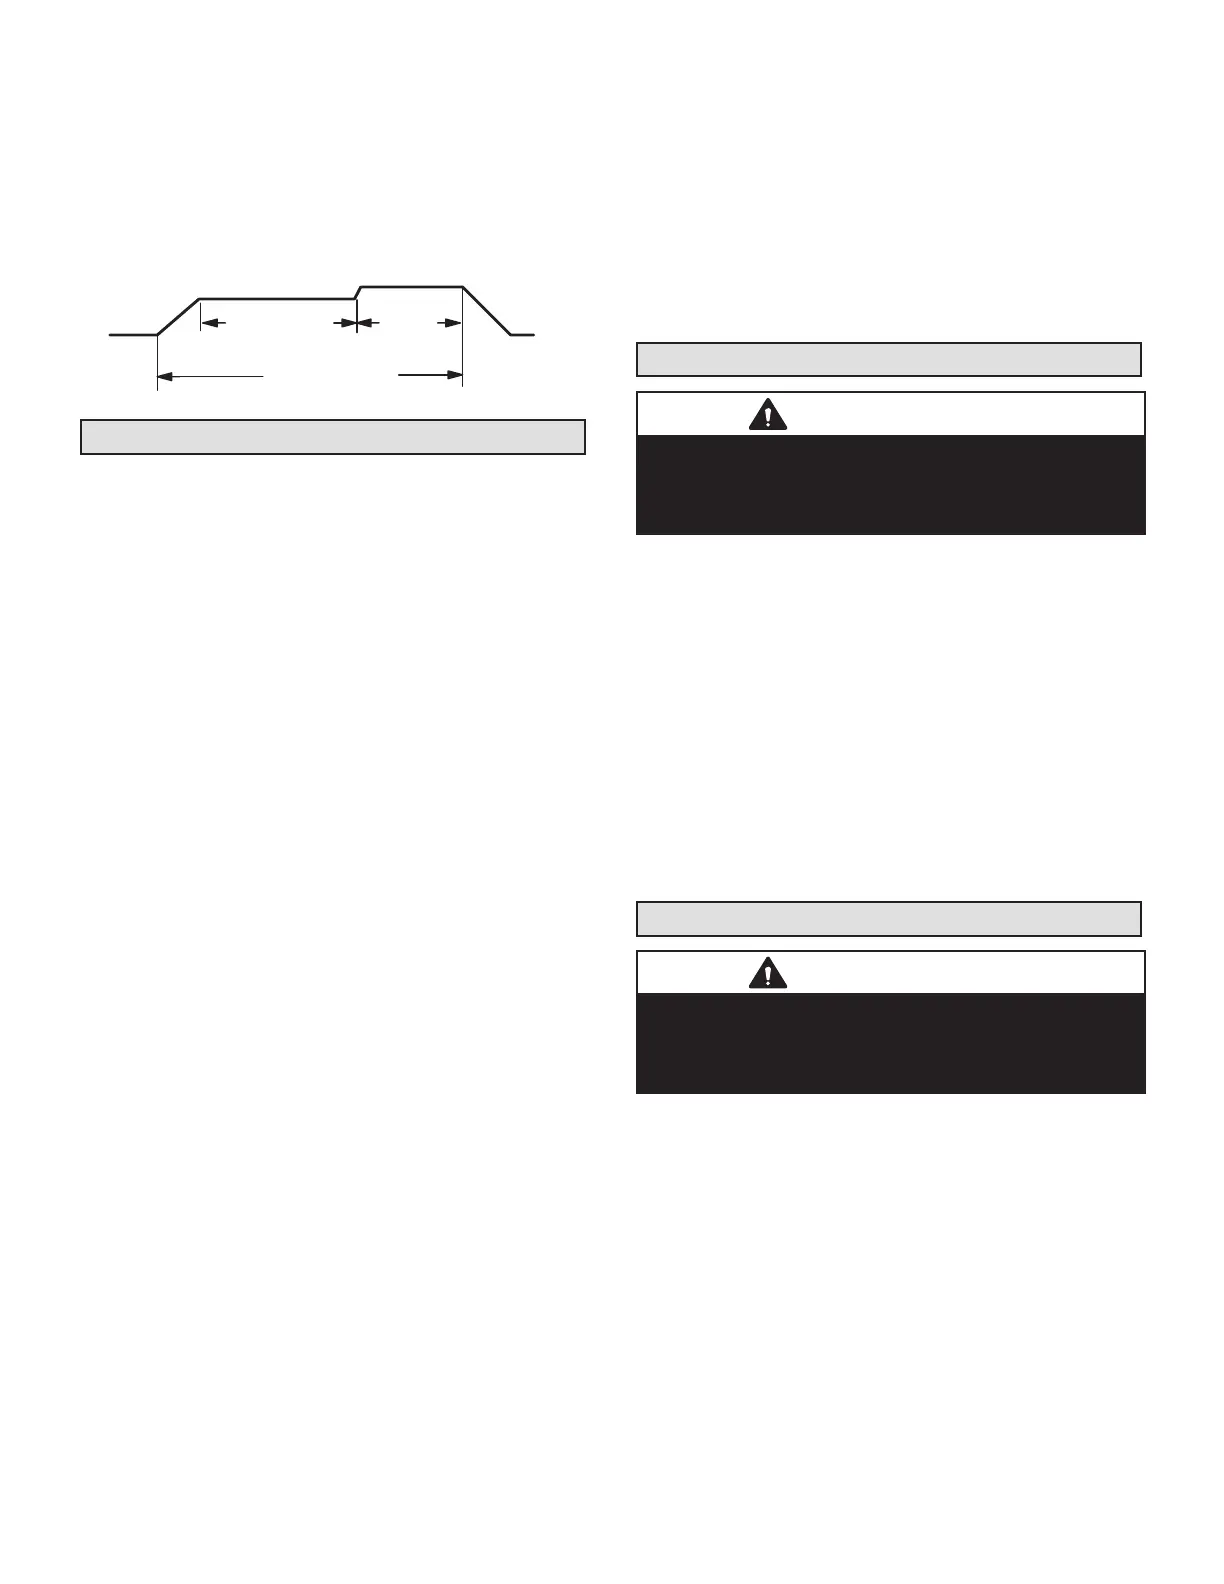
#4 Pins Jumpered
A- Motor ramps up to 82%.
B- Motor then runs at 82% for approximately 7-1/2 min-
utes. If demand has not been satised after 7-1/2 min-
utes,
C- Motor runs at 100% until demand is satised.
D- Once demand is met, motor ramps down to stop.
A
B
OFF
OFF
D
COOLING DEMAND
7 1/2 MIN
82% CFM
100%
CFM
Check-out Procedures
NOTE – Refer to outdoor unit installation instructions for sys-
tem start-up instructions and refrigerant charging instructions.
PRE-START-UP CHECKS
• Is the air handler properly and securely installed?
• If horizontally congured, is the unit sloped up to 5/8
inch toward drain lines?
• Will the unit be accessible for servicing?
• Has an auxiliary pan been provided under the unit with
separate drain for units installed above a nished ceil-
ing or in any installation where condensate overow
could cause damage?
• Have ALL unused drain pan ports been properly
plugged?
• Has the condensate line been properly sized, run,
trapped, pitched, and tested?
• Is the duct system correctly sized, run, sealed, and in-
sulated?
• Have all cabinet openings and wiring been sealed?
• Is the indoor coil factory-installed TXV properly sized for
the outdoor unit being used?
• Have all unused parts and packaging been disposed
of?
• Is the lter clean, in place, and of adequate size?
• Is the wiring neat, correct, and in accordance with the
wiring diagram?
• Is the unit properly grounded and protected (fused)?
• Is the thermostat correctly wired and in a good location?
• Are all access panels in place and secure?
CHECK BLOWER OPERATION
• Set thermostat to FAN ON.
• The indoor blower should come on.
CHECK COOLING OPERATION
• Set thermostat to force a call for cooling (approximately
5ºF lower than the indoor ambient temperature).
• The outdoor unit should come on immediately and the
indoor blower should start between 30 - 60 seconds later.
• Check the air ow from a register to conrm that the
system is moving cooled air.
• Set the thermostat 5ºF higher than the indoor tempera-
ture. The indoor blower and outdoor unit should cycle
o.
CHECK ELECTRIC HEAT (IF USED)
• Set thermostat to call for auxiliary heat (approximate-
ly 5°F above ambient temperature). The indoor blow-
er and auxiliary heat should come on together. Allow a
minimum of 3 minutes for all sequencers to cycle on.
• Set the thermostat so that it does not call for heat. Allow
up to 5 minutes for all sequencers to cycle o.
Maintenance
IMPORTANT
Do not operate system without a lter. A lter is required
to protect the coil, blower, and internal parts from
excessive dirt and dust. The lter is placed in the return
duct by the installer.
• Inspect air lters at least once a month and replace or
clean as required. Dirty lters are the most common
cause of inadequate heating or cooling performance.
• Replace disposable lters. Cleanable lters can be
cleaned by soaking in mild detergent and rinsing with
cold water.
• Install new/clean lters with the arrows on the side point-
ing in the direction of air ow. Do not replace a clean-
able (high velocity) lter with a disposable (low velocity)
lter unless return air system is properly sized for it.
• If water should start coming from the secondary drain
line, a problem exists which should be investigated and
corrected. Contact a qualied service technician.
Repairing or Replacing Cabinet Insulation
IMPORTANT
DAMAGED INSULATION MUST BE REPAIRED OR
REPLACED before the unit is put back into operation.
Insulation loses its insulating value when wet, damaged,
separated or torn.
Matte- or foil-faced insulation is installed in indoor equip-
ment to provide a barrier between outside air conditions
(surrounding ambient temperature and humidity) and the
varying conditions inside the unit. If the insulation barrier
is damaged (wet, ripped, torn or separated from the cabi-
net walls), the surrounding ambient air will aect the inside
surface temperature of the cabinet.
The temperature/humidity dierence between the inside
and outside of the cabinet can cause condensation on the
inside or outside of the cabinet which leads to sheet metal
corrosion and, subsequently, component failure.
 Loading...