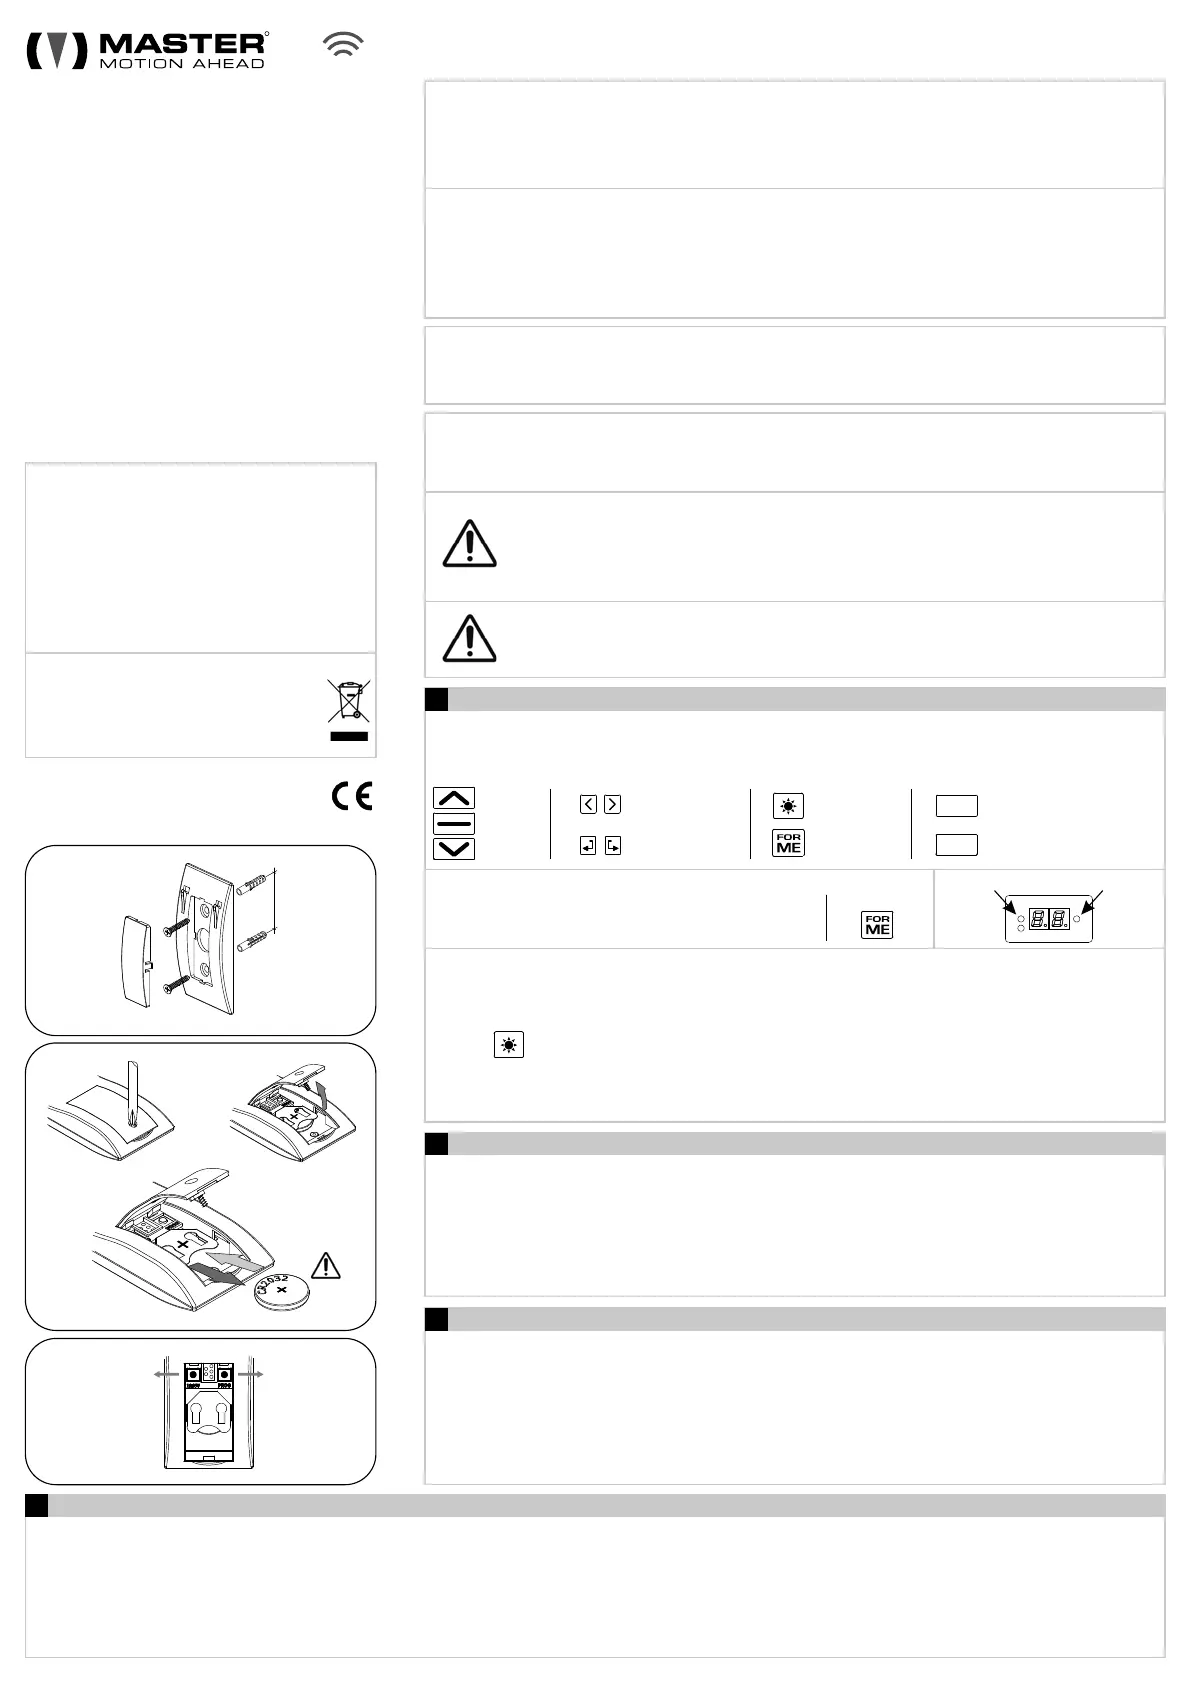
up
stop
down
channel -/+
prev/next
SUN On/Off
FOR ME
right orientation
left orientation
access to the
receiver menu (see fig.3)
transmitters
insertion-deletion (see fig.3)
MENU
PROG
Dear Customer, thank you for purchasing a MASTER
S.p.A. product. This guide contains all the information you
will need concerning the use of this product. Read the
instructions carefully and keep them for further
consultation.
ARCO is designed specifically to control sun awnings,
blinds, roller shutters, screens or similar items. All other
use beyond the field defined by MASTER S.p.A. is
forbidden. This, as well as the breach of the instructions
given in this guide, shall release MASTER S.p.A. from any
liability and shall annul the product warranty. Water,
humidity, heat sources, accidental falls can damage the
device. Do not use abrasive products or solvents to clean
the product.
The radio range is limited by radio appliance control
standards. Do not use radio systems in places with strong
interference (for example, near police stations, airports,
banks, etc). It is iadvisable to carry out a technical inspection
prior to installing a radio system in order to identify possible
sources of interference. Radio systems can be used where
any disturbances or malfunction of the transmitter or receiver
do not constitute a risk factor, or if such factor is eliminated
using appropriate safety systems.The presence of radio
devices working at the same transmission frequency may
reduce the range of the system, limiting functionality.
R
433,42 MHz
User manual for ARCO series
Technical specifications
- Power supply: n° 1 CR2032 lithium battery
- Operating temperature: 0° C - +55°C
- Operating frequency: 433.42 Mhz
- Operating frequency band: 433,050 – 434,790 Mhz
- Max radiated power, e.r.p. : <10 mW
- N° of channelARCO: 1
- N° of channelsARCO2: 2 + sequencer channel
- N° of channelsARCO5: 5 + sequencer channel
- N° of channelsARCO10: 10 + sequencer channel
- N° of channelsARCO20: 20 + 4 groups
At the end of the product life cycle, dispose of the
device in compliance with local regulations. This
product could contain substances that are harmful to
human health and the environment: do not dispose
of the product in domestic waste.
Battery insertion/replacement
The transmitter is powered by a battery CR2032. To insert the battery: remove the battery cover on the back of the
transmitter, insert the battery respecting the polarity, close the cover (see fig.2). Used batteries must be discarded in
appropriate containers. It it recommended to replace the battery every 2 years.
Fixing the wall bracket
A) Fix (at a height of less than 2m) the bracket to the wall using the supplied plugs (see fig.1).
B) Cover the screw heads with the coverage provided.
C) Hang the transmitter to the support.
Disposal
FUNCTIONS ASSOCIATED WITH THE TRANSMITTER BUTTONS
BASIC FUNCTIONS
To memorize:
FAVORITE POSITION
SUN / AUTOMATIC LOWERING FUNCTION
ENABLING/DISABLING GROUPS AND CHANNELS
NOTE: Sun/Automatic lowering» bothIn ARCO2 the « function is active for channels: if you enable it for channel 1, it is
automatically activated for channel 2 and viceversa
DELAY OF TRANSMISSION ON GROUPS AND SEQUENCER CHANNEL
For Sequencer channel and for the Groups you can set the interval of time (from 1 to 10 sec) which must pass between the transmission on one channel and the next. The factory sets the
delay at 1 second. The use of high intervals of time can negatively effect on the battery life. To modify the setting:
SETTING THE CHANNELS BELONGING TO A GROUP (only ARCO20)
To configure the different groups, selecting which channels should be part of them, follow the procedure below:
With transmitters , and you can turn off the channels that are not used; it's possible, with the
same procedure, reactivate the channels. The procedure is as follows:
ARCO 5 ARCO 10 ARCO 20
By the «SUN On / Off " button you can activate / deactivate the SUN function or the AUTOMATIC LOWERING function, in
the receivers equipped with these functions. To modify the setting:
C) YELLOW LED IS ON activeIf : sun/automatic lowering function
B) Press until the state of the yellow LED varies (about 2seconds)
A) Select the channel (excluded sequencer channel and groups)
All products and technical specifications given in this document
are subject to variation without notice. Unless previously and
specifically authorised by the manufacturer, the device must be
used exclusively with receivers produced by the same
manufacturer. The manufacturer shall not be liable for damage
resulting from improper,incorrect or unreasonable use.
Press togheter STOP and FOR ME and hold
the buttons until the receiver signalation (about 5 seconds)
F) press twice MENUTo exit, or wait about 15 seconds (the display switches off).
E) If necessary,press PREV and NEXT to select another channel/group and return to point C.
D) STOPPress to modify the setting.
C) YELLOW LED IS ON channel/group enabled RED LED IS ON channel/group disabledIf : / If :
B) STOP 01Press . will appear.
A) STOP and MENU chPress togheter and hold the buttons for about 3 seconds, until the symbol is displayed.
F) press 1 time MENUTo exit, or wait about 15 seconds (the display switches off).
E) STOPPress to save the setting.
D) PREV NEXTUse and to set the required value.
C) STOPPress . The currently set value appears on the display (from 01 to 10 sec).
B) NEXT SdPress . The symbol appears on the display.
A) STOP and MENU chPress togheter and hold the buttons for about 3 seconds, until the symbol is displayed.
G) press twice MENUTo exit, or wait about 15 seconds (the display switches off).
F) If necessary, press PREV and NEXT to select another channel and return to point E.
E) STOPPress to modify the setting.
If :RED LED IS ON channel not belongs to the group
D) YELLOW LED IS ON: channel belongs to the groupIf
C) Press STOP. Channel 01 appears.
B) G1Press twice NEXT. symbol appears on the display. To select another group press NEXT.
A) STOP and MENU chPress togheter and hold the buttons for about 3 seconds, until the symbol is displayed.
Do not ingest the battery, chemical burn hazard
Keep new and used batteries out of the reach of children. If the battery compartment does not close tightly,
discontinue use of the product and keep it out of the reach of children. If you suspect batteries have been
swallowed or inserted into other body orifices, seek immediate medical attention.
This product contains a coin / button cell battery. If the coin / button cell battery is swallowed, it can cause
severe internal burns in as little as 2 hours and lead to death.
WARNING
Risk of explosion if battery is replaced with wrong type. If the battery is subjected to high temperatures (fire,
hot oven), if it is crushed or cut, there is a risk of explosion and leakage of flammable liquids or gases. Do not
recharge non-rechargeable batteries.
Notes on radio system
NOTE: It is possible that some receiving devices do not associate any operations to some transmitter buttons or that
associate to the transmitter buttons some operations different from what it is described. In this case consider the
instruction manual of the receiving device.
NOTE! ARCO series can be used with different types of receivers (motor, control unit, etc.): the first memorization
procedure, the procedure for memorizing additional remote controls (in addition to the first one) and the various
procedures for changing the settings of the receivers are listed in the manuals of the various devices.
fig.1
fig.3
36mm
GROUPS: ARCO 20 Groups G1 G2 G3 G4is equipped with 4 virtual channels called (indicated with , , , ) which send in
succession (see also paragraph 4), for all the active radio channels belonging to the group, the selected
command. To select a group, scroll through the list of channels until the symbols G1, G2, G3 and G4 appear.
Up to 20 channels can be associated with each group.
SEQUENCER: ARCO 2 ARCO 5 ARCO 10 Sequencer, and are equipped with a virtual channel called : it sends in
succession (see also paragraph 4), for all active radio channels, the selected command. To select the
Sequencer, scroll through the list of channels until the symbol appears.SE
To recall:
MENU
PROG
fig.2
YELLOW LedRED Led
1
2
3
4
www.mastermotion.eu
rev04_02.08.22
MASTER S.p.A. via Pertini 3, 30030 Martellago (VE)
 Loading...