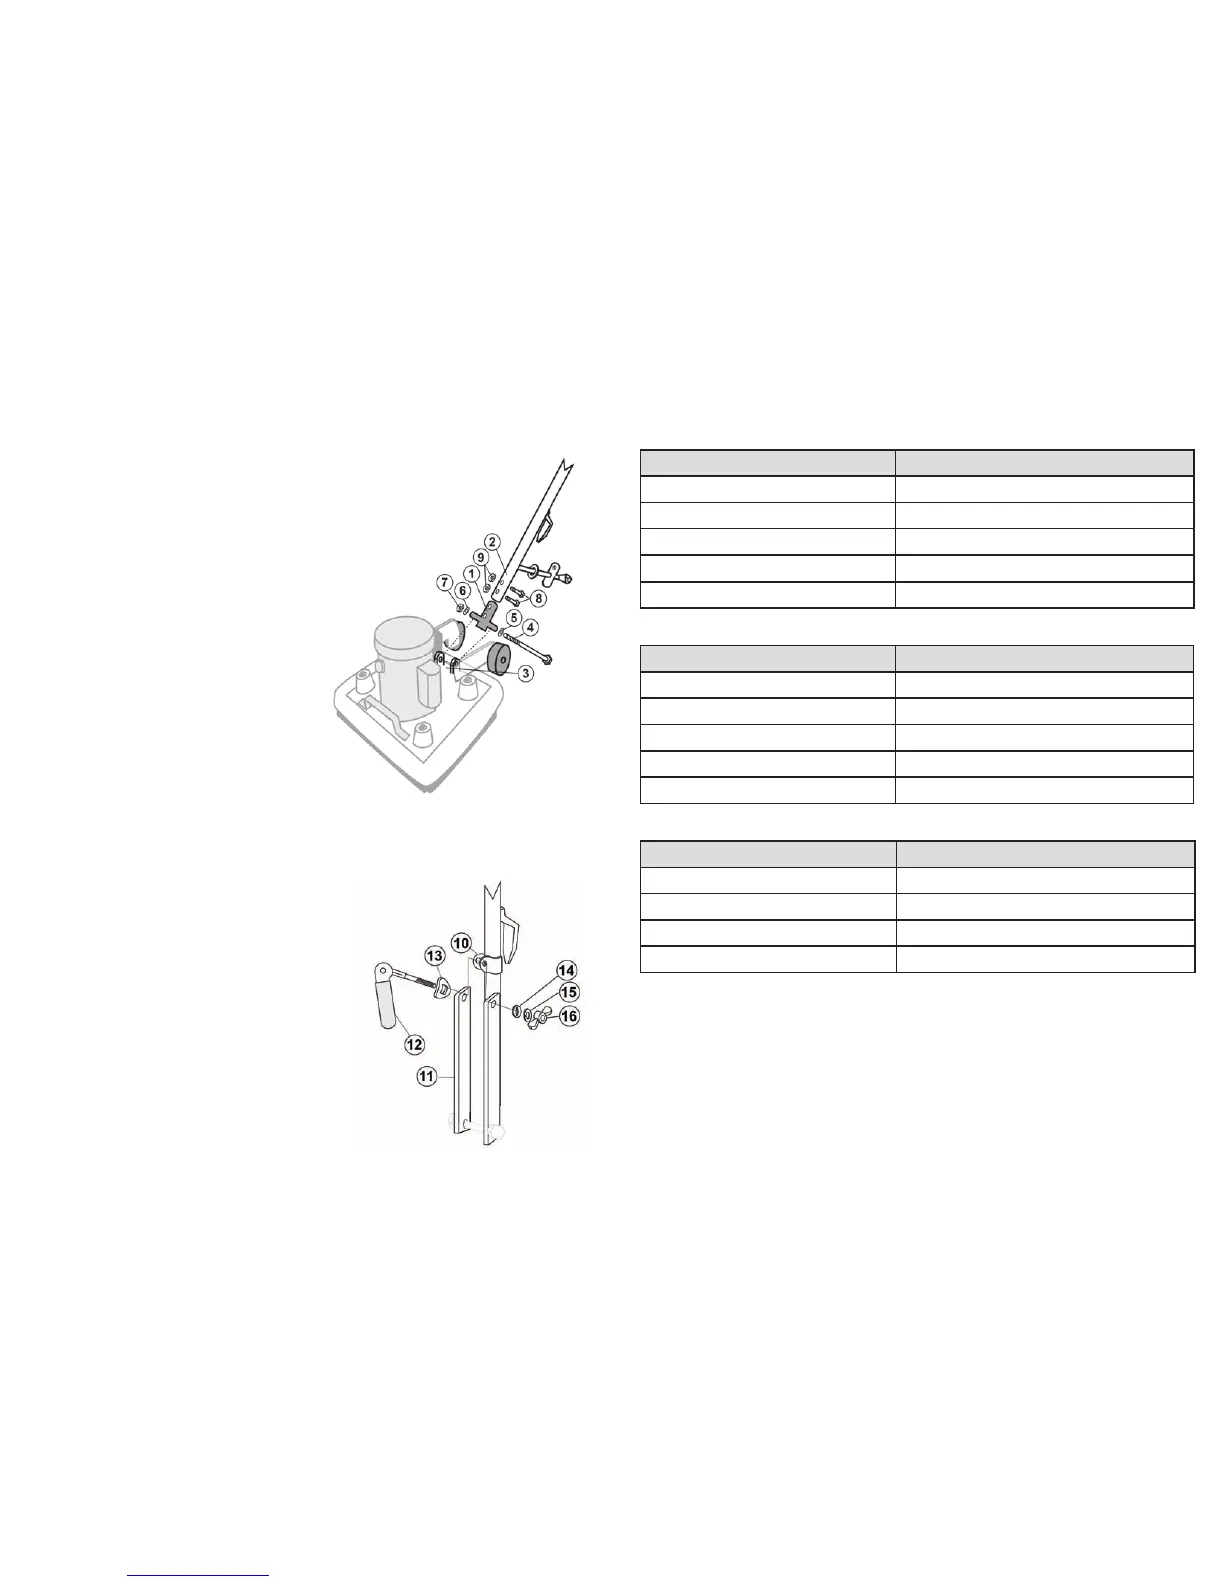
2.0 Machine Handle
Theoormachineisshippedfromthefactorywiththehandleattached.Noassembly
isrequired.Thefollowinginstructionsdetailhowtoreattachthehandleifthehandle
orpartsneedtobereplaced.Youwillneedtwo(2)7/16”wrenchestocompletethe
assembly.
1. Mount the handle to the chassis:
Slidetheyoke(1)intothehandletube
assembly(2).Alignthetwoverticalholes
ineachpart.Slideayokebolt(8)through
eachholeandsecureayokenut(9)onto
theendofeachbolt.Placetheconnected
yokeandhandletubassemblyintothe
bracketsonthemachinebase(3).Slide
anylonatwasher(5)ontotheyokepin
screw(4).Inserttheyokewithwasherinto
therstbrackethole,thenyokeandout
throughthesecondbrackethole.Slidea
secondnylonatwasher(6)ontotheend
oftheyokepinscrew(7)andtightena
yokenuttotheendoftheyokepinscrew.
2. Mount the support braces on the handle:
Tipthehandleup.Thehandlemounting
collar(10)isdesignedtoslidefreelyup
anddownthehandletube,allowingthe
handletobeadjustedforthecomfortable
operationofallusers.Lineupthemounting
collarwiththeupperholesinthetwo
straighthandlebraces(11).
3. Complete handle assembly:
• Place the curved spacer (13) with a
square hole onto the locking lever shaft
(12). The curve must face the lever.
• From behind the machine, insert the shaft
through the right handle brace (11), the
mounting collar (10) and the left handle
brace.
• Place a spacer (14) on the shaft.
• Place the split washer (12) on the shaft.
• Place the locking wing nut (15) on the
shaft.
• Adjust the wing nut for tightness. When
correctly installed, the collar slides easily
when the cam-engineered locking lever
is “up,” but is rmly xed when the lever
is “down.”
(4) Dry Scrub Floor Machine
Dry Scrub Floor Machine (13)
9.0 6-Quart Backpack Troubleshooting Guide
CAUTION: Always disconnect power cord before servicing vacuum.
WARNING: Repairs should only be performed by an authorized service center.
PROBLEM: Loss of vacuum
CAUSE SOLUTION
Cap is damaged Inspect and replace if needed
Faulty vacuum motor Call manufacturer or service center
Full paper bag lter Replace paper lter bag
Clogged hose or wand Remove obstruction
Loose or broken fan Call manufacturer or service center
PROBLEM: Motor is not running
CAUSE SOLUTION
Faulty on/off switch Call manufacturer or service center
Power cord defective Call manufacturer or service center
Loose connection or wiring Call manufacturer or service center
Motor defective Call manufacturer or service center
Blown fuse or tripped circuit breaker Replace fuse or reset circuit breaker
PROBLEM: Dust blowing from vacuum when running
CAUSE SOLUTION
Full paper bag Replace lter bag
Paper lter bag not installed properly Reinstall or replace paper lter bag properly
Cloth lter bag is dirty Clean cloth lter bag
Cloth or paper lter bag is torn Replace
 Loading...