6
P If you select a day of the week for which setting
have already been mode, all the timer numbers
that have been set are displayed. And the details
of the timer setting for the number which has “”
mark is displayed. You can modify the selected
setting by overwriting it.
P
In case you set ON timer and OFF timer operating
at the same time, OFF timer will be effective.
P If the same two time are set for ON timer on the
same day, the lower number shows preference.
�&8KGF8GG<A:4A7K<G<A:/88>?LG<@8E%B78
9G8EN Q<F7<FC?4L87N Q<F7<FC?4L87
1 (E8FFBE5HGGBA
By pressing or button, it is possible to choose the item to set.
“
” (selecting the next timer operation number
for the same day of the week)
“
” (selecting the next day of the week)
“
” (Timer mode ends)
2 (E8FF +,5HGGBA
In case “ ” is selected, “ ” is
displayed.
Repeat step 3 and onward of Weekly timer setting on page 5.
In case “
” is selected, “ ” is
displayed.
Repeat step 1 and onward of Weekly timer setting on page 5.
In case “
” is selected, timer mode is ended.
2 1
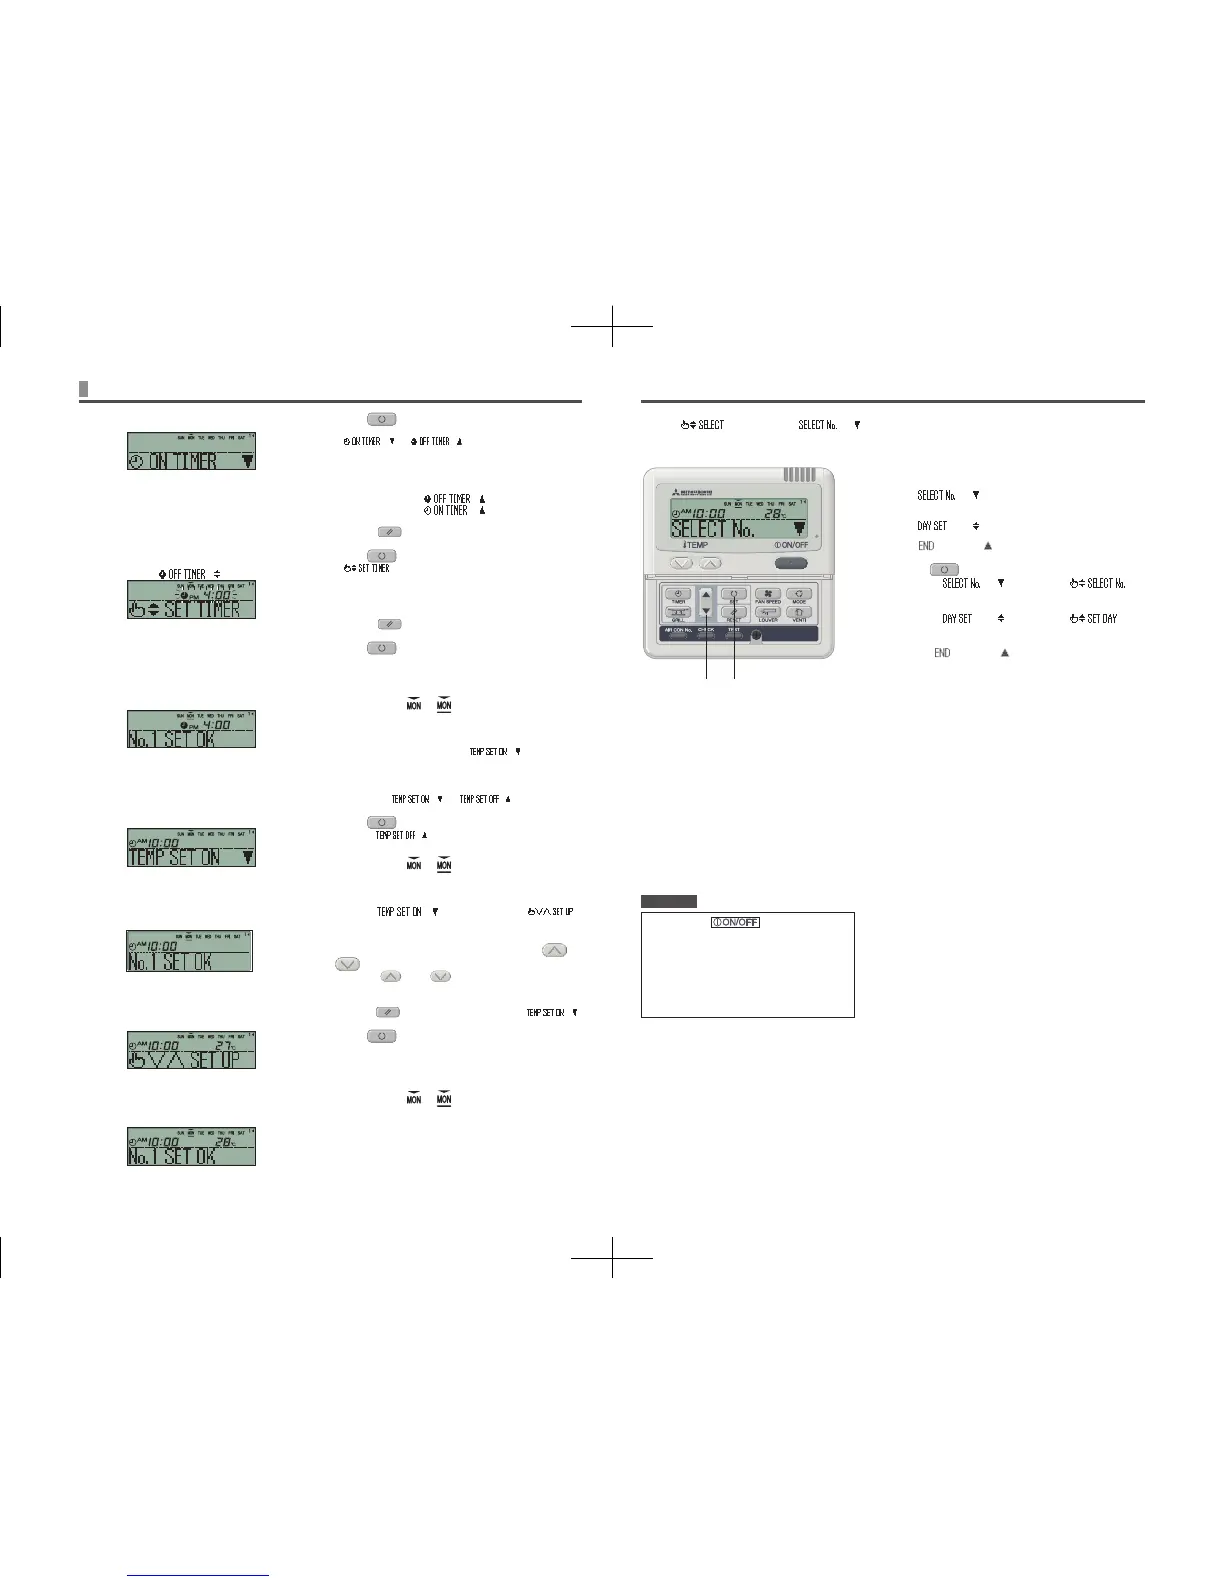
�<FC?4L49G8E/88>?LG<@8E%B78F+8GG<A:
P The day of the week set is underlined.
P The mark is displayed above the current day of the week.
P The display of all the timer operation numbers set for the
current day is turned on. The mark indicates the next
setting number to be activated, and the set time is displayed.
P The timer operations are executed in order, and the number
and time display is turned off when all the timer operations
for the current day is completed.
P If you press
button while timer
mode is operative, timer mode is canceled and
the display will return to the original display.
P If you do not press any button for several
minutes after entering the timer mode, the
timer mode ends and returns to the original
display.
,,&,!'&
HOW TO PERFORM THE TIMER OPERATION < WIRED REMOTE CONTROL >
5 (E8FF +,5HGGBA
mark next to a number is switched to light.
“
” or “ ” is displayed.
The settings so far are effective and the display buttons to the left
diagram.
6 (E8FFBE5HGGBA
(E8FF5HGGBA4A7N Q<F7<FC?4L87
(E8FF5HGGBA4A7N
Q<F7<FC?4L87
+8?86G8<G;8EB9G;845BI8GJB
Press the
RESET button to return to the step 3 display.
7 (E8FF +,5HGGBA
“ ” is displayed
8 (E8FFBE5HGGBA
+8GG;8G<@8
Press the
RESET button to return to the step 5 display.
9 (E8FF +,5HGGBA
Time display is switched to light, and is fixed.
!A64F8B9'G<@8EF8GG<A:F8GG<A:CEB68FF<F6B@C?8G87BA
G;<FFG8C
A “_” mark is lit (
�
) under the day of the week which
you set and the display appears as the left diagram.
Proceed to “�Next setting and Exiting Weekly timer Mode” on the
right page.
!A 64F8B9 '& G<@8EF8GG<A:N
Q <F 7<FC?4L87
CEB6887GBFG8C10
10
(E8FFBE5HGGBA
Select either “ ” or “ ”.
11
(E8FF +,5HGGBA
!A64F8N Q;4F588AF8?86G87'&G<@8EF8GG<A:
CEB68FF<F6B@C?8G87
A “_” mark is lit (
�
) under the day of the week which
you set and the display appears as the left diagram.
Proceed to “�Next setting and Exiting Weekly timer Mode” on the
right page.
!A 64F8N
Q ;4F 588A F8?86G87N Q
<F7<FC?4L87(EB6887GBFG8C
12
(E8FF G;8 G8@C8E4GHE8 F8GG<A: 5HGGBAF BE
Press the or the button to increase or decrease by
1°C.
+8GG;8G8@C8E4GHE8B9BC8E4G<BAFG4EG<A:
Press the reset button to return to the display “ ”.
13
(E8FF +,5HGGBA
'& G<@8E F8GG<A: J<G; FG4EGHC G8@C8E4GHE8 ;4F 588A
6B@C?8G87
,;8 G8@C8E4GHE87<FC?4L FJ<G6;8F9EB@ 9?4F;<A:GB ?<:;G<A:
FG45?L
A “_” mark is lit (
�
) under the day of the week which
you set and the display appears as the left diagram.
Proceed to “�Next setting and Exiting Weekly timer Mode” on the
right page.
<When “ ” is selected>
 Loading...