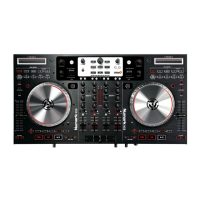
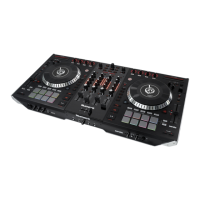
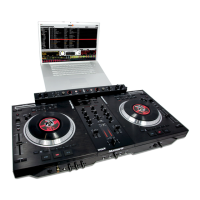
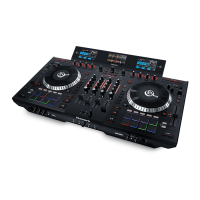
6
24. Bleep / Reverse: Reverses audio playback of the track on the corresponding deck. When the
switch is in the Reverse position, the playback of the track will be reversed. Returning the switch
to its center (deactivated) position will resume normal playback from wherever the Audio
Playhead stops. When the switch is in the Bleep position, the playback of the track will be
reversed. Returning the switch to its center (deactivated) position will resume normal playback
from where it would have been if you had never engaged the Bleep function (i.e., as if the track
had been playing forward the whole time).
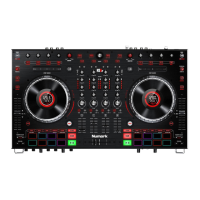
Cue Controls
25. Hot Cue Buttons (1–5): Assigns a Hot Cue Point or returns the track to that Hot Cue Point.
When a Hot Cue Button is unlit, you can assign a Hot Cue Point by pressing it at the desired
point in your track. Once it is assigned, the Hot Cue Button will light. To return to that Hot Cue
Point, simply press it.
Press and hold Shift and then press a Hot Cue Button to delete its assigned Hot Cue Point.
Tip: If the Deck is paused, holding a lit Hot Cue Button will start playback from that Hot Cue
Point. Releasing it will return the track to that Hot Cue Point and pause playback.
Pad Mode Controls
26. Pads: These pads have different functions on each Deck depending on the current Pad Mode.
These pads are the same pads used with Akai Professional MPCs
®
, so they are velocity-sensitive
(in certain modes only), durable, and easy to play.
27. Parameter < / > : Use these buttons for various functions in each Pad Mode. Press and hold
Shift and use these buttons to access secondary parameters.
28. Cues: This Pad Mode button switches the pads between two modes: Hot Cue Mode (red) and
Hot Cue Auto-Loop Mode (orange). When the button is unlit, the first press will always select Hot
Cue Mode. See the User Guide for more information.
29. Auto / Roll: This Pad Mode button puts the pads in two modes: Auto-Loop Mode (dark blue)
and Loop Roll Mode (light blue). When the button is unlit, the first press will always select Auto-
Loop Mode. See the User Guide for more information.
30. Loop: This Pad Mode button switches the pads between two banks in Manual Loop Mode.
When the button is unlit, the first press will always select the first bank. See the User Guide for
more information.
31. Sampler: This Pad Mode button switches the pads between two modes: Sample Player Mode
and Sample Velocity Trigger Mode). When the button is unlit, the first press will always select
Sample Player Mode. See the User Guide for more information.
32. Slicer: This Pad Mode button switches the pads between two modes: Slicer Mode and Slicer
Loop Mode. When the button is unlit, the first press will always select Slicer Mode. See the User
Guide for more information.
Important: Your track must have a set Beat Grid for Slicer Mode or Slicer Loop Mode to work.
Track Controls
33. Strip Search™: The length of this strip represents the length of the entire track. Place your
finger on a point along this sensor to jump to that point in the track. (If you want to scroll through
a track, we recommend using your computer rather than running your finger along the strip.)
34. Slip / Clear: When using the software’s Beat Grid, press and hold this button and move the
platter to “slip” (i.e., shift or slide) the entire Beat Grid to the left or right.
Press and hold Shift and then press this button to delete the entire Beat Grid.
Important: Your track must have a set Beat Grid for the Slip / Clear button to work.
35. Adjust / Set: Press and hold this button and move the platter to “warp” the entire Beat Grid.
Press and hold Shift and then press this button to set a Beat Marker at the Audio Playhead’s
current location.
Important: Your track must have a set Beat Grid for the Adjust feature to work. Also, using the
Adjust feature will change the track’s BPM.
 Loading...