2
EN
● Thank you for purchasing an Olympus digital camera. Before you start to use your new camera, please
read these instructions carefully to enjoy optimum performance and a longer service life. Keep this manual
in a safe place for future reference.
● We recommend that you take test shots to get accustomed to your camera before taking important
photographs.
● In the interest of continually improving our products, Olympus reserves the right to update or modify
information contained in this manual.
● The screen and camera illustrations shown in this manual were produced during the development stages
and may differ from the actual product. Unless otherwise specifi ed, the explanation about these illustrations
is provided for FE-3000/X-890.
The camera you purchased is provided with the CD-ROM Instruction Manual. For detailed information
on the features, please refer to the Instruction Manual. Adobe Reader is required to view the Instruction
Manual.
Preparing the Camera
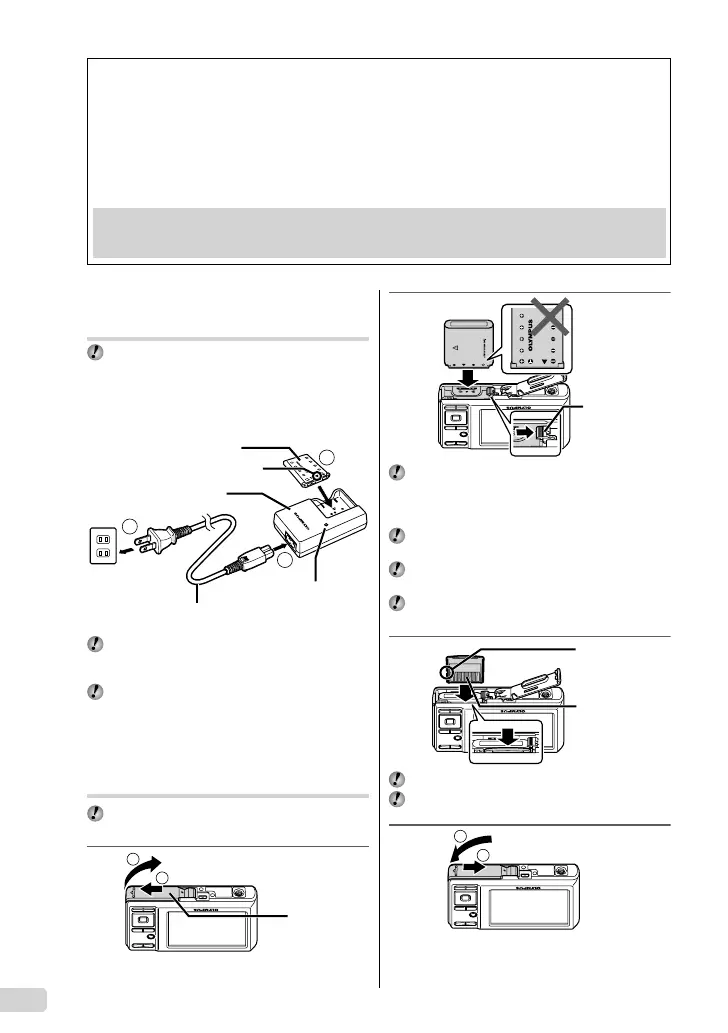
Charging the battery
The included battery charger (AC cable or plug-in
type) differs depending on the region where you
purchased the camera. If you received a plug-in type
battery charger, plug it directly into an AC outlet.
Example: AC cable type battery charger
1
2
3
AC outlet
AC cable
Lithium ion battery
Battery charger
Charging indicator
On: Charging
Off: Charged
▼
Battery comes partially charged. Before use, be sure
to charge the battery until the charging indicator goes
off (for approx. 2 hours).
If the charge indicator does not light or it blinks, the
battery may not be inserted correctly or the battery or
the charger may be broken.
Loading the battery and the
xD-Picture Card™ (sold separately)
into the camera
Do not insert anything other than an xD-Picture Card
or the microSD Attachment into the camera.
1
2
1
Battery/card
compartment
cover
2
Battery lock
knob
Insert the battery by putting in the ▼ marked side
fi rst, with the B marks toward the battery lock knob.
Damage to the battery exterior (scratches, etc.) may
produce heat or an explosion.
Insert the battery while sliding the battery lock knob
in the direction of the arrow.
Slide the battery lock knob in the direction of the
arrow to unlock, and then remove the battery.
Turn off the camera before opening the battery/card
compartment cover.
3
Notch
Contact area
Insert the card straight until it clicks into place.
Do not touch the contact area directly.
1
2
4
01Basicd4385-86en.indd201Basicd4385-86en.indd2 2008/12/0117:40:312008/12/0117:40:31
 Loading...