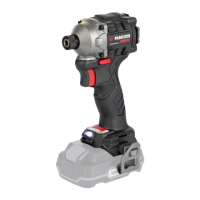
PDSSAP 20-Li A1
■ 50
│
GB
│
MT
Inserting/removing the battery pack
Inserting the battery pack
♦ Set the rotation direction switch to the middle
position (lock). Snap the battery pack into
the handle.
Removing the battery pack
♦ Press the release button and remove the
battery pack.
Checking the battery charge level
♦ Press the battery charge level button 3 to
check the charge level of the battery (see also
main diagram).
The status/remaining charge will be shown on
the battery display LED - as follows:
RED/ORANGE/GREEN = maximum charge
RED/ORANGE = medium charge
RED = low charge – charge the battery
Switching on/off
Switching on
♦ Press and hold the ON/OFF switch to start
the tool.
The LED work light lights up when the ON/
OFF switch is pressed lightly or fully.
This provides illumination of the work area in
poor lighting conditions.
Switching off
♦ Release the ON/OFF switch to switch off the
appliance.
Setting/preselecting the rotation
speed/tightening torque
♦ Press the torque preselection button to select
the required torque incrementally. The selected
torque is shown on the torque display.
♦ Pressing the ON/OFF switch lightly yields a
low speed. Increasing the pressure increases
the speed/tightening torque.
♦ The tightening torque depends on the selected
speed/torque preselection and impact duration.
NOTE
► When tightening wheel nuts, however, the
smallest torque setting must be selected to
avoid over-tightening.
► The integrated motor brake ensures rapid
stoppage.
ATTENTION!
♦ The tightening torque actually attained must
always be checked with a torque wrench!
Changing the direction of rotation
♦ Change the direction of rotation by pushing the
rotation direction switch to the right or left.
Inserting/replacing tools
♦ Pull the locking collar
1a
backwards. Insert a
suitable tool into the tool holder.
♦ Pull the locking collar
1a
backwards again to
remove the tool.
IB_329780_PDSSAP20-LiA1_LB5.indb 50 07.08.20 13:57
 Loading...