Model 14 Sound Level Meter User Manual
d) Wherever possible, always check the instrument calibration before and after each
measurement.
e) Whenever the instrument is not to be used for a long period of time (> one
month) then remove the battery completely. This action will prevent leakage
damage.
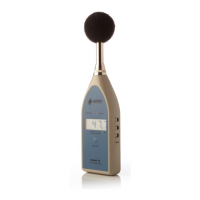
Display and Indicators
Display
The LCD display of the Model 14 is scaled in decibels, either 'A' or 'C' weighted,
depending on the position of the A/C slide switch.
There are indicators in the display as follows:-
Function Indicator Cause and Possible Action
Low Battery LOWBAT Battery capacity low, replace battery
Maximum Hold MAX HOLD The display is MAX, push MAX HOLD to reset
Indicator
There are also two status indications above the instrument display, these have the
following functions:
Function Indication Cause and Possible Action
Under Range Green Light The sound level is below the current
measurement range. Move the L/H slide to the L
position.
Overload Red Light The sound level is above the current
measurement range. Move the L/H slide switch
to the H position.
 Loading...