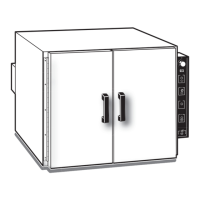
Position the unit in its ultimate operating location. Keep a minimum of 4"
of airspace around the unit and a minimum of 18" above the unit. The
portholes at the top of the unit will expel a small amount of warm air through
natural convection.
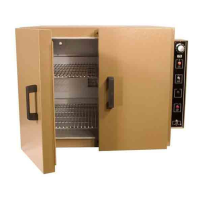
Shelf Installation
Install the adjustable shelf by placing the ends of the wire shelf bracket into
the corresponding holes located on the inner sides of the oven at the desired
height. Push the ends of the bracket into the holes until the first bends in the
bracket are against the wall, then rotate the bracket down. Place the shelf on
the brackets. (FIG 1)
Plug the unit into a grounded outlet for your unit's rated voltage.
Press or to
Increase / Decrease
PAGE 2
A B
C D
The unit is ready for your immediate use. All control parameters, calibration
and, tuning has been done at the factory, no adjustments are necessary.
Turn the power switch to the ON (UP) position. All LED's on the temperature
controller will light up and display the current chamber temperature. The OUT
and RUN indicators will also light up once the unit has been powered ON.
Read Operating InstructionsThoroughly Prior to Operation
Safety Precautions
Once the unit nears the desired temperature, allow the oven to cycle
for 20 minutes at the set-point before the temperature becomes fully
stable. Upon each initial powering-up, the control may typically overshoot
the set-point by 3 or 4 degrees especially if the temperature set is close to
the operating ambient temperature. After equilibrium is achieved the
control will hold the set temperature within 1 unit degree F.
Set-Up & Installation
General Operation
FIG. 1
300
OUT
RUN
Once the oven is powered ON, it will immediately begin to heat to the
factory preset temperature set-point. To change the set-point temperature
follow the quick sequence shown to the right in FIG 2.
FIG. 2
The temperature control is set at the factory to read 1/10th degree F or
Fahrenheit units.
See Menu Functions Guide for controller functions.
P
F
P
F
Press 3 times to
return to chamber
temperature
P
F
Press once to
see SP
RUN and OUT lights ON
indicates normal heating process.
The OUT light will flash intermittently
after achieving the set point.
Read Operating Instructions thoroughly prior to operation and observe the following safety precautions:
Use only a grounded outlet that is rated for your model's electrical requirement.
Do not modify the oven or factory control settings to operate the oven above the stated maximum operating
temperature.
Exterior surfaces on the AFE and AFE-LT Lab Oven models may become hot to the touch when operating at higher
set temperatures.
Do not leave the oven unattended during operation.
Do not place volatile or combustible materials inside the Lab Oven.
Do not use any flammable solvents or gases or materials that may contain flammable solvents or gases, or with
liquids, vapors or chemicals that produce toxic gases.
Do not use open liquids in the oven.
Conduct periodic maintenance as required.
WARNING
Warns of a possible electrical shock
IMPORTANT
Refers to an important note in the usage of the unit.
WARNING
Warns of a possible risk of fire
CAUTION
Cautions of HOT exterior surface during operation.
WARNING
Warns of possible injury or muscle strains, use assistance when moving or liftiing.
PPP
P
 Loading...