EasyManua.ls Logo

Roland G-70 User Manual

Roland G-70
260 pages
To Next Page IconTo Next Page
To Previous Page IconTo Previous Page
Page #181 background imageLoading...
Page #181 background image
Recording User Styles from scratch
G-70 Music Workstation
r
181
Press the second [BEAT] field (the denominator) and
enter the duration of each beat using the
[DATA÷ENTRY] dial or the [DEC]/[INC] buttons.
You can also set the tempo (20~250) here, or leave
that for later.
‰Continue with step (6) below.
Preparing your own settings
If none of the templates matches the settings you
need, press the [MY¥SETUP] field.
Here, you can prepare the STYLE COMPOSER for the
work at hand by selecting the desired sounds and
setting additional parameters.
Please proceed in the order given here until you have
a firm grasp of the flexibility:
(a) Press the [TRACK] field and use the [DATA÷ENTRY] dial or
the [DEC]/[INC] buttons to select the track whose settings
you want to change.
With the exception of the tempo, all other parameters only
apply to the selected track. There are 8 tracks: ADrum (the
drums), ABass (the bass) and Acc1~6 (melodic accompani-
ment parts).
(b) Press the [TRACK¥INSTRUMENT] field to jump to the TONE
SELECT page. (You can also press a TONE button to
assign the desired sound to the track.)
The [SRX¥EXPANSION] and [HARMONIC¥BAR] buttons are
not available for Music Style tracks. The ADrums track can
only use Drum Sets (so that only the [DRUMS] button of
the TONE pad is available).
(c) Play a few notes on the keyboard to audition the sound.
(d) If necessary, change the CONTROLS settings by pressing
their fields and using the [DATA÷ENTRY] dial or the [DEC]/
[INC] buttons.
The four fields refer to the following aspects:
These settings may come in handy to ensure that all ACC1
parts (for example) use the same amount of reverb and are
always located in the right half of the stereo image. You
can also change them later (see p. 189).
(e) Repeat steps (a)~(d) for the remaining tracks, modes and
patterns.
(f) Press the first [BEAT] field (the numerator) and enter the
desired number of beats using the [DATA÷ENTRY] dial or
the [DEC]/[INC] buttons.
(g) Press the second [BEAT] field (the denominator) and
enter the duration of each beat using the [DATA÷ENTRY]
dial or the [DEC]/[INC] buttons.
See “Time signature” above. You can also set the tempo
(20~250) here, or leave that for later.
(6) Press the [EXECUTE] field.
The display returns to the STYLE COMPOSER page,
which only contains the sound assignments you have
just made.
Getting ready for the first track
(7) On the STYLE COMPOSER page, press the DIVISION
field and use the [DATA÷ENTRY] dial to select the
Division you want to record (“Intro”, “Main”, “Fill”
or “Ending”).
(8) Press the RECORDER [REC¥∏] button.
The display changes to:
EXPRESS Temporary volume changes (CC11).
REVERB Reverb Send (CC91), i.e. how strongly the
selected track should be processed by the
reverb effect.
PANPOT The track’s stereo placement (L63~0~R63).
CHORUS Chorus Send (CC93), i.e. how strongly the
selected track should be processed by the cho-
rus effect.
8 possibilities
Can be set for
all 8 tracks
REC

Table of Contents

Other manuals for Roland G-70

Question and Answer IconNeed help?

Do you have a question about the Roland G-70 and is the answer not in the manual?
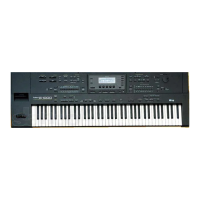
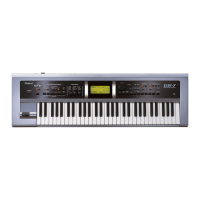
Roland G-70 Specifications

General IconGeneral
TypeArranger Workstation
Number of Keys76
Keyboard FeaturesVelocity-sensitive, Aftertouch
DisplayColor LCD
Polyphony128 voices
EffectsReverb, Chorus
Sequencer16-track
ConnectorsMIDI

Summary

IMPORTANT SAFETY INSTRUCTIONS

General Safety Precautions

Essential instructions for safe operation, preventing electric shock and fire hazards.

Panel Descriptions

Front Panel Controls Overview

Detailed guide to all controls, buttons, and sections on the G-70's front panel.

Rear Panel Connectivity

Explanation of all rear panel connectors, inputs, and outputs.

2. Setting Up and Demo Songs

Initial Connections and Power-On Procedure

Steps for connecting the G-70 and powering it on safely.

Interactive Demo Guide

How to access and use the G-70's built-in interactive demonstration function.

3. Quick Start

Understanding Core Functions and Arranger Playback

Overview of Keyboard, Arranger/Style, Recorder sections and basic Arranger operation.

4. About the Keyboard modes

Arranger, Piano, and Organ Modes

Explanation of the three primary keyboard modes and their unique functions.

5. Using the Performance Functions

Pitch Bend, Modulation, and Transposition

Using pitch bend, modulation lever, and transposition for expressive playing.

D Beam Controller Operation

Guide to using the D Beam controller for interactive performance effects.

Using Optional Footswitches

Assigning functions to optional FC7 pedals and foot switches.

9. Working with User Programs

Saving, Loading, and Managing User Programs

Procedures for saving, recalling, and organizing user settings and Set Lists.

10. Song and Style Makeup Tools

Mixing Parts and Editing Sounds

Adjusting instrument levels, effects, and editing sounds within songs and styles.

Vocal Harmonist and Effects Editing

Customizing Vocal Harmonist settings, effects, and voice processing parameters.

14. Using the 16-track Sequencer

Sequencer Overview, Recording, and Editing Tracks

Introduction to the 16-track sequencer, recording tracks, and detailed editing of events.

15. Programming Styles (Style Composer)

Creating and Editing Custom Styles

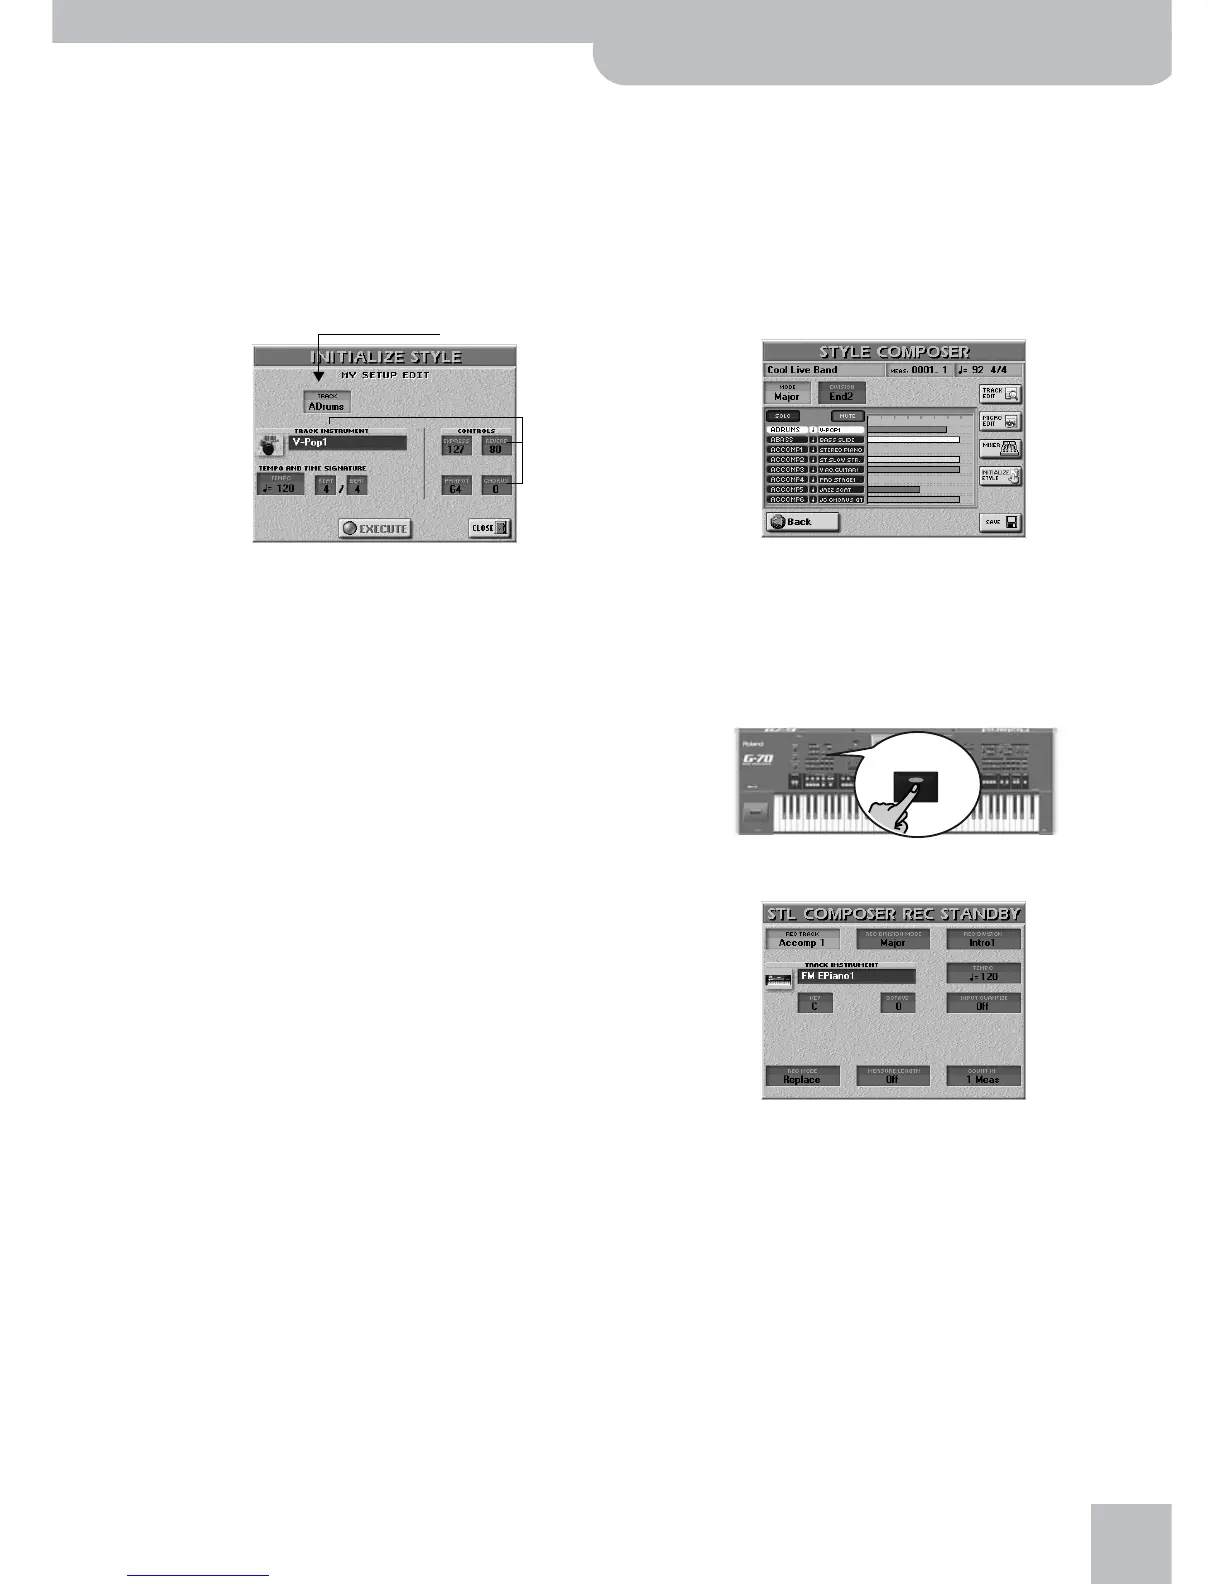
Step-by-step guide to creating new styles from scratch or editing existing ones.

16. Disk/Media Functions

Saving, Loading, Formatting, and Managing Files

Essential operations for managing data on internal memory, floppy disks, and memory cards.

18. MIDI

Accessing and Configuring MIDI Settings

Setting up MIDI connections, parameters, presets, and system functions.

19. Miscellaneous

System Settings and V-LINK Functionality

Adjusting system settings like touch screen beep, info display, and using V-LINK for visual integration.

20. Specifications

G-70 Technical Specifications

Detailed technical specifications of the G-70's hardware and capabilities.

21. Appendix

Expansion Board Installation and MIDI Chart

Guide to installing expansion boards and a reference MIDI implementation chart.

Related product manuals