EasyManua.ls Logo

Ryobi HPL52 User Manual

Ryobi HPL52
32 pages
To Next Page IconTo Next Page
To Previous Page IconTo Previous Page
Page #10 background imageLoading...
Page #10 background image
10 - English
REPLACING BLADES
See Figures 12 - 14, page 13.
The planer blades are reversible. When one edge becomes
dull, the blade can be reversed so that the other side can
be used.
Always replace or reverse blades in pairs. Do not attempt
to sharpen blades. If the blades in the planer show signs of
becoming dull, chipped, or damaged in any way, replace them.
When replacing the blades, use recommended replacement
blade only, RYOBI part number 039821001057.
WARNING:
Always wear heavy leather gloves and use caution when
loosening blade screws and handling and/or changing
blades. Blades are sharp and can cause serous personal
injury.
Unplug the planer.
Secure the planer in an upside-down position.
Loosen the three screws securing the blade on the blade
holder by turning counterclockwise with the provided
blade wrench.
NOTE: Do not over-loosen the screws. If screws are too
loose, alignment of the new blade will not be accurate.
NOTE: Before removing the old blades, take notice of
the direction of cut as well as how the tapered edge of
the old blades are oriented. The tapered edge of the new
blades must be in the same orientation as the original
blades, with the tapered edge on the same side as the
screw heads and the flat edge facing the cutter block.
Depress the spring-loaded blade guard.
Push the blade holder out of the cutter block assembly
using the tip of a screwdriver.
Remove the old blade from the blade holder by sliding
the blade out.
MAINTENANCE
NOTE: If blade cannot be easily pushed out of blade
holder after loosening blade securing screws, use a
block of wood to break the blade loose from the blade
holder with a short sharp blow. Then push the blade with
a screwdriver to remove. If necessary, tap the block of
wood sharply with a small hammer to break the blade
loose.
Clean any sawdust or wood chips from around the blade
area.
Slide the new blade into the slot of the blade holder.
Use a screwdriver to push the blade into the blade holder
until it is centered into position.
Depress the spring-loaded blade guard.
Insert the blade holder into the cutter block assembly.
Retighten the three blade securing screws using the blade
wrench.
Repeat the above procedure to change the other blade.
REPLACING THE BELT
See Figures 15 - 16, page 13.
When replacing the belt, use the recommended replacement
belt only, RYOBI part number 039821001042.
Unplug the planer.
Remove belt cover screws.
Remove the belt cover.
Force the old belt from the small pulley by turning in the
direction shown. As you turn the belt, pull and work it
off the small pulley until it has been completely removed
from both pulleys.
Install the new belt over the large pulley. As you turn the
belt, push and work it onto the small pulley until it is in
place.
Replace the belt cover.
Install belt cover screws and tighten securely.
NOTE: Do not overtighten the screws.
NOTE: ILLUSTRATIONS START ON PAGE 11
AFTER FRENCH AND SPANISH LANGUAGE SECTIONS.
ACCESSORIES
Look for these accessories where you purchased this product or call 1-800-525-2579.
Planer Blades ...................................................................................................................................................039821001057
Belt ...................................................................................................................................................................039821001042
Question and Answer IconNeed help?

Do you have a question about the Ryobi HPL52 and is the answer not in the manual?

Ryobi HPL52 Specifications

General IconGeneral
BrandRyobi
ModelHPL52
CategoryPlaner
LanguageEnglish

Summary

General Power Tool Safety Warnings

Work Area Safety

Keep the work area clean, well-lit, and free from flammable materials.

Electrical Safety

Protect against electric shock by using proper plugs and avoiding wet conditions.

Personal Safety

Stay alert, use PPE, and avoid distractions or fatigue while operating the tool.

Power Tool Use and Care

Operate tools correctly, maintain them, and ensure they are not used by untrained persons.

Planer Safety Warnings

Service Guidelines

Ensure proper servicing by qualified personnel using identical replacement parts.

Extension Cord Safety

Ensure extension cords are in good condition, properly sized, and used safely.

Symbols and Meanings

Signal Word Definitions

Explains signal words like DANGER, WARNING, CAUTION, and NOTICE.

Product Symbol Explanations

Defines symbols used on the product for safe operation and identification.

Electrical Information

Double Insulation

Explains the double insulation concept for electrical safety.

Electrical Connection Requirements

Details voltage, AC/DC, and frequency requirements for connecting the tool.

Extension Cord Usage

Provides guidance on selecting and using appropriate extension cords for power tools.

Features

Product Specifications

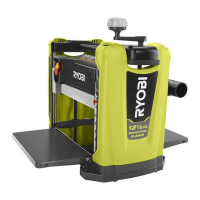
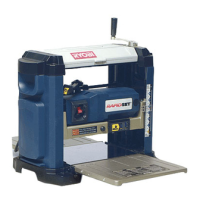
Lists technical specifications like planing depth, width, and speed.

Assembly

Assembly Warnings

Warns against using the product if not fully assembled or with missing parts.

California Proposition 65 Warning

Informs about chemicals in the product and dust exposure risks.

Operation

Applications

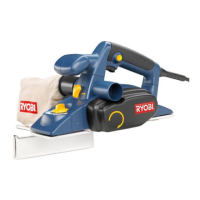
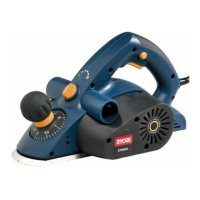
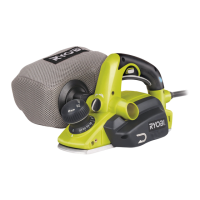
Lists the intended uses of the planer, such as planing edges and making rabbets.

Attaching the Dust Bag

Instructions on how to attach and empty the dust bag for debris collection.

Adjusting Exhaust Direction

How to change the exhaust port direction for dust and chip management.

Setting Planing Depth

Guide on adjusting the depth knob for desired cut depth.

Starting and Stopping

Procedures for safely starting and stopping the planer.

Planer Operation Basics

Guidelines for holding and moving the planer during operation.

Maintenance

General Maintenance

Tips for cleaning plastic parts and avoiding damaging chemicals.

Lubrication and Cord Safety

Information on tool lubrication and power cord replacement safety.

Cleaning Exhaust and Dust Bag

Steps to clean the exhaust port and empty the dust bag for optimal performance.

Accessories and Parts Replacement

Replacing Blades

Step-by-step instructions for safely replacing planer blades.

Replacing the Belt

Guide on how to replace the drive belt for the planer.

Customer Support and Service

Obtaining Service and Parts

Information on how to request service, purchase parts, and find service centers.

Warranty Information

Details on the product's limited warranty coverage and proof of purchase requirement.

Related product manuals