Chapter 2
Installing the Device
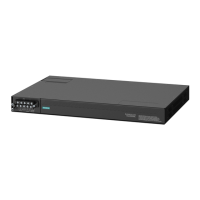
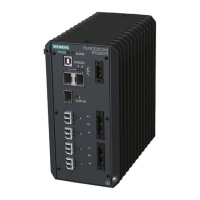
RUGGEDCOM RS910
Installation Guide
6 Required Tools and Materials
• Section2.6, “Cabling Recommendations”
Section2.1
Required Tools and Materials
The following tools and materials are required to install the RUGGEDCOM RS910:
Tools/Materials Purpose
AC power cord (16 AWG) For connecting power to the device.
CAT-5 Ethernet cables For connecting the device to the network.
Flathead screwdriver For mounting the device to a DIN rail.
Phillips screwdriver For mounting the device to a panel.
4 x #6-32 screws For mounting the device to a panel.
Section2.2
Mounting the Device
The RUGGEDCOM RS910 is designed for maximum mounting and display flexibility. It can be equipped with
adapters that allow it to be installed on a 35 mm (1.4 in) DIN rail or affixed to a panel.
NOTE
For detailed dimensions of the device with either DIN rail or panel hardware installed, refer to
Chapter5, Dimension Drawings .
CONTENTS
• Section2.2.1, “Mounting the Device on a DIN Rail”
• Section2.2.2, “Mounting the Device to a Panel”
Section2.2.1
Mounting the Device on a DIN Rail
For DIN rail installations, the RS910 can be equipped with a DIN rail bracket pre-installed on the back of the
chassis. The bracket allows the device to be slid onto a standard 35 mm (1.4 in) DIN rail.
To mount the device to a DIN rail, do the following:
1. Align the slot in the bracket with the DIN rail.
 Loading...