Très facilement en quatre temps votre machine
brode des boutonnières de n’importe quelle
taille.
• Vous n’avez pas besoin de tourner le tissu ni de
changer la position de l’aiguille.
• Faites toujours une boutonnière test sur un
échantillon de votre tissu.
• Assurez-vous que la canette contient
suffisamment de fil pour broder vos
boutonnières.
• Pour broder des boutonnières sur des pièces
tubulaires, utilisez le bras-libre de votre
machine.
• Marquez l’emplacement des boutonnières
comme indiqué sur votre patron.
Sélecteur de point: Boutonnière (A)
Largeur de point: Pré-sélectionnée
Pied presseur: boutonnière (L)
Plaque à aiguille: universelle (A)
• Relevez le pied presseur.
• Placez le tissu sous le pied presseur.
• Alignez les repères rouges du pied presseur
sur les lignes de traçage de la boutonnière (1).
• Tournez le sélecteur de longueur pour amener
le symbole (1) lèvre de la boutonnière face au
point (•).
• Descendez l’aiguille dans le tissu (2) en
tournant le volant à la main vers vous.
• Brodez la première lèvre (3).
• Relevez l’aiguille.
• Tournez le sélecteur de longueur pour amener
le symbole (2) face au point (•).
• Brodez le point d’arrêt (4) (quatre à six points).
Réglages recommandés
Étape 1
Étape 2
22 67
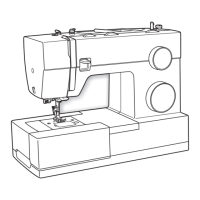
Threading the machine
1. Place spool on spool pin. Use the
correct spool pin holder to hold
spool firmly in place.
2. Lift the presser foot, and turn the
hand wheel towards your direction
until the take-up lever reaches its
highest position.
3. Lead thread passing it first through
the lower slot of the thread guide.
Next through the upper slot, leading
the thread to the right and around
(illustration 1).
4. Pass the thread through the second
thread guide, by inserting it from the
botton to the top (illustration 2).
5. Pass the thread around the tension,
so that it slips between the tension
disks (illustration 3).
6. With your right hand holding the
spool still pull the thread slightly up,
by raising the spring (illustration 4)
and allowing the thread to slide
inside the protector (illustration 5).
7. Pass the thread through the take-up
lever as shown in the illustration 6.
4
2
5
3
1
6
2
3
4
3
2
1
0
1
2
3
4
5
2
3
4
3
2
1
0
1
2
3
4
5
4
1
Boutonnière
4 temps
(seulement pour machines avec
5, 6, 8 et 10 points)
 Loading...