15Series 4144 Powerhead
6.1.3 Pressure Test
Carry out the same preparations as
for the vacuum test, b 6.1.2
– Always carry out the vacuum test,
before the pressure test, b 6.1.2
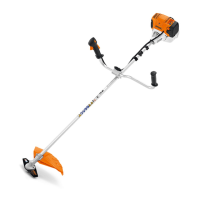
: Connect pressure hose (1) of
pump 0000 850 1300 to nipple
(arrow).
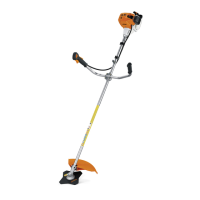
: Push ring (1) to the right.
: Operate the lever (2) until the
pressure gauge (arrow) indicates
a pressure of 0.5 bar. If this
pressure remains constant for at
least 20 seconds, the engine is
airtight.
– If the pressure drops below 0.5
bar within 20 seconds, the leak
must be located and the faulty
part replaced.
938RA020 TG
1
938RA022 TG
1
2
To find the leak, coat the suspect
area with oil and pressurize the
engine. Bubbles will appear if a leak
exists.
– After finishing the test, push the
ring to the left to vent the pump –
disconnect the hose.
– Remove the test flange.
– Install the carburetor
– see service manual for
"Series 4144 Components – FS,
FC, KM"
– Loosen the muffler and pull out
the sealing plate.
– Tighten down the muffler firmly.
– Reassemble all other parts in the
reverse sequence.
– Tightening torques, b 3.3
6.2 Oil seals
It is not necessary to disassemble
the engine to replace the oil seals.
Ignition side
– Remove the engine – see service
manual for "Series 4144
Components – FS, FC, KM"
– Remove the flywheel, b 7.5
– Free off the oil seal in its seat by
tapping it with a suitable tube or a
punch.
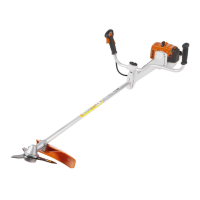
: Apply puller (1) 5910 890 4400
with No. 3.1 jaws 0000 893 3706.
– Clamp the puller arms.
– Pull out the oil seal.
Take care not to damage the
crankshaft stub.
– Clean the sealing face, b 9
– Lubricate sealing lips of new oil
seal with grease, b 9
938RA023 TG
1
 Loading...