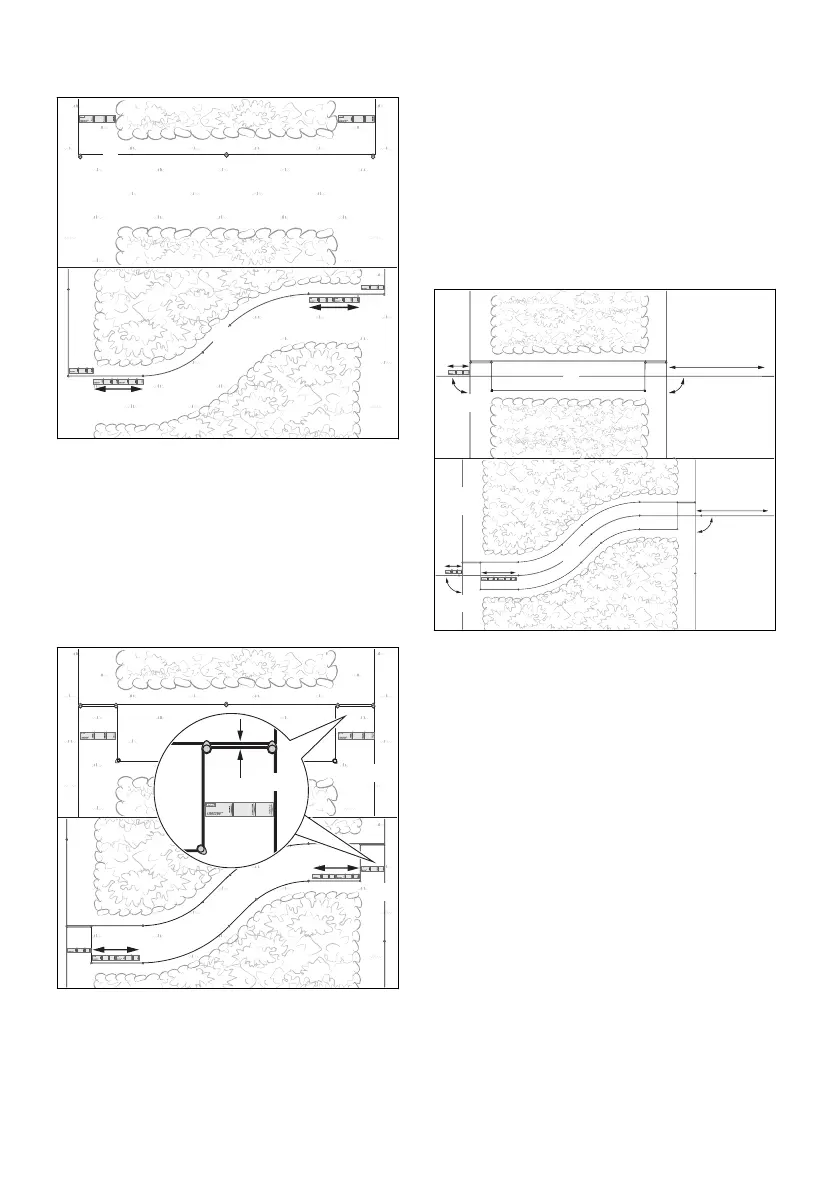
Installing a corridor
► Guide the perimeter wire (2), as illustrated,
from the main mowing area (A) to the mowing
area (B).
► If the corridor is to be installed in an arc: Route
the perimeter wire (2) for a length of a = 74 cm
(length: 2x iMOW® ruler) at the start and end
of the corridor and at a right angle (90°) to the
mowing area.
► Route the perimeter wire (2) clockwise around
the mowing area (B) and back to the corridor.
► Route the perimeter wire (2) parallel and
closely together for 37 cm (length: 1x iMOW
®
ruler) without the perimeter wires crossing
over each other.
► Route the perimeter wire (2) parallel at a dis‐
tance of at least 55 cm toward the main mow‐
ing area (A).
► Route the perimeter wire (2) parallel and
closely together for 37 cm (length: 1x iMOW
®
ruler) to the main mowing area (A) without the
perimeter wires crossing over each other.
► If the corridor is to be installed in an arc: Route
the perimeter wire (2) for a length of a = 74 cm
(length: 2x iMOW® ruler) at the start and end
of the corridor and at a right angle (90°) to the
mowing area.
► Complete the routing of the wire on the main
mowing area (A).
d
d
90°
90°
90°
90°
c
c
3
3
A
B
A
B
0000099969_001
► Route the guide wire (3) on the main mowing
area (A) for a length of at least c = 37 cm
(length: 1x iMOW
®
ruler) in a straight line and
at a right angle (90°) to the corridor.
► Route the guide wire in the center of the corri‐
dor.
► Route the guide wire (3) after the corridor for a
length of at least d = 2 m in a straight line and
at a right angle (90°) into the mowing area (B).
8.12 Inclines/slopes
The robot mower can navigate and mow inclines
up to 45%. With the Upgrade Kit 10, iMOW
®
traction wheels gradients of up to 60 % can be
driven and mowed. The Upgrade Kit 10 is availa‐
ble as a special accessory.
English 8 Installing the Perimeter Wire
28 0458-012-0101-A
 Loading...