39
Checking the Hydraulic Lines
Before each use, check the hydraulic lines and hoses for
leaks, loose fittings, kinked lines, loose mounting
supports, wear, weather and chemical deterioration. Make
necessary repairs before operating.
Note: Keep areas around hydraulic system clean from
debris build up.
Hydraulic fluid escaping under pressure can
penetrate skin and cause injury.
• If hydraulic fluid is injected into the skin it
must be surgically removed within a few hours
by a doctor familiar with this type of injury.
Gangrene may result if this is not done.
• Keep body and hands away from pin hole leaks
or nozzles that eject high pressure hydraulic
fluid.
• Use cardboard or paper to find hydraulic leaks.
• Safely relieve all pressure in the hydraulic
system before performing any work on the
hydraulic system.
• Make sure all hydraulic fluid hoses and lines
are in good condition and all hydraulic
connections and fittings are tight before
applying pressure to hydraulic system.
Warning
Re–setting Ground Following
System
If the True Core ground following system requires service
of any kind (with exception of turf guard replacement) or
if the tine holders are contacting the turf guards when set
in the deepest setting, the depth adjustment tie rod may
need to be re–set.
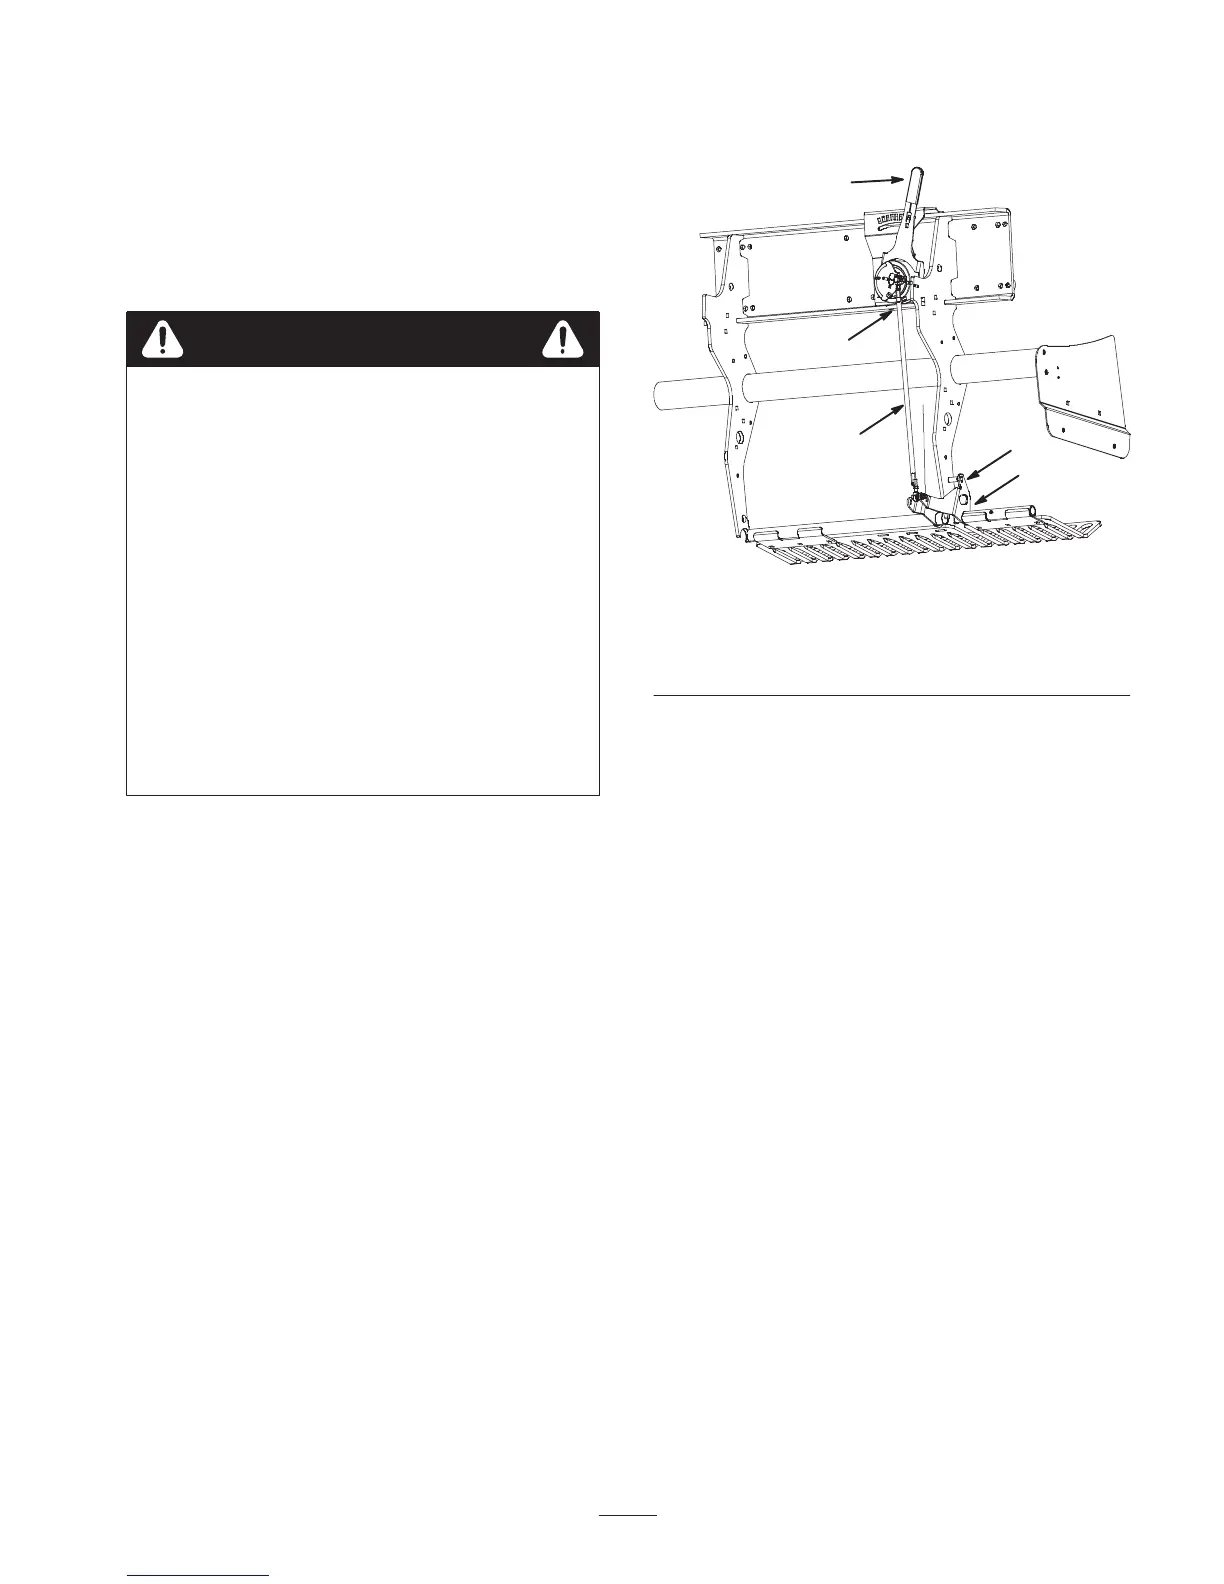
1. Rotate the LH turf guard mounting bracket (Fig. 54)
up until a locking pin (5/16 drill rod or capscrew) can
be inserted between the bracket and the depth setting
tube welded to the frame.
2. Move the ground following lever (Fig. 54) to the “H”
setting (deepest).
3. Disconnect the out–board ball switch (Fig. 54) from
the wire harness (Head–Low switch).
4. Loosen the jam nuts (LH & RH) on the depth
adjustment tie rod (Fig. 54) .
5. Use a multi–meter to determine electrical closure of
the ball switch.
6. Rotate the tie rod until the ball switch just closes or
makes contact.
2
5
3
4
1
Figure 54
1. Turf guard mounting
bracket
2. Ground following lever
3. Out board ball switch
4. Depth adjustment tie rod
5. Locking pin
7. Secure the LH & RH jam nuts on the tie rod.
8. Re–connect the ball switch to the wire harness.
9. Remove the“pin” from the turf guard bracket and
depth setting tube.
Inspecting Belts
The drive belts on the ProCore 648 have been designed to
be very durable. However, the normal exposure to UV
radiation, ozone or incidental exposure to chemicals can
deteriorate the rubber compounding over time and lead to
premature wear or material loss (i.e. chunking).
Annual belt inspection is highly recommended for signs of
wear, excessive cushion cracks, or large embedded debris
with replacement when needed.
A complete belt service kit is available from your
Authorized Toro Distributor.
Side Shield Adjustment
The coring head side shields should be adjusted so the
bottom rides between 1 to 1.5 inches from the turf while
aerating.
1. Loosen the bolts and nuts securing the side shield to
frame (Fig. 55).
2. Adjust shield up or down and tighten nuts.
 Loading...