The default volume of your parent unit is level 4.
If you experience high-pitched screeching noise
from your baby monitor while posit ioning:
Make sure your baby units and parent unit are
more than 1 meter (3 feet) apart, OR
Turn down the volume of your parent unit.
•
•
1.
2.
3.
•
-
-
Operating range
The operating range of the baby monitor is
up to 300 meters (1,000 feet) outdoors or
50 meters (160 feet) indoors. The actual
operating range may vary depending on
the environmental conditions and other
interferences such as walls, doors and other
obstructions.
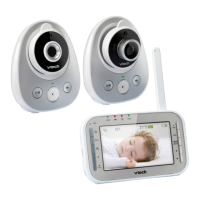
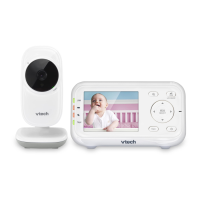
Overview
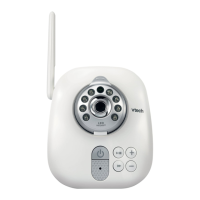
Baby unit overviewoverview
1
Infrared LEDs
2
Light sensor
3
Camera
4
ON/OFF light
On when the baby unit is turned on
and is paired to the parent unit.
Flashes when the baby unit is not
being viewed; or when the link to the
parent unit is lost.
•
•
5
/
VOL
/
Press to adjust the baby unit
speaker volume. It determines the
lullaby volume and talkback volume
transmitted from the parent unit.
•
6
Play/Stop
Press to play or stop lullaby on the
baby unit.
•
7
Microphone
8
Skip
Press to play the next lullaby.•
9
ON/OFF switch
Slide to turn on or off the baby unit.•
10
Speaker
11
Temperature sensor
12
PAIR
Your baby units and parent unit
provided are already paired.
Press and hold on accessory baby
units (VM306, purchased separately)
to pair to the parent unit.
•
•
13 Threaded socket
For wall mount installation use.•
14
Power jack
Parent unit overview
1
Antenna
2
LED lights
Indicate the dif ferent statuses of
the parent unit. For details, refer to
Parent unit lights.
•
3
Microphone
4
On/off
Press and hold to power on.
Press and hold again to power off.
•
•
5
TALK
Press and hold to talk to the selected
baby unit in SINGLE-CAM or
PATROL mode.
•
6
Zoom
Press to zoom in or out while viewing
image in SINGLE-CAM or PATROL
mode.
•
7
While in a menu, press to choose an
item.
While viewing zoomed image,
press and hold to move the zoomed
image rightward.
While in SPLIT-VIEW mode, press to
move the selection box rightward.
•
•
•
8
BACK
While in a menu, press to return to
the main menu or idle screen.
While viewing zoomed image,
press and hold to move the zoomed
image leftward.
While in SPLIT-VIEW mode, press to
move the selection box leftward.
•
•
•
9 VIEW / LCD ON/OFF
Press and hold to turn off the parent
unit screen.
Press to view the image of the
next baby unit in SINGLE-CAM or
PATROL mode.
PATROL
Press to turn on or off the PATROL
mode.
SPLIT
Press to turn on or off the
SPLIT-VIEW mode.
•
•
•
•
10
+/VOL
Press to increase the parent unit
speaker volume.
•
11
-/VOL
Press to decrease the parent unit
speaker volume.
•
12
MENU/SELECT
Press to enter the menu.
While in a menu, press to choose an
item, or save a setting.
•
•
13
While in a menu, press to scroll up.
While viewing zoomed image,
press and hold to move the zoomed
image upward.
While in SPLIT-VIEW mode, press to
move the selection box upward.
•
•
•
14
While in a menu, press to scroll down.
While viewing zoomed image,
press and hold to move the zoomed
image downward.
While in SPLIT-VIEW mode, press to
move the selection box downward.
•
•
•
15
Stand
16
Speaker
17
Power jack
Parent unit lights
LINK
On when the parent unit is linked to
the baby unit.
Flashes when the link to the baby
unit being viewed in SINGLE-CAM
or PATROL mode is lost; or when
the link to all baby units being
viewed in SPLIT-VIEW mode is lost.
On when the parent unit is
connected to AC power, or the
battery is charging.
Flashes when the parent unit
battery is low and needs charging.
Off when the parent unit is
disconnected from AC power.
TALK
On when the parent unit is talking to
the baby unit.
On when the parent unit speaker
volume is turned off.
Parent unit display icons
Connection status
displays when strong signal
strength is detected between the
baby unit and the parent unit.
or displays when moderate
or low signal strength is detected
between the baby unit and the
parent unit.
displays when the link between
the baby unit and the parent unit
is lost.
•
•
•
Lullaby
Displays when the baby unit being
viewed is playing lullaby.
•
or
or
or
Current view status
Displays the number of the baby
unit that is being viewed when in
SINGLE-CAM and PATROL mode.
Displays the number of the
highlighted baby unit when in
SPLIT-VIEW mode.
•
•
Patrol mode
Displays when the parent unit is in
PATROL mode.
•
Split-view mode
Displays when the parent unit is in
SPLIT-VIEW mode.
•
Night vision
Displays when the baby unit being
viewed has activated the night
vision feature.
•
Zoom
Displays when the baby unit
camera has zoomed in.
•
Temperature alert tone
Displays when the temperature
alert tone is set on.
•
o
F or
o
C
Real-time temperature
Displays the real-time temperature
detected by the baby unit in
Fahrenheit (
o
F) or Celcius (
o
C)
(e.g. 57
o
F or 14
o
C).
•
Mute alert
Displays when the parent unit
speaker volume is set to off.
Displays when SPLIT-VIEW mode
is turned on.
•
•
9-level sound indicator
(1 to 3 bars) indicates low
sound level detected by the baby
unit.
(4 to 6 bars) indicates
moderate sound level detected by
the baby unit.
(7 to 9 bars) indicates high
sound level detected by the baby
unit (e.g. baby crying loudly).
•
•
•
Speaker volume
Displays the parent unit speaker
volume level while adjusting.
•
Battery status
animates
when the batter y is charging.
displays solid when the battery
is fully charged.
displays when the battery is
low and needs charging.
•
•
•
AC power without battery
Displays when the parent unit is
connected to AC power without
the battery.
•
Parent unit main menu icons
Language
You can select a language (English,
French or Spanish) to be used in all
screen displays.
Alert Tone
You can set the parent unit to beep
when
the parent unit operates in low
battery condition;
the link between the parent unit
and the baby unit is lost; or
the baby unit detects sounds
while in SPLIT-VIEW mode.
•
•
•
Sensitivity
With this feature, you can choose
to hear sounds from the baby unit
all the time, or to hear sounds that
exceed a certain level. You can
use the parent unit to adjust the
microphone sensitivity of your baby
unit. The higher the sensitivit y level,
the more sensitive the baby unit is
in detecting sounds for transmitting
to the parent unit.
Temperature
You can turn on the Temperature
alert tone so that the parent
unit beeps whenever the room
temperature detected by the baby
unit falls outside of the desired
temperature range.
Vibration
You can turn on the vibration alert
so that the parent unit vibrates when
it receives Low battery tone, No
link alert, Sound alert in split-view
or Temperature alert tone after
turning on the respective alert tones.
Sound-activated Screen
Automatically turns on the
parent unit screen when a baby
unit detects a sound after the
screen is turned off. When no
sound is detected, the screen is
automatically off to save power.
LCD
You can change the brightness of
the parent unit screen, or turn on
the Dim Mode to save power.
Rename
You can choose a specific name
for the baby unit from a pre-defined
name list.
Pair/Unpair
The baby unit and parent unit
provided are already paired. You
can add or replace baby units
(VM306, purchased separately) to
your baby monitor system.
Parent unit display messages
No link to
CAM # *
The selected baby unit is
out of range or is turned
off.
Battery low at
Parent Unit
The battery level of the
parent unit is very low and
needs to be recharged.
Battery empty.
Powering off ...
The battery is empty and
needs to be recharged.
Sound
detecte d at CAM #
The sound level exceeds
the threshold at CAM # in
SPLIT-VIEW mode.
Temperature
too high at CAM #
or
Temperature
too low at CAM #
The temperature
detected by the baby unit
is higher/lower than the
desired temperature alert
range.
Powering on...
The parent unit is turning
on.
The parent unit is
searching for baby units.
* # represents the selected baby unit number.
Using the baby monitor
Power on or off the baby unit
Slide the ON/OFF switch on the baby units
to ON to power on. The ON/OFF LED light
turns on.
Slide the ON/OFF switch on the baby units
to OFF to power off. The ON/OFF LED light
turns off.
Power on or off the parent unit
Press and hold to power on the parent
unit. The screen turns on.
Press and hold again to power off the
parent unit. The screen turns off.
Turn on or off the parent unit
screen
You can turn on or off the parent unit screen
without powering off the parent unit. You can
still hear sound from the baby units.
Press and hold LCD ON/OFF on the top of
the parent unit to turn off the screen.
Press any key on the parent unit to turn on
the screen again.
•
•
•
•
•
•
Adjust the speaker volume
For parent unit:
Press +
/
VOL
/
- on the parent unit at any
time when viewing images.
While the screen is dimmed, any keypress or
alert message will trig ger the screen to return to
the preset brightness level. Af ter 10 minutes of
idle, it will be dimmed again.
1.
2.
3.
4.
1.
2.
3.
4.
•
Adjust the sound sensitivity of
the baby units
You can choose to hear sounds from the
baby units all the time, or to hear sounds
that exceed a certain level. You can use the
parent unit to adjust the microphone sensitivity
of your baby units from Lowest to Highest.
The higher the sensitivity level, the more
sensitive the baby unit is in detecting sounds
for transmitting to the parent unit. The sound
sensitivity level is preset to Highest.
Sound sensitivity table for reference
Sensitivity
Level
Description
Highest
The parent unit speaker is constantly
on, and you will hear all sounds
(including background noises) from
your baby’s room.
High
The parent unit speaker turns on for
soft babbling and louder sounds from
your baby. It remains quiet when your
baby sleeps soundly.
Medium
The parent unit speaker turns on
for loud babbling and louder sounds
from your baby. It remains quiet when
your baby makes soft sounds.
Low
The parent unit speaker turns on for
crying and louder sounds from your
baby. It remains quiet when your
baby makes soft sounds.
Lowest
The parent unit speaker turns on for
loud crying or screeching sounds
from your baby. It remains quiet when
your baby makes soft sounds.
Press MENU when the parent unit is idle.
Press or to choose Sensitivity, then
press SELECT.
If you have more than one baby unit,
the system prompts you to choose the
desired baby unit or all baby units, press
or to choose ALL CAM or CAM #,
then press SELECT.
Press or to choose the desired
sensitivity level, then press SELECT to
confirm your selection.