4
plug into an outlet.
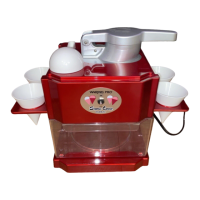
5. To begin shaving ice, drop approximately 8-12 ice cubes
(depending on size and shape) into the ice chute. Do not
overll or an interlock safety feature will prevent the shaving
mechanism from turning on. DO NOT ATTEMPT TO PUSH
ICE CUBES INTO BLADE USING HANDS OR OTHER
INSTURMENTS.
6. Flip the toggle switch to the On position and rmly push the
ice press down to start the ice shaving mechanism.
NOTE: if a large ice cube should become lodged in the unit,
so that the blades cannot reach it, ip the toggle switch
to the Off position and unplug from outlet. Empty freshly
shaved snow from the snow bin, place snow bin back on
the main housing, then pour warm water down the ice chute
until lodged ice cube is melted or falls free. Empty the water
from the snow bin, and dry thoroughly before placing back
on the main housing. Resume feeding ice cubes through the
ice chute.
7. When all the ice has been shaved, turn the unit to the Off
position and unplug.
8. Remove the snow bin from the main housing and use the ice
scooper to shape your snow cones.
9. Add ingredients specied in the recipe section or as desired.
HELPFUL HINTS
• Whenshavingmultiplebatchesoficecubes,itisimportant
to atten the snow in the snow bin. You will notice a mound
of snow is formed directly under the ice crushing mechanism,
and if not attened this could stop the shaving mechanism
from operating properly. To atten, simply remove the snow
bin and either empty freshly shaved snow into another
container or atten within the snow bin using the ice scooper.
• Itisimportanttoshaveicecubesfreshfromthefreezer.
Partially melted ice cubes could keep the shaving mechanism
from operating properly. If an ice cube should become lodged
because of this, please see the NOTE above to release.
• Ifneeded,additionalpaperconesaresoldbyonlinekitchen
and paper suppliers.
 Loading...