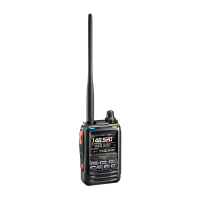
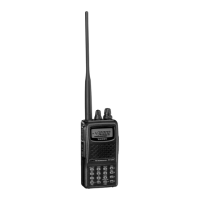
FT2DR/DE
Quick Guide
C4FM/FM
1 Antenna(SMA)
2 TX/BUSYLED
3 Touchpaneldisplay
4 [PTT]switch
5 [MONI/T-CALL]switch
6 [SQL]switch
7 Powerswitch
8 [DISP]key
9 [BACK]key
10 [X]key
11 [GM]key
12 Batterypack
13 GPSantenna
14 DIAL
15 VOL
16 microSDcardslot
17 DATAterminal
18 MIC/SPterminal
19 [BAND]key
20 EXTDCINterminal
21 [V/M]key
22 [A/B]key
Input /
Edit the Call Sign
Input the Call Sign
When the power is turned
on for the first time after
purchase, or when ALL
RESET is executed, a
screen to input the call sign
is displayed.
Press the key to
display the alphabet input
screen. Use the keypad
entry screen to input the
Call Sign ID.
Touch [123] to switch to
the numeric input screen.
Touch [ABC] in the numeric
input screen to return to
the alphabet input screen.
Press
to complete the
Call Sign entry.
Changing the Call Sign
The Call Sign ID can be
changed using the set
mode. Press the
key
for one second or longer
to display the “SETUP
MENU” and then touch
[CALLSIGN].
Alphabet input screen is
displayed.
Input the call sign using the
alphabet input screen and
the numeric input screen
and then press
.
EH060M551
Return to the Current Operating Screen
To exit set mode and return to the current operation mode,
either press
on the left side of the transceiver, or briefly
press the key repeatedly.
Reset the Settings
Reset All
Press the
key for one second or longer while pressing the
key,
key and key to turn the power ON.
Touch [OK] when “ALL RESET?” appears on the display.
Reset the Settings of the Set Mode
Press the
key for one second or longer while pressing
the key and key to turn the power ON. Touch
[OK] when “SET MODE RESET?” appears on the display.
Select the Operating Band
The operating band is switched each time the
key is pressed. Also, in dual band operations, touching
the frequency display area of the non-operating band
(displayed in grey), will change it to the operating band.
The frequency band displayed in black is the operating
band.
Each time the key is pressed for one second or
longer, the screen will switch between dual band display
and mono band display.
Adjusting the Volume
Turn the VOL knob to the left or right to adjust the volume
up or down.
Selecting the Frequency Band
Select the frequency band by pressing the key.
Touch [FMW] before pressing the key to switch the
frequency band in the reverse order.
Press the [BAND] key to switch the receive frequency
operating bands in the order shown in the below table.
Touch [FMW] before pressing the [BAND] key, to switch
the bands in the reverse order.
The receive frequency bands for Band A and B are as
shown in the following table.
Frequency Band (Band)
Band A
Band B
522 kHz
to
1710 kHz (AM radio band)
●
—
76 (88) MHz
to
108 MHz
(FM radio band)
●
—
1.8 MHz
to
30 MHz
(shortwave band)
●
—
30 MHz to 76 (88) MHz
(50 MHz band)
●
—
108 MHz
to
137 MHz
(aeronautical radio band)
● ●
137 MHz to 174 MHz
(144 MHz band)
● ●
174 MHz
to
222 MHz
● ●
222 MHz
to
420 MHz
(information radio band (1))
● ●
420 MHz to 470 MHz
(430 MHz band)
● ●
470 MHz
to
774 (800) MHz
*Band B is up to 580 MHz
● ●
803 (800) MHz
to
999 MHz
(information radio band (2))
●
—
( ):EXP/European Version
Setting the Frequency
Press the key to switch to the VFO mode and then turn
the DIAL. Or touch the frequency display area to show the
keypad entry screen and enter the frequency manually.
Selecting the Communication Mode
Use the radio in the AMS mode ( / / ) for normal
operations. The communications mode is automatically
selected to match the mode of the received signals. Touch
[MODE] to switch the communication mode.
“AMS” → “DN (V/D mode)” → “VW (FR mode)” → “FM
(Analog)”
DN: Digital voice and data will be sent simultaneously
with automatic error correction, for reliable
communications.
VW: Digital voice data is transmitted using the entire 12.5
kHz bandwidth. High quality voice communication is
possible.
FM: Analog communication using the FM mode.
Changing the Transmit Power
Touch [FMW] and [TXPWR] and then turn the DIAL to
select the transmit output level.
“HIGH” → “LOW1” → “LOW2” → “LOW3”
(When a lithium-ion battery pack, or an external power
supply is connected)
Press
after selecting the transmit output power.
Locking the Keys and Switches
Press (power switch) to lock the key buttons. Press
(power switch) again to release the lock.
1
2
3
4
5
6
7
8
9
10
11
12
14
15
16
17
18
19
20
21
22