This document describes the YouRne Electric Aluminum Hitch-Mounted Bike Carrier, Item# 10104098, a device designed for transporting bicycles.
Function Description:
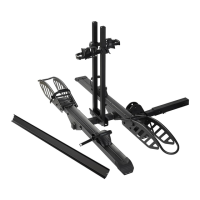
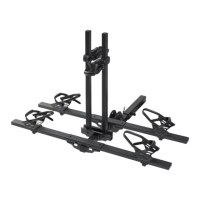
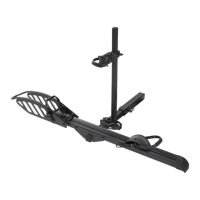
The YouRne Electric Aluminum Hitch-Mounted Bike Carrier is a robust and versatile system for securely transporting up to two bicycles on the rear of a vehicle. It attaches to a 2" hitch receiver and features a folding design for convenience when not in use. The carrier utilizes wheel cradles and straps to hold the bicycle wheels, and a U-shaped tube with adjustable blocks and straps to secure the bicycle frame, ensuring stability during transport. The design allows for adjustment to accommodate different bicycle wheelbases and frame designs.
Important Technical Specifications:
- Length: 51.5"
- Width: 37.2"
- Height: 38.6"
- Maximum Weight Capacity: 200 LBS*
The carrier is assembled using various bolts, nuts, washers, and tubes. Key components include:
- Folding Connector (Part #1)
- Supporting Tube (Part #2)
- Crossbeam (Part #5)
- U-Shaped Tube (Part #8)
- M16x80 Hexagon Bolt (Part #3) and M16 Lock Nut (Part #4) for connecting the supporting tube and folding connector.
- M8x20 Carriage Bolt (pre-installed, Part #5-1), Φ8 Flat Washer (Part #6), and M8 Lock Nut (Part #7) for attaching crossbeams.
- M8x40 Hexagon Bolt (Part #9), Φ8 Nylon Washer (Part #14), and M8 Lock Nut (Part #7) for connecting the U-shaped tube to the supporting tube.
- M16 Shockproof Bolt (Part #10), Φ16 Spring Washer (Part #11), Φ16 Flat Washer (Part #12), and Φ 3.8 Pin (Part #13) for attaching the carrier to the vehicle's hitch receiver.
- Blocks (Part #15) for securing the bicycle frame.
Usage Features:
The bike carrier is designed for ease of assembly and use, with clear instructions provided for each step.
Assembly Process:
- Connecting Supporting Tube and Folding Connector: Align the holes of the supporting tube (2) and folding connector (1). Insert an M16x80 hexagon bolt (3) through the holes and secure it with an M16 lock nut (4). It is recommended to tighten to 80% tightness to ensure smooth folding.
- Installing Crossbeams: Install the first crossbeam (5) on the supporting tube (2) closest to the folding connector, ensuring it is centered. Use the pre-installed M8x20 carriage bolts (5-1) in the crossbeam, aligning them with slots in the supporting tube. Place Φ8 flat washers (6) below the supporting tube and secure with M8 lock nuts (7). Fully tighten the lock nuts. Repeat this process for the second crossbeam (5) on the supporting tube (2), farthest from the folding connector.
- Attaching U-Shaped Tube: First, slide the blocks (15) onto the U-shaped tube (8), ensuring the straps face outward. Then, align the holes on the U-shaped tube (8) with the holes on the supporting tube (2). Insert an M8x40 hexagon bolt (9) through a Φ8 nylon washer (14), the U-shaped tube, another Φ8 nylon washer (14), and the supporting tube. Secure with an M8 lock nut (7). Repeat for the other side. Tighten to 90% tightness to allow for smooth adjustment of the U-shaped tube.
- Connecting to Vehicle Hitch: Align the holes of the folding tube with the vehicle's 2" hitch receiver. Insert an M16 shockproof bolt (10) through a Φ16 spring washer (11), a Φ16 flat washer (12), and the aligned holes. Secure the bolt with a Φ 3.8 pin (13) by passing it through the holes on the bolt.
Bike Installation:
- Preparation: If loading only one bike, place it on the crossbeam closest to the vehicle. The bicycle's front tire should be on the driver's side. Press the buckle on each wheel cradle to release the straps.
- Adjusting Wheel Cradles: Adjust the wheel cradles to match the bicycle's wheelbase. Open the cam gear to slide the cradles along the crossbeam, then close the cam gear to lock them in place. Once the tire is against the cradle, press the button on the cradle to secure it.
- Securing Bicycle: Insert a strap through each rim and reinsert it into the buckle on the wheel cradle, pulling tight. Secure the bike to the U-shaped tube. Adjust the U-shaped tube and block to rest comfortably against the bike frame. Press the buckle to release the strap from the block, wrap it around the bike frame, reinsert it into the block, and pull tight for a proper fit.
- Second Bike Installation (Optional): If desired, place a second bike on the crossbeam farthest from the vehicle. The front tire should be on the passenger's side. Do not move the U-shaped tube. Adjust the second block to rest comfortably against the second bike. Secure the bike using the same strap method as the first. If proper securing is not possible, do not transport more than one bike.
Carrier Folding:
- Folding Status 1: Press the U-shaped tube in the designated area and lower it until it's level with the crossbeams. Ensure each block faces the inside of the U-shaped tube. Release the strap by pulling up on the buckle, loop it tightly around the closest crossbeam, reinsert it into the buckle, and press down to secure. Repeat for the other block, strap, and crossbeam, ensuring all straps are tight.
- Folding Status 2: Pull the handle in the direction indicated by the arrow to fold the bike rack vertically. The rack will automatically stop at a fixed position.
Maintenance Features / Warnings:
- Weight Capacity: Do not exceed the 200 lbs weight capacity (120 lbs when used in an RV).
- Bike Limit: Do not carry more than 2 bikes.
- Human/Animal Transport: Not intended for transporting humans or animals.
- Single Bike Placement: If loading one bike, place it closest to the vehicle.
- Security: All bikes must be properly secured before operating the vehicle.
- Clearance: Ensure the front of the bike(s) is at or above the bottom of the bumper to avoid damage.
- Flammable Items: Do not carry flammable items on the rack.
- Electric Bicycles: Remove batteries from electric bicycles before transport to reduce weight.
- Long Trips: Frequently check straps and bike position, especially on rough terrain.
- Alterations: Do not make alterations to the product.
- Inspection: Before each use, inspect the bike rack for signs of wear, corrosion, and fatigue. Do not use if parts are bent, broken, deformed, or missing. Remove the rack from the vehicle if damaged parts are found.
- Tool Recommendation: Recommended tools for assembly (not included) are a 300mm Monkey Wrench, a 13mm Open Wrench, and a 24mm Open Wrench.