The Young Electric Hitch Bike Rack - FELLOW (model 10104133) is a robust and versatile solution designed for transporting bicycles via a vehicle's hitch receiver. This manual provides detailed instructions for assembly, installation, and usage, ensuring safe and efficient transportation of bikes.
Function Description:
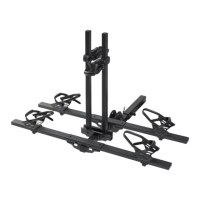
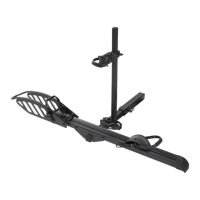
The primary function of the FELLOW hitch bike rack is to securely hold and transport up to two bicycles on the rear of a vehicle equipped with a 2-inch hitch receiver. It is specifically designed to accommodate both electric bikes and regular bikes, with a focus on stability and ease of use. The rack features a rotating group mechanism, allowing for convenient access to the vehicle's rear without fully removing the rack. Its design incorporates multiple securing points for the bicycles, including wheel holders and frame straps, to prevent movement and damage during transit. The rack can also be folded for compact storage when not in use or when the vehicle is parked.
Important Technical Specifications:
- Maximum Weight Bicycle Capacity: 200 LBS (90.7 kg)
- Maximum Bicycle Wheelbase: 50 inches (127 cm)
- Applicable Hitched Bike Types: Electric Bike / Regular Bike
- Hitch Receiver Size: 2 inches
- Material: Steel
- Package Size: 57.7 x 14.7 x 7.3 inches (146.5 x 37.3 x 18.5 cm)
- Package Weight: 64.6 lbs (29.3 kg)
- Dimensions (Installed): Approximately 40 inches (height), 55.5 inches (length), 38.1 inches (width)
- Tire Width Compatibility: Universal, up to 5 inches wide tires
Usage Features:
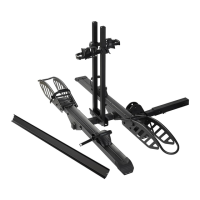
- Easy Assembly: The manual outlines a step-by-step assembly process, starting with attaching the rotating group to the bottom fixing bracket, then installing the wheel holders onto the beam assembly, and finally securing the middle support tube and connecting block.
- Rotating Mechanism: The rack incorporates a rotating group (Part 1) that allows the entire rack to pivot away from the vehicle, providing access to the trunk or tailgate without having to unload the bikes or detach the rack from the hitch. This feature is controlled by a bent pin and lock nut system.
- Adjustable Wheel Holders: Left and Right Wheel Holders (Parts 9, 10) can be adjusted along the Beam Assembly (Part 8) to fit various bicycle wheelbases, ensuring a snug and secure fit for different bike sizes.
- Secure Bike Attachment: Bicycles are secured using ratchet wheel straps for both front and rear wheels, and an additional strap for the seat tube or horizontal tube of the bicycle frame. This multi-point securing system minimizes bike movement during transport.
- Folding Capability: The rack is designed to fold up when not in use, reducing its footprint on the vehicle and making it easier to park or store. The folding steps are clearly illustrated in the manual.
- Hitch Receiver Compatibility: Designed specifically for 2-inch hitch receivers, the rack is secured with an M16 Shockproof Bolt (Part 19), spring washer (Part 20), and flat washer (Part 21). A lock (not included) can be used for added security, with a recommended lock beam diameter of less than 7mm.
- First Bike Placement: For optimal stability and ease of installation, it is recommended to place the first bike or the bike closest to the vehicle on the side that is nearest to the vehicle.
- Horizontal Support Tube Positioning: Turning the Middle Support Tube (Part 15) to a horizontal position before placing bikes on the platform can simplify the installation process.
Maintenance Features:
- Regular Inspection: The manual emphasizes the importance of inspecting the bike rack for any signs of wear, corrosion, and fatigue before each use. This includes checking for bent, broken, deformed, or missing parts.
- Proper Securing: All bolts and nuts should be tightened according to the instructions (e.g., 50Nm for M10x60 Bolt and M10 Lock Nut) to ensure the rack's structural integrity. The manual advises against overtightening certain bolts to allow for easy rotation of components.
- Battery Removal for E-bikes: When transporting electric bicycles, it is crucial to remove the batteries prior to transport. This reduces the overall weight supported by the carrier and enhances safety.
- Load Management: Adhering to the maximum weight capacity of 200 lbs and not carrying more than 2 bikes is essential for the rack's longevity and safe operation. Overloading can lead to damage and safety hazards.
- Avoid Alterations: Users are explicitly warned against making alterations to the product, as this can compromise its safety and performance.
- Flammable Items: Do not carry flammable items on the bike rack.
- Bike Positioning: Ensure the front of the bike(s), when mounted, are at or above the bottom of the bumper to prevent damage.
- Long Trip Checks: For extended trips, especially over rough terrain, frequently check the straps and bike positions to ensure everything remains secure.
- Warranty: Young Electric provides a 2-year warranty covering non-artificial product defects, encouraging proper maintenance and use to avoid issues not covered by the warranty (e.g., normal wear and tear, misuse, unauthorized modifications).