12 TX Thermal Disperson Level Switches | Operating instruction manual
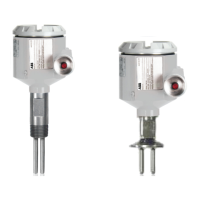
5.0 INSTALLATION
The instrument should be inserted into process line so that the wrench ats (the two at sections between the pipe
threads that permit you to torque the sensor head threads into the process line with a wrench) are perpendicular to the
direction of ow. It is recommended that in ow rate applications the larger diameter tube on the sensor be oriented
upstream to the direction of ow.
For mounting threaded units to process line, it is recommended that:
A half-coupling, thread-o-let or the like be used. It is ideal that the probes extend into the line being monitored. If a
pipe tee is used it is recommended that the leg used to mount the instrument be the same as the instrument connec-
tion size (1” MNPT type). The standard instrument (1.8 inch) will t in a 1 ½” X 1 ½” X 1” or larger tee. The 1.2 inch
option units are available to insert directly into a 1” or ¾” tee.
For mounting anged units, the wrench ats on the sensor head should similarly, be parallel to ow. For liquid service,
ll the process line so that the probe is surrounded by liquid. Then provide wiring to the housing according to the fol-
lowing wiring detail:
Output: (All Series) = 1 Double Pole-Double Throw (DPDT) Relay, Max: 8 amps or 250 Volts or 740 VA or 373 Watts
Dual Switch Point Option Board (All Series) = 1 (DPDT) Relay, Max: 8 amps or 250 Volts or 740 VA or 373 Watts with
millivolt output = (3 times the delta voltage)
Note: Dual Compartment Housing – Total of 2 sets of contacts only (One set from each Relay & no millivolt output).
MAX means do not exceed!
5.1 Wiring Diagram
 Loading...