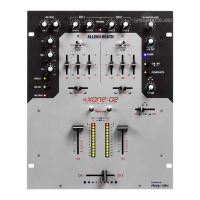
XONE:02 User Guide 5
Quick Start :
1 Ensure your safety First read and understand the Important Safety Instructions printed earlier.
Make sure that all your equipment is set for your local mains supply voltage and correctly grounded to
ensure your safety. Do not turn anything on until you have checked your wiring and control settings.
2 Set all controls to their starting position Set channel FADERS, LEVELS, HEADPHONES,
BOOTH and VCA MASTER controls minimum (anti-clockwise). Set PAN, EQ and CONTOUR controls
centre. Set the CROSSFADER to CH1 and CUE fader to CH1. Set all switches up or out.
3 Plug in your sources and outputs Plug in two music sources, one to CH1 the other to CH2
inputs A. Set the rear switches according to line or RIAA turntable source. Plug the LEFT and RIGHT
OUT into the amplifiers feeding the main speakers, the LINK (BOOTH) OUT into the amps feeding the
local DJ speakers, and plug in your stereo headphones. It is very important that the amplifier levels are
turned right down at this stage.
4 Turn the system on Switch on the mixer and music sources first. Check that the blue POWER
indicator turns on. The meters may pulse as the power rails stabilise. This is quite normal. Finally
switch on the amplifiers with their level controls turned down. The system should be quiet.
5 Adjust the level trims Start the music playing and raise the INPUT A level control for each
channel until its meter reads an average ‘0’ with loud moments at ‘+5’. If the red ‘PEAK’ indicator
flashes then back off the trim slightly. Slowly raise the headphones level control. You should hear the
CH1 music signal. Slide the CUE fader across to CH2. You should now hear the CH2 music signal. If
it sounds distorted, bassy or thin check that you have plugged it into the correct Line or Phono inputs.
6 Route the music to the main speakers With music playing and crossfader set to CH1, raise the
CH1 fader to its top ‘0’ position. Next, raise the VCA MASTER control to maximum. Now slowly raise
the amplifier level trim. You should start to hear the music through the main speakers. If you do not
then check that the TRANSFORM switches are in their normal off position. Set the amplifiers for the
loudest volume you want to allow in the room with console meters reading as described above. Now
turn back the master for normal listening level. Move the CROSSFADER to the right and check the
CH2 music signal. If you hear any hum or buzz check the system for bad wiring, ground loops or
missing grounds, in particular those connecting to turntables.
7 Check the microphone If you are using a microphone then plug it into MIC 1. We recommend
you use a cardioid vocal dynamic type. Switch it on by pressing MIC ON and raise its LEVEL control
until you hear it in the mix. Turn back the level if the mic starts to feed back.
8 Route the music to the booth monitor speakers Now set the BOOTH level control to maximum
and slowly turn up its amplifier level trim until the monitor is as loud as you need it to be relative to the
main speakers. Setting the levels in this way prevents the DJ exceeding the allowed maximum by
setting all controls to maximum. The meters provide an accurate display of the system capability.
9 Experiment with the channel faders and crossfader With the two music sources playing you
can experiment with these important performance controls. Adjust the fader CONTOUR control from a
gentle fade to very steep cut to suit your mixing style. Press REVERSE to change the way the fader
works. Try the PAN fader to move the sound between the left and right speakers. Also experiment with
the small CUE fader which lets you preview your mix in the headphones first.
10 Experiment with the EQ Now the creative fun bit. With one channel playing, listen to the effect
of cutting or boosting the three EQ slider controls. Boost is restricted to +6dB to prevent system
overload but you can cut up to a massive –26dB which almost completely sucks out or ‘kills’ the
selected frequency band. Watch the meters and pull back the input level if it peaks. Experiment with
the mic EQ which is optimised for vocal adjustment. Some LO cut helps reduce the annoying popping
noise when you talk close to the mic. A little mid boost may help warm up a dull sounding mic, some HI
boost can help cut through the mix, or use cut if you are plagued by feedback.
11 Experiment with the TRANSFORM switches The transform switch simply turns the channel on
or off. Use this for ‘stutter’ effects popular with performance DJs.
12 Now that you have started… Experiment further with all the controls, keeping the volume at a
low level until you are sure what each does. Refer to the section on using the EFFECTS LOOP later in
this guide for details on how to add external effects such as delay and reverb. To find out more about
each control continue to read through this guide. HAPPY MIXING !
Important Note about Hearing : To avoid damage to your
hearing do not operate any sound system at excessively high volume. This also
applies to any close-to-ear monitoring such as headphones. Continued
exposure to high volume sound can cause frequency selective or wide range
hearing loss. Make sure that your system complies with any venue sound level
and noise regulations which may apply.
 Loading...