12 Rockwell Automation Publication 5069-IN013D-EN-P - April 2018
CompactLogix 5380 Controllers
Power the System
After the end cap is installed on the last module in the system, turn on
power to the MOD power RTB and the SA power RTB.
Set the Network Internet Protocol (IP) Addresses
Out-of-the-box, CompactLogix 5380 controllers are configured to use
Dual-IP mode, and each Ethernet port is DHCP-enabled.
Dual-IP mode is available with the Logix Designer application, version
29.00.00 or later that requires a unique IP address for each Ethernet
port.
CompactLogix 5380 controllers also support Linear/DLR mode, a
mode that requires only one IP address. If necessary, you can use
RSLinx Classic software to change the controller from Dual-IP mode
to Linear/DLR mode and then set the IP address on the controller.
You can use the following to set the IP address:
• BOOTP DHCP EtherNet/IP Commissioning Tool - We
recommend that you use version 3.02.00 or later.
• Logix Designer application
• RSLinx Classic software
The minimum version of each tool that you can use to set the IP
address depends on the controller catalog number.
For more information on which minimum versions that are used with
the controllers, see
page 6.
For more information on how to set the IP address for a controller that
uses the Dual-IP mode, see the CompactLogix 5380 and
Compact GuardLogix 5380 Controllers User Manual, publication
5069-UM001.
Connect the Controller to an EtherNet/IP Network
Use an RJ45 cable to connect the controller to an EtherNet/IP
network.
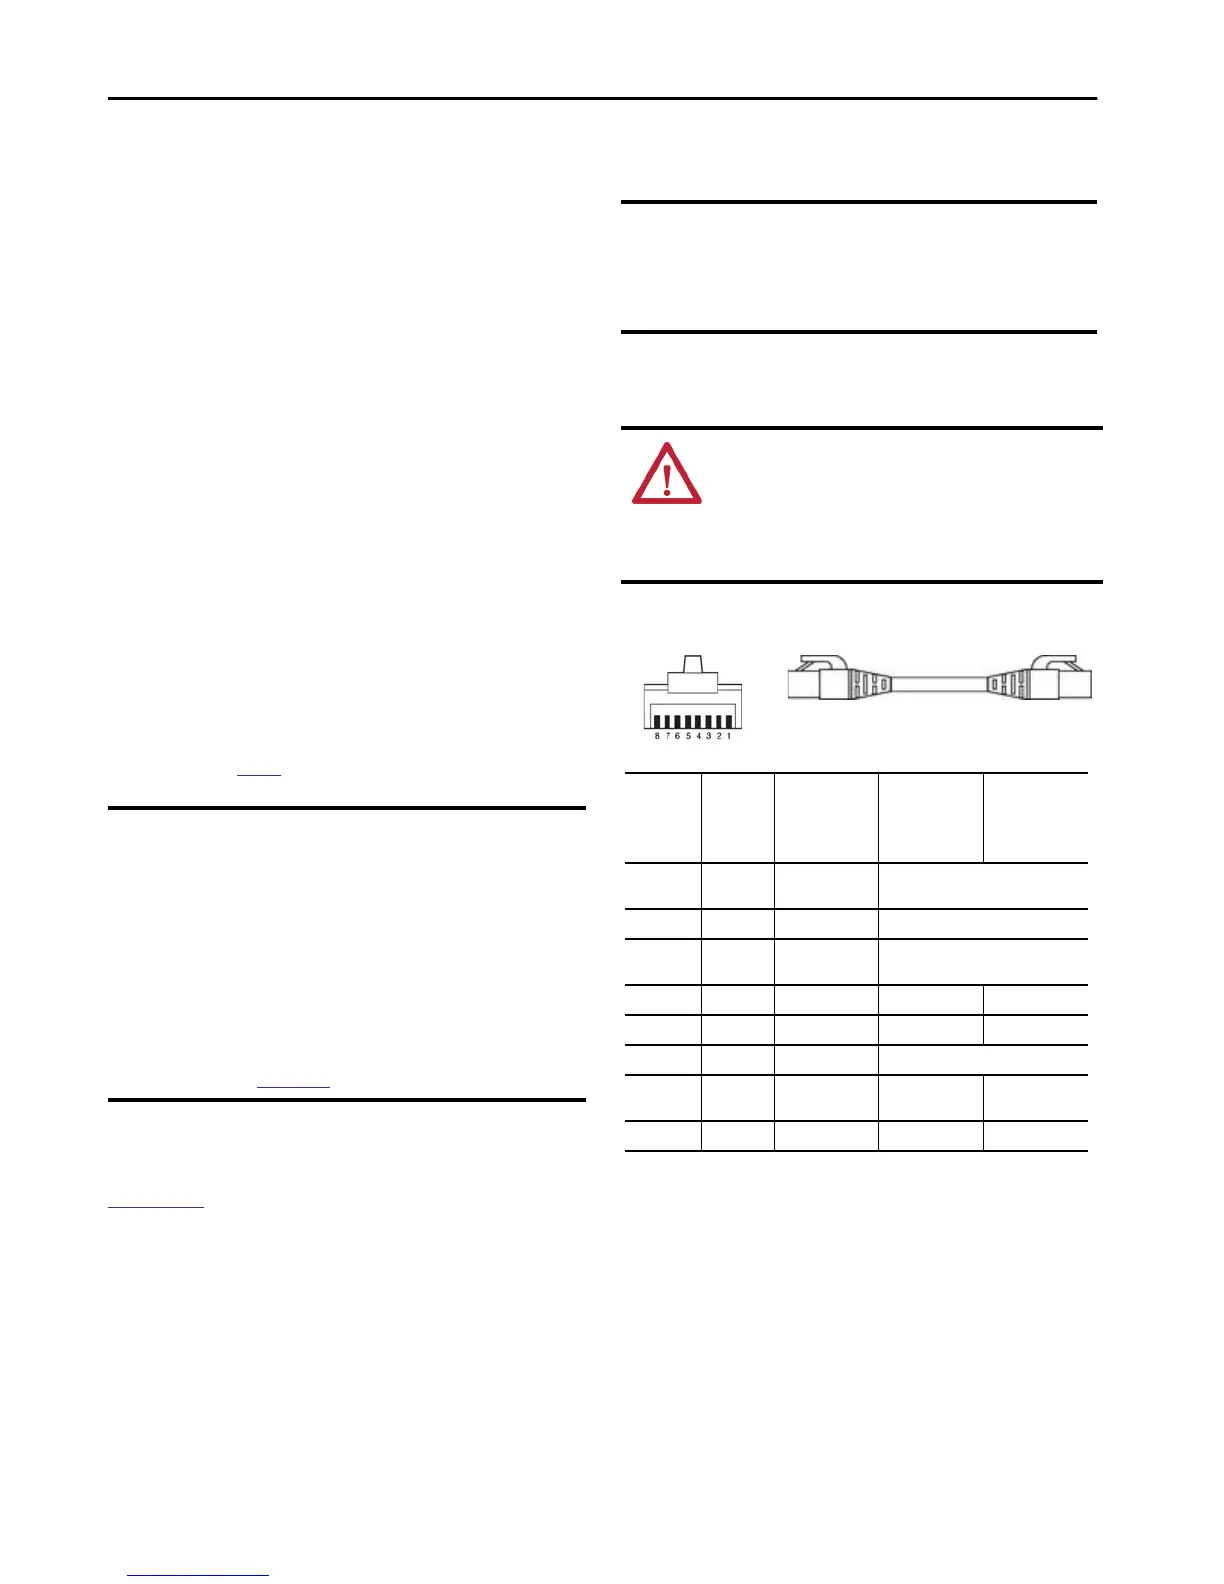
1. If needed, wire the RJ45 connector as shown.
2. Connect the RJ45 cable to an Ethernet port on the controller.
You can connect two RJ45 cables to the controller.
IMPORTANT Consider the following:
• The controller does not have rotary switches that you can
use to set the address.
• You must connect to the controller via the USB port when
you use RSLinx Classic software or the Logix Designer
application to assign an IP address.
• To reset the IP address and set the controller to
DHCP-enabled, you must perform a Stage 2 Reset. A Stage 2
Reset returns the controller to the out-of box state.
The controller supports a Stage 1 Reset and Stage 2 Reset.
For more information on Stage 1 and Stage 2 Resets, see the
CompactLogix 5380 Controllers User Manual, publication
5069-UM001.
IMPORTANT Before you can connect a CompactLogix 5380 controller to an
EtherNet/IP network, you must first install the network and
its components.
This section assumes that the EtherNet/IP network is
installed.
WARNING: If you connect or disconnect the communication
cable with power applied to this controller or any device on the
network, an electrical arc can occur. This could cause an explosion
in hazardous location installations.
Be sure that power is removed or the area is nonhazardous before
proceeding.
Connector
Number
Color
1585J 8-pin
Cables with
Support for 10/
100/1000 Mbps
1585J 8-pin
Cables with
Support for 10/
100 Mbps
1585J 4-pin
Cables with
Support for 10/
100 Mbps
1
White/
Orange
BI_DA+ TxData +
2 Orange BI_DA- TxData -
3
White/
Green
BI_DB+ Recv Data +
4 Blue BI_DC+ Unused N/A
5 White/Blue BI_DC- Unused N/A
6 Green BI_DB- Recv Data -
7
White/
Brown
BI_DD+ Unused N/A
8 Brown BI_DD- Unused N/A
 Loading...