EasyManua.ls Logo

Asus M5A99X EVO User Manual

Asus M5A99X EVO
138 pages
To Next Page IconTo Next Page
To Previous Page IconTo Previous Page
Page #80 background imageLoading...
Page #80 background image
3-16 Chapter 3: BIOS setup
Chapter 3
3.5.3 SATA Conguration
While entering Setup, the BIOS automatically detects the presence of SATA devices. The SATA
Port items show Not Present if no SATA device is installed to the corresponding SATA port.
Main
Ai Tweaker
Advanced Monitor Boot Tool
Exit
Options for SATA Configuration.
Back Advanced\ SATA Configuration >
UEFI BIOS Utility - Advanced Mode
SATA Configuration
SATA Port1 Not Present
SATA Port2 Not Present
SATA Port3 Not Present
SATA Port4 Not Present
SATA Port5 Not Present
SATA Port6 Not Present
> SB SATA Configuration
SB SATA Conguration
Options for SATA Configuration.
OnChip SATA Channel [Enabled]
[Enabled] Enables the onboard channel SATA port.
[Disabled] Disables the onboard channel SATA port.
The following items appear only when you set the OnChip SATA Channel item to
[Enabled].
SATA Port1–Port4 [AHCI]
Allows you to set the SATA configuration.
[IDE] Set to [IDE] when you want to use the Serial ATA hard disk drives as
Parallel ATA physical storage devices.
[RAID] Set to [RAID] when you want to create a RAID configuration from the SATA
hard disk drives.
[AHCI] Set to [AHCI] when you want the SATA hard disk drives to use the AHCI
(Advanced Host Controller Interface). The AHCI allows the onboard
storage driver to enable advanced Serial ATA features that increases
storage performance on random workloads by allowing the drive to
internally optimize the order of commands.
SATA Port5–Port6 [AHCI]
Setting this item to [IDE] instead of [RAID] or [AHCI] allows the system to recognize the
optical drives connected to the SATA connectors 5 or 6 when installing Windows OS.
When the SATA Port1–Port 4 and the SATA Port5–Port 6 items are set to [AHCI], the
information of the SATA connectors 1–6 can be seen only under the OS environment
or during POST.
For Windows
®
XP OS, you have to install the AHCI driver, so that you could use the
SATA connectors 1–6 in AHCI mode under the OS environment.

Table of Contents

Other manuals for Asus M5A99X EVO

Question and Answer IconNeed help?

Do you have a question about the Asus M5A99X EVO and is the answer not in the manual?
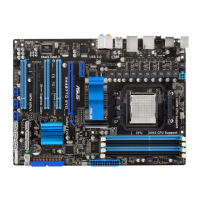
Asus M5A99X EVO Specifications

General IconGeneral
ChipsetAMD 990X
CPU SocketAM3+
Memory TypeDDR3
Max Memory32GB
Memory StandardDDR3 2133(O.C.)/1866/1600/1333/1066
Form FactorATX
AudioRealtek ALC892 8-Channel High Definition Audio CODEC
RAID SupportRAID 0, 1, 5, 10
Memory Slots4
Storage Interfaces6 x SATA 6Gb/s
USB Ports12 x USB 2.0
LANRealtek 8111E
Multi-GPU SupportAMD Quad-GPU CrossFireX

Summary

Chapter 1: Product introduction

1.1 Welcome!

Brief welcome message to the user.

1.2 Package contents

Details the items included in the motherboard package.

1.3 Special features

Highlights key technologies and features of the M5A99X EVO motherboard.

Chapter 2: Hardware information

2.1 Before you proceed

Important precautions before installing components or changing settings.

2.2 Motherboard overview

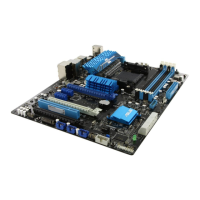
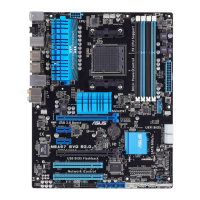
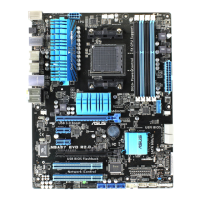
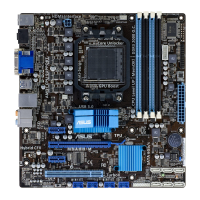
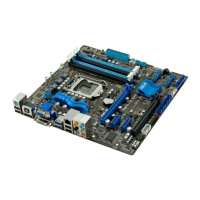
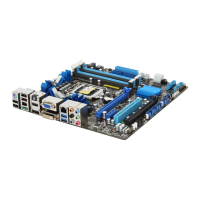
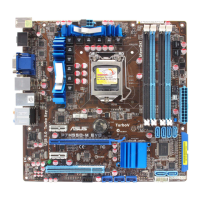
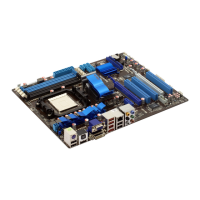
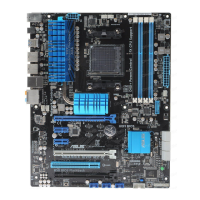
Describes the layout and components of the motherboard.

2.3 Building your computer system

Guides on assembling PC components, including CPU and DIMM installation.

2.3.10 Rear panel connection

Explains the different ports and connectors on the motherboard's rear panel.

2.4 Starting up for the first time

Step-by-step guide on how to initially power on and start the computer.

Chapter 3: BIOS setup

3.1 Knowing BIOS

Introduction to the ASUS UEFI BIOS and its interface.

3.2 BIOS setup program

How to enter and navigate the BIOS setup utility.

3.3 Main menu

Describes the main screen of the BIOS, including system info and basic settings.

3.4 Ai Tweaker menu

Options for configuring overclocking-related settings for CPU and memory.

3.5 Advanced menu

Settings for CPU, North Bridge, SATA, USB, and other system devices.

3.6 Monitor menu

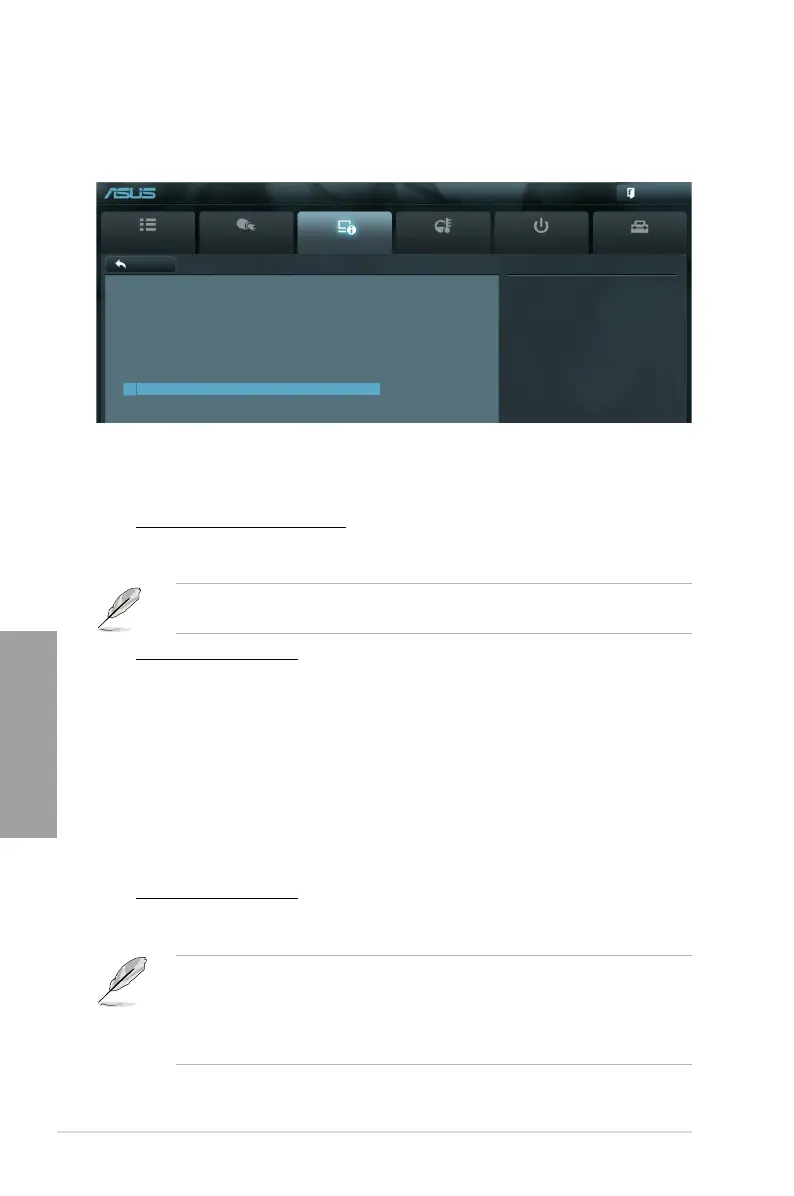
Displays system temperature, power status, and fan settings.

3.7 Boot menu

Configuration options for system boot behavior and device priority.

3.8 Tools menu

Access to special functions like EZ Flash, SPD Information, and O.C. Profile.

3.10 Updating BIOS

Instructions and utilities for updating the motherboard BIOS.

Chapter 4: Software support

4.1 Installing an operating system

Information on supported OS versions and driver installation.

4.2 Support DVD information

Details on the contents of the support DVD and how to run it.

4.3 Software information

Overview of ASUS utilities like AI Suite II, DIGI+ VRM, TurboV EVO, etc.

4.4 RAID configurations

Explains different RAID levels and how to configure them using the AMD SB950 chipset.

4.5 Creating a RAID driver disk

Procedures for creating a RAID driver disk for OS installation.

Chapter 5: Multiple GPU technology support

5.1 ATI® CrossFireX™ technology

Instructions for installing and enabling ATI CrossFireX for multi-GPU setups.

5.1.1 Requirements

Lists necessary hardware and software requirements for ATI CrossFireX.

5.2 NVIDIA® SLI™ technology

Guide to installing and enabling NVIDIA SLI for multi-GPU configurations.

5.2.1 Requirements

Lists necessary hardware and software requirements for NVIDIA SLI.

Related product manuals