EasyManua.ls Logo

Chamberlain 3850 User Manual

Chamberlain 3850
40 pages
To Next Page IconTo Next Page
To Previous Page IconTo Previous Page
Page #35 background imageLoading...
Page #35 background image
35
1. Press and release the “learn” button on
motor unit. The learn indicator light will
glow steadily for 30 seconds.
2. Within 30 seconds, enter a four digit
personal identification number (PIN) of
your choice on the keypad. Then press
and hold the enter button.
3. Release the button when the motor unit
lights blink. It has learned the code. If
light bulbs are not installed, two clicks
will be heard.
To Add, Reprogram or Change a Keyless Entry PIN
NOTE: Your new Keyless Entry must be programmed to operate your garage door opener.
USING THE “LEARN” BUTTON USING THE DOOR CONTROL
To change an existing, known PIN
If the existing PIN is known, it may be changed by one person
without using a ladder.
1. Press the four buttons for the present PIN, then press and hold
the # button.
The opener light will blink twice. Release the # button.
2. Press the new 4-digit PIN you have chosen, then press Enter.
The motor unit lights will blink once when the PIN has been
learned.
Test by pressing the new PIN, then press Enter. The door should
move.
To set a temporary PIN
You may authorize access by visitors or service people with a
temporary 4-digit PIN. After a programmed number of hours or
number of accesses, this temporary PIN expires and will no
longer open the door. It can be used to close the door even after
it has expired. To set a temporary PIN:
1. Press the four buttons for your personal entry PIN (not the last
temporary PIN), then press and hold the button.
The opener light will blink three times. Release the button.
1. Press the PROG <Learn> button on the
door control.
2. Press the PROG <Learn> button again to
confirm Learn Mode.
3. Enter a four digit personal identification
number (PIN) of your choice on the
keypad. Then press enter.
4. When the motor unit lights blink, it has
learned the code. If light bulbs are not
installed, two clicks will be heard.
NOTE: This method requires two people if the Keyless Entry is
already mounted outside the garage.
LOCK
LIGHT
LOCK
LIGHT
One Button Close: Opener can be closed by pressing only the ENTER button if the one button close feature has been activated. This
feature has been activated at the factory. To activate or deactivate this feature press and hold buttons 1 and 9 for 10 seconds. The
keypad will blink twice when the one button close is active. The keypad will blink four times when one button close is deactivated.
2. Press the temporary 4-digit PIN you have chosen, then press
Enter.
The opener light will blink four times.
3. To set the number of hours this temporary PIN will work, press
the number of hours (up to 255), then press .
OR
3. To set the number of times this temporary PIN will work, press
the number of times (up to 255), then press #.
The opener light will blink once when the temporary PIN has been
learned.
Test by pressing the four buttons for the temporary PIN, then
press Enter. The door should move. If the temporary PIN was set
to a certain number of openings, remember that the test has used
up one opening. To clear the temporary password, repeat steps
1-3, setting the number of hours or times to 0 in step 3.
LOCK
LIGHT

Table of Contents

Question and Answer IconNeed help?

Do you have a question about the Chamberlain 3850 and is the answer not in the manual?

Chamberlain 3850 Specifications

General IconGeneral
TypeChain Drive
Horsepower1/2 HP
Battery BackupNo
Voltage120V
LightingYes
Keyless EntryYes
WarrantyLifetime motor warranty

Summary

Introduction

Safety Symbol and Signal Word Review

Explains the meaning of warning and caution symbols used in the manual.

Preparing Your Garage Door

Critical Safety Warnings

Details severe injury/death risks during installation if door is unbalanced or locks are not disabled.

Damage Prevention Cautions

Warns about disabling locks and using correct voltage to prevent opener damage.

Assembly Step 1: Rail to Motor Unit

Caution: Prevent Opener Damage

Warns against using incorrect bolts during rail attachment to prevent opener damage.

Assembly Step 2: Set Belt Tension

Assembly Step 3: Attach Belt Cap Retainer

Warning: Prevent Finger Injury

Advises keeping hands clear of the belt pulley and securing the cover to prevent finger injury.

Important Installation Instructions

General Installation Safety

Lists crucial safety warnings and instructions for a safe garage door opener installation.

Installation Step 1: Header Bracket Location

Warning: Prevent Serious Injury or Death

Emphasizes rigid fastening of the header bracket to avoid door reversal issues and injury.

Installation Step 2: Install Header Bracket

Installation Step 3: Attach Rail to Header Bracket

Installation Step 4: Position Opener

Caution: Prevent Garage Door Damage

Instructs to rest the opener rail on a 2x4 for correct height to prevent garage door damage.

Installation Step 5: Hang the Opener

Warning: Prevent Falling Opener Injury

Stresses securely fastening the opener to structural supports to prevent it from falling.

Installation Step 6: Install Smart Control Panel

Caution: Prevent LCD Damage

Warns about potential damage to the LCD screen from extreme cold temperatures.

Warning: Prevent Electrocution Risk

Advises disconnecting power before installing the door control for safety.

Warning: Prevent Closing Door Injury

Outlines safety measures for installing the door control to prevent injury from a closing door.

Installation Step 7: Install EverCharge Standby Power System

Caution: Wear Protective Gear

Recommends wearing protective gear when handling the battery.

Installation Step 8: Install Lights

Caution: Prevent Overheating of Lights

Warns against using incorrect bulb types or wattages to prevent overheating.

Installation Step 9: Attach Emergency Release Rope and Handle

Warning: Prevent Falling Door Injury

Details safety precautions when using the emergency release handle, especially with unbalanced doors.

Installation Step 10: Electrical Requirements

Warning: Prevent Electrocution and Fire Risk

Emphasizes disconnecting power before work and adhering to electrical codes.

Installation Step 11: Install Protector System

Safety Reversing Sensor Information

Explains how the safety reversing sensor works and its detection capabilities.

Warning: Power Off Before Sensor Install

Advises ensuring power is off before installing the safety reversing sensor.

Warning: Prevent Closing Door Injury (Sensor)

Stresses correct connection and alignment of the safety sensor and its mandatory use.

Installing Safety Reversing Sensor Brackets

Mounting and Wiring Safety Reversing Sensors

Aligning Safety Reversing Sensors

Details the procedure for aligning the safety reversing sensors for proper operation.

Troubleshooting Safety Reversing Sensors

Provides solutions for common issues with the safety reversing sensors.

Installation Step 12: Fasten Door Bracket

Warning: Lightweight Door Reinforcement

Warns that lightweight doors need reinforcement before bracket installation.

Installation Step 13: Connect Door Arm to Trolley

Adjustment Step 1: Program Travel Limits

Warning: Safety Reversal System Importance

Warns about serious injury risk from closing doors if the safety reversal system is not properly installed.

Caution: Vehicle Clearance

Advises ensuring the fully open door provides adequate clearance for vehicles.

Adjustment Step 2: Set the Force

Warning: Safety System Testing Required

Reiterates serious injury risk if the safety reversal system is not properly installed or tested.

Adjustment Step 3: Test Safety Reversal System

Safety Reversal System Test Procedure

Details the procedure for testing the safety reversal system using an obstruction.

Critical Safety Checks After Adjustments

Lists circumstances that require re-testing the safety reverse system.

Warning: Regular Safety System Testing

Reinforces the importance of testing the safety reversal system regularly.

Adjustment Step 4: Test Protector System

Warning: Sensor System Safety

Warns about serious injury risks if the safety reversing sensor is not properly installed or tested.

Operation

Important Safety Instructions for Operation

Lists crucial safety warnings and instructions for operating the garage door opener.

Using Your Garage Door Opener

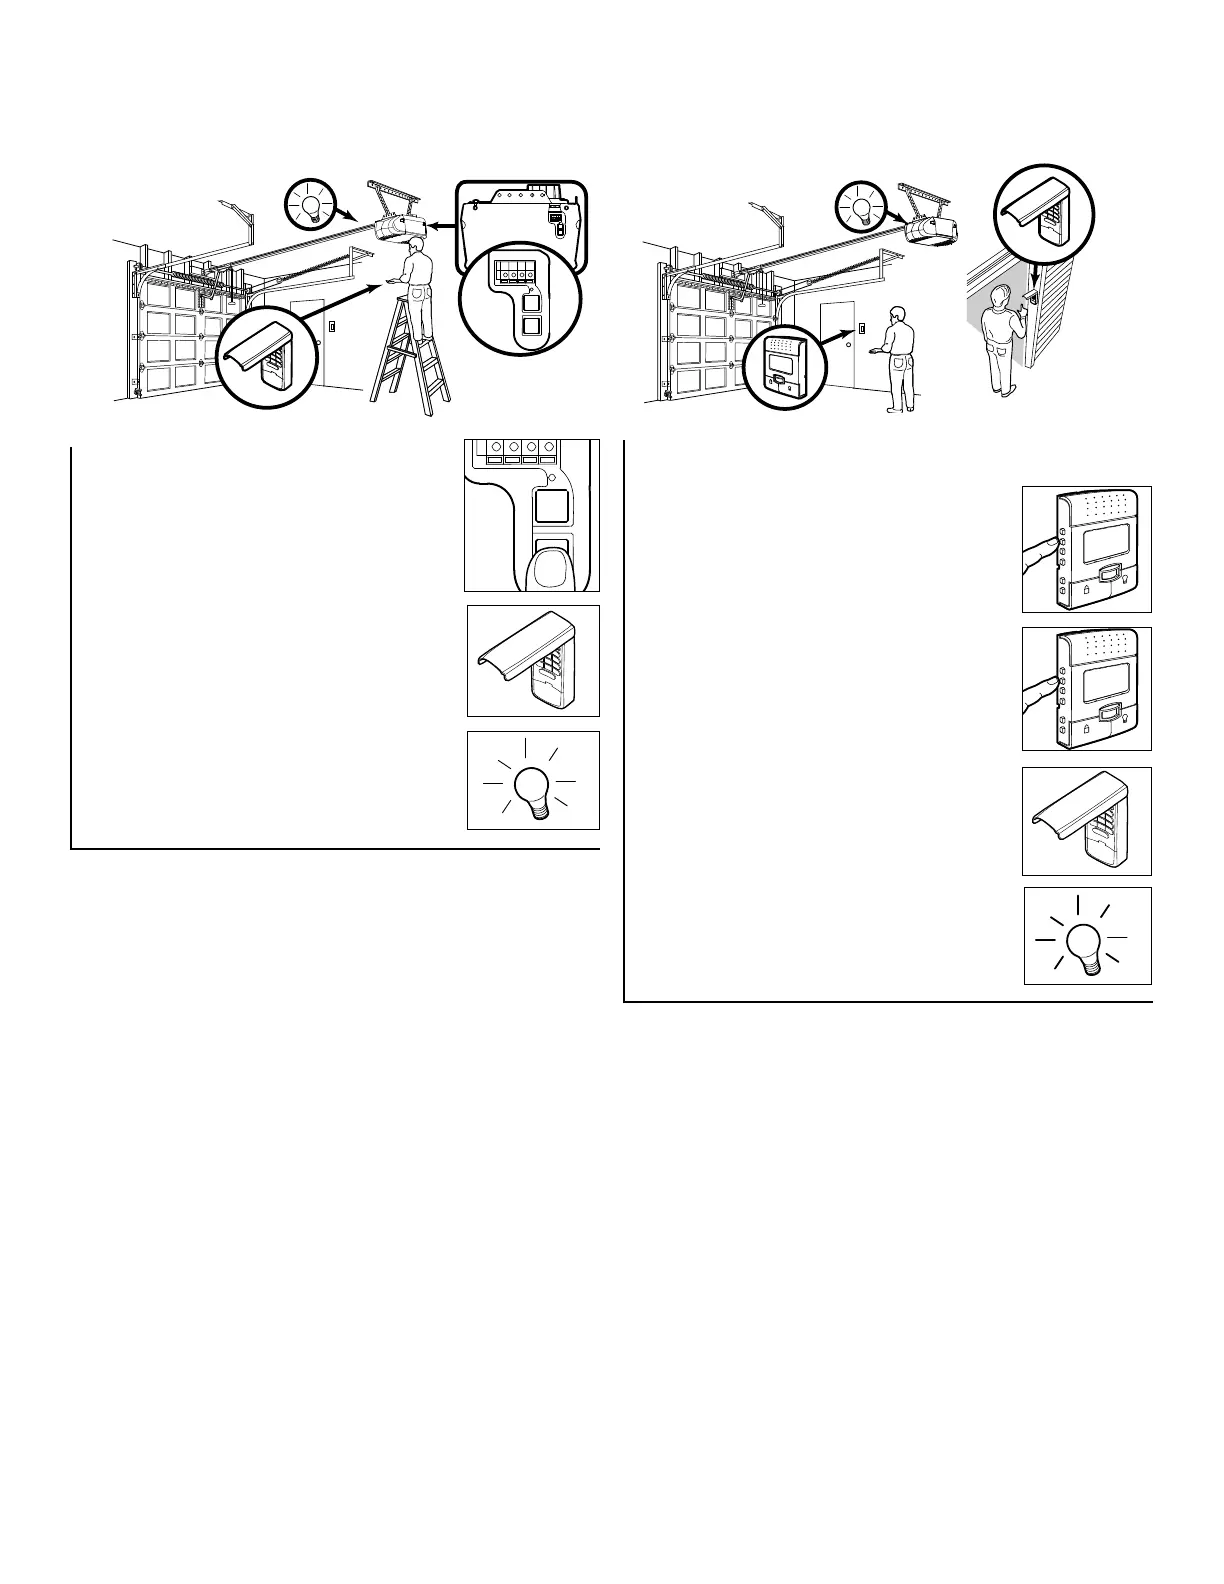
Explains how to operate the opener using various controls like remotes and wall controls.

Using the Wall-Mounted Door Control

Using the Remote Control

Remote Control Troubleshooting

Lists common problems with remote controls and their solutions.

EverCharge Standby Power System

Operating Instructions for Standby Power

Provides instructions for testing and charging the optional EverCharge standby power system.

Warning: Battery Fire and Injury Risk

Warns about fire and injury risks associated with the battery, advising proper handling and replacement.

Caution: Battery Handling Safety

Recommends wearing protective gear when working with the battery compartment.

Manually Opening the Garage Door

Warning: Manual Operation Safety

Warns about injury risks from falling doors when using the manual release, especially with unbalanced doors.

Troubleshooting Common Problems

Diagnostic Chart for Opener Issues

Smart Control Panel Messages

Programming Your Opener

Keyless Entry PIN Programming

Related product manuals