16
Switch Installation
Connecting to Power
5. Insert the other end of the exposed ground wire lead into the earth-ground wire connection on the power converter
terminal block. Note that the position of the power converter may vary on different switch models.
6. Tighten the earth-ground wire connection terminal block screw.
Note: Torque to 8 in.-lb, not to exceed 10 in-lb.
Warning: An exposed wire lead from a DC-input power source can conduct harmful levels of electricity. Be sure that
no exposed portion of the DC-input power source wire extends from the power and relay connector. Statement 122
7. Insert the twisted-pair wire leads into the terminal block line and neutral connections. Insert the wire (labeled number
1 in Figure 6 on page 15) lead into the neutral wire connection and the wire (labeled number 2 in Figure 6 on
page 15) lead into the line wire connection. Ensure that only wire with insulation extends from the connectors. See
Figure 6 on page 15.
8. Tighten the line and neutral terminal block screws.
Note: Torque to 8 in.-lb, not to exceed 10 in-lb.
9. Connect the red wire to the positive pole of the DC power source, and connect the black wire to the return pole.
Ensure that each pole has a current-limiting-type fuse rated to 30 Amp.
Wiring the DC Power Source
Read these cautions and warnings before wiring the switch to the DC power source.
Warning: A readily accessible two-poled disconnect device must be incorporated in the fixed wiring.
Statement 1022
Warning: This product relies on the building’s installation for short-circuit (overcurrent) protection. Ensure that the
protective device is rated not greater than: 6A.
Statement 1005
Warning: Installation of the equipment must comply with local and national electrical codes. Statement 1074
Warning: Before performing any of the following procedures, ensure that power is removed from the DC circuit.
Statement 1003
Warning: Only trained and qualified personnel should be allowed to install, replace, or service this equipment.
Statement 1030
Caution: For wire connections to the power and alarm connectors, you must use UL- and CSA-rated, style 1007 or
1569 twisted-pair copper appliance wiring material (AWM) wire (such as Belden part number 9318).
To wire the switch to a DC power source, follow these steps:
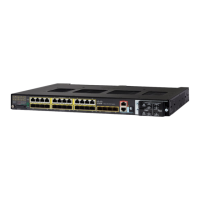
1. Locate the two power connectors on the switch front panel labeled DC-A and DC-B.
Note: Non-PoE units have only one power connection (DC-A).
2. Identify the connector positive and return DC power connections. The labels for power connectors DC-A and DC-B
are on the switch panel as displayed below.
3. Measure two strands of twisted-pair copper wire (16-to-18 AWG) long enough to connect to the DC power source.
Label Connection
+ Positive DC power connection
– Return DC power connection
 Loading...