EasyManua.ls Logo

Craftsman 139.18595 User Manual

Craftsman 139.18595
80 pages
To Next Page IconTo Next Page
To Previous Page IconTo Previous Page
Page #75 background imageLoading...
Page #75 background image
*Télécommande à trois fonctions
Programmé en usine, le gros bouton dont pourrait être
munie votre télécommande sert au fonctionnement de
l’ouvre-porte de garage. Tout autre bouton d’une
télécommande Security
®
à trois fonctions ou d’une
télécommande compacte
peut être programmé pour
faire fonctionner d’autres
ouvre-portes de garage
Security
®
.
Pour effacer tous les codes de la
mémoire du moteur
Pour désactiver toute télécommande non désirée, effacer
d’abord tous les codes :
Enfoncer et tenir le bouton « learn » du
moteur jusqu’à ce que le témoin lumineux
learn s’éteigne (environ 6 secondes).
Tous les codes précédents sont
maintenant effacés. Reprogrammer
chaque télécommande ou entrée sans clé qu’on désire
utiliser.
1. Enfoncer et relâcher le bouton
« learn » sur le moteur. Le témoin
lumineux learn s’allumera en
continu pendant 30 secondes.
2. Dans un délai de 30 secondes,
enfoncer et tenir le bouton de la
télécommande* qui fera fonctionner
votre porte de garage.
3. Relâcher le bouton lorsque
l’éclairage du moteur clignote. Il a
appris le code. Si les ampoules ne
sont pas posées, deux clics
se feront entendre.
Pour ajouter ou reprogrammer une télécommande à main
UTILISATION DU BOUTON « LEARN » UTILISATION DE LA COMMANDE MURALE DE LUXE
PROGRAMMATION
35
L’ouvre-porte de garage a été programmé en usine de manière à fonctionner avec la télécommande à main fournie. La porte
s’ouvrira et se fermera lorsqu’on appuiera sur le gros bouton-poussoir.
Ci-après se trouvent des instructions pour programmer votre ouvre-porte en vue du fonctionnement avec d’autres
télécommandes Security
®
.
1. Enfoncer et tenir le bouton de la
télécommande* qui fera fonctionner
votre porte de garage.
2. Tout en maintenant le bouton de la
télécommande enfoncé, appuyer et
tenir le bouton LIGHT de la
commande murale de luxe.
3. Maintenir les deux boutons
enfoncés tout en appuyant sur le
bouton-poussoir de la commande
murale de luxe (les trois boutons
sont enfoncés).
4. Relâcher les boutons lorsque
l’éclairage du moteur clignote. Il a
appris le code. Si les ampoules ne
sont pas posées, deux clics
se feront entendre.
L
O
C
K
LIGHT
L
O
C
K
LIGHT
L
O
C
K
L
I
G
H
T
L
O
C
K
L
I
G
H
T
REMARQUE : Si cet ouvre-porte de garage Security
®
est utilisé avec une télécommande émettrice à code fixe, le dispositif
technique que contient le récepteur de l’ouvre-porte et qui procure une protection contre les vols de code, se trouvera
contourné. Le détenteur des droits d’auteur de cet ouvre-porte de garage n’autorise pas l’acheteur ni le fournisseur de la
télécommande émettrice à code fixe à contourner ce dispositif technique.

Table of Contents

Question and Answer IconNeed help?

Do you have a question about the Craftsman 139.18595 and is the answer not in the manual?

Craftsman 139.18595 Specifications

General IconGeneral
TypeChain Drive
Horsepower1/2 HP
Frequency60 Hz
Remote ControlYes
Voltage120V

Summary

Introduction to Garage Door Opener Manual

Safety Symbol and Signal Word Review

Explains safety symbols and signal words used throughout the manual.

Assembly Guide for Garage Door Opener

Assemble the Rail and Install the Trolley

Connects rail sections and mounts the trolley assembly for opener function.

Fasten the Rail to the Motor Unit

Secures the assembled rail to the main motor unit for structural integrity.

Install the Idler Pulley

Attaches the idler pulley to the rail end, essential for chain/cable movement.

Install the Chain/Cable

Connects the chain or cable to the trolley and sprocket for power transmission.

Tighten the Chain

Adjusts chain tension for proper operation and to prevent sprocket noise.

Installation Procedures for Garage Door Opener

Preparing Your Garage Door

Essential pre-installation steps including door balance checks and disabling locks.

Tools Needed for Installation

Lists all necessary hand tools required for assembly and installation procedures.

Planning Your Installation

Identifies door type, height, and garage area conditions for proper opener placement.

Carton Inventory

Lists all parts included in the opener packaging for initial verification.

Hardware Inventory

Details all hardware components required for assembly and installation.

Determine the Header Bracket Location

Identifies the correct mounting position for the header bracket based on door type.

Install the Header Bracket

Secures the header bracket to the wall or ceiling structural support.

Attach the Rail to the Header Bracket

Connects the assembled rail to the mounted header bracket.

Position the Opener

Sets the correct height and placement of the motor unit for optimal operation.

Hang the Opener

Mounts the opener securely to the ceiling or wall supports using hanging brackets.

Install the Door Control

Mounts the wall-mounted control panel and wires it to the opener.

Install Lights

Installs the light bulbs and lenses into the motor unit's end panel.

Attach the Emergency Release Rope and Handle

Installs the manual release mechanism for disengaging the trolley.

Electrical Requirements

Details power connection standards, grounding, and wiring compliance.

Install The Protector System® (Safety Reversing Sensors)

Installs and aligns the safety reversing sensors for obstruction detection.

Install Brackets for Safety Sensors

Describes different methods for mounting the safety sensor brackets.

Mount and Wire the Safety Sensors

Connects sensor wires to the motor unit and aligns the sensors for proper function.

Fasten the Door Bracket

Attaches the door bracket to the garage door for connecting the opener arm.

Connect Door Arm to Trolley

Links the door arm sections to the opener's trolley assembly.

Adjustment Procedures for Garage Door Opener

Adjust the UP and DOWN Travel Limits

Sets the open and close positions of the garage door for safe operation.

Adjust the Force

Sets the force required to open and close the door, ensuring proper reversal.

Test the Safety Reversal System

Verifies the door reverses upon striking an obstruction, a critical safety feature.

Test The Protector System®

Verifies the function of the safety reversing sensors by testing the beam path.

Operation of Your Garage Door Opener

General Operation Safety Instructions

Key safety guidelines to follow when operating the garage door opener.

Using Your Garage Door Opener

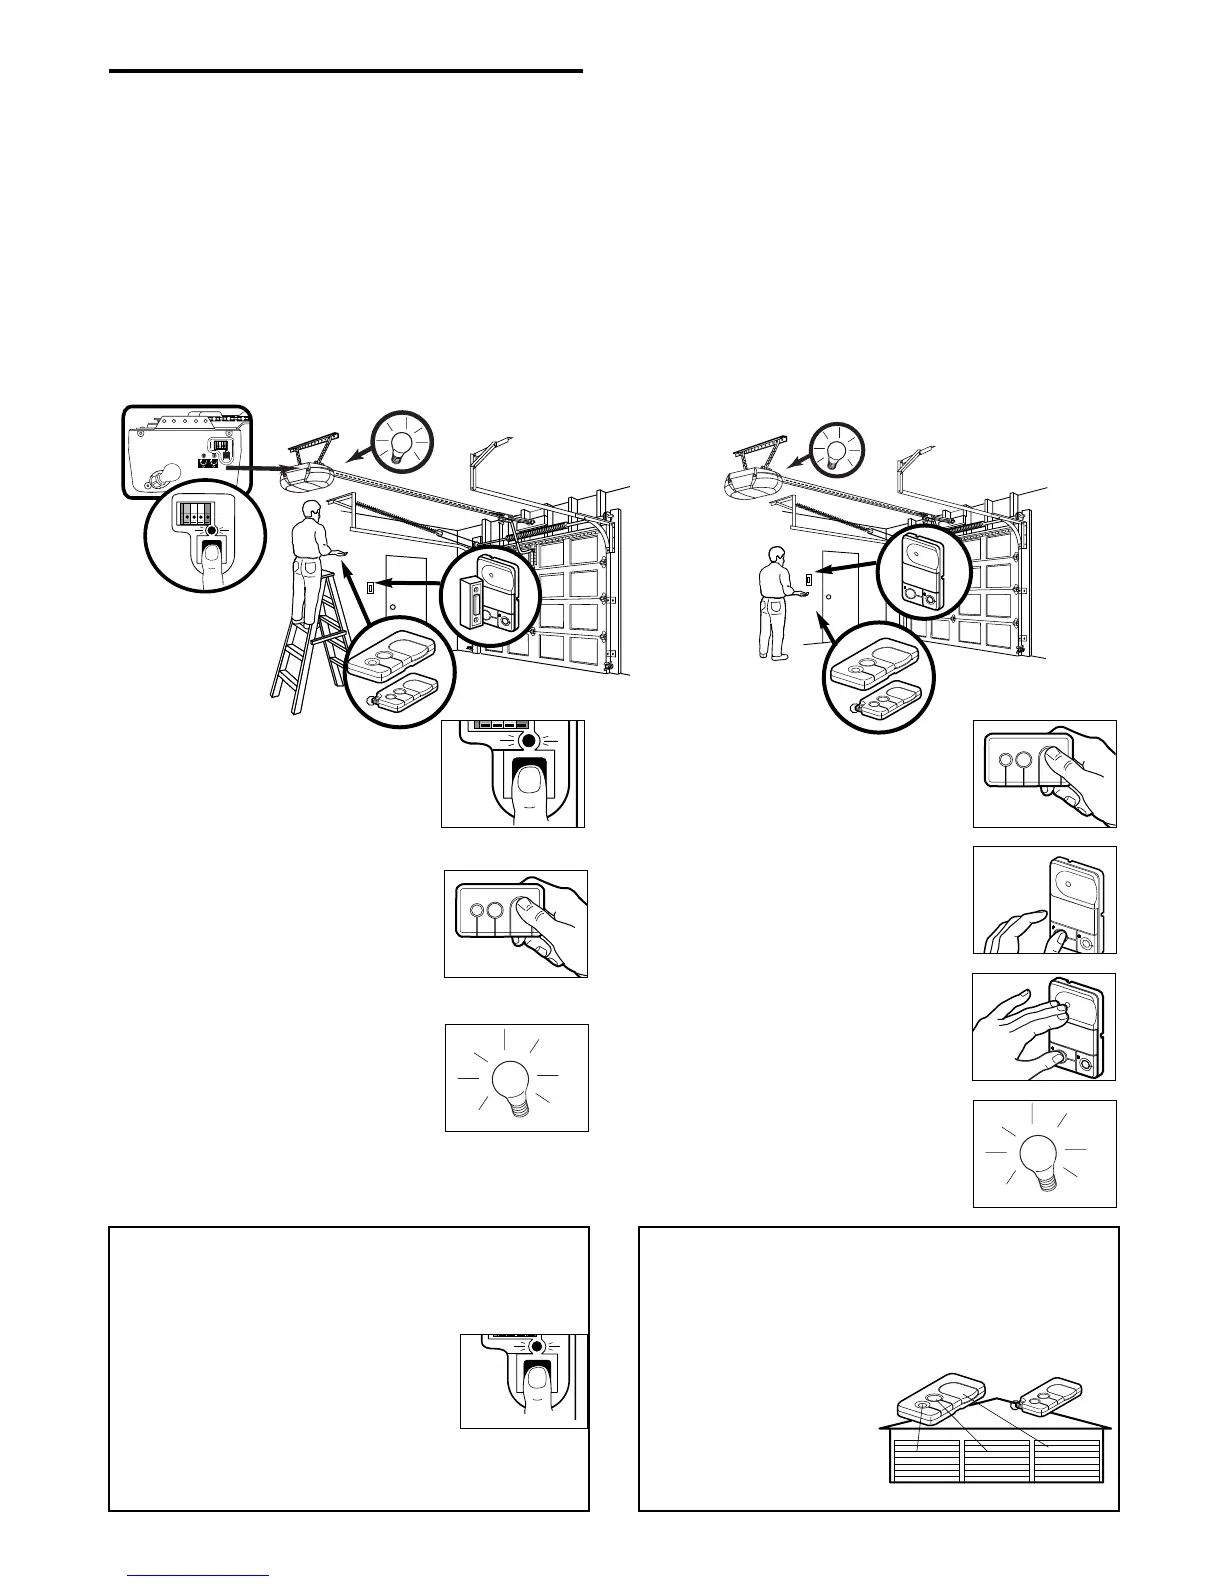
Explains how to activate the opener using remotes, wall controls, and keypads.

Using the Wall-Mounted Door Control

Details operation of the control console, including light and lock features.

Opening the Door Manually

Instructions for operating the garage door manually in case of power failure.

Care and Maintenance of Your Opener

Limit and Force Adjustments

Notes on how weather affects settings and where to find adjustment information.

Maintenance Schedule

Recommended checks and tasks performed monthly, twice yearly, and yearly.

Remote Control Battery Replacement

Instructions for safely replacing the battery in the remote control transmitter.

Troubleshooting Garage Door Opener Issues

Common Problems and Solutions

Addresses common opener issues like sensor malfunctions, remote activation, and door reversal.

Diagnostic Chart

Lists error codes (flashes) and their meanings for diagnosing opener issues.

Programming Your Garage Door Opener

Add or Reprogram a Hand-held Remote Control

Steps to pair additional remote controls with the garage door opener.

Erase All Codes From Motor Unit Memory

Procedure to clear all previously programmed remote controls from the opener.

Add, Reprogram or Change a Keyless Entry PIN

Instructions for programming and managing the keypad entry PIN.

Garage Door Opener Repair Parts

Rail Assembly Parts

Identifies components of the opener's rail system for replacement.

Installation Parts

Lists various parts used during the installation process.

Motor Unit Assembly Parts

Details components of the main motor unit for repair or identification.

Optional Accessories for Garage Door Opener

Available Accessories

Lists and describes optional add-on items for enhanced opener functionality.

Warranty Information for Garage Door Opener

Sears Warranty Terms

Outlines the limited warranties for the opener, motor, and belt, including coverage details.

Related product manuals